One of the many staples of sci-fi games is the humble hologram. It’s always been a fascination of film directors and game developers alike to make stuff out of bright light, from people to virtual landscapes, to anchor the movie or game into the far-flung future. Today, using the power of Shader Graph, we’ll make some holograms of our own.
Holograms
Making holograms is surprisingly simple. Well, maybe not in real life, but in URP certainly! If we use the default scene after creating a URP project, then the post processing effects are already set up to use bloom, which we’ll need for making the hologram glow appropriately. The holographic object needs only a handful of components to look convincing. One: a bright edge. Because of the way light works, holograms will appear brighter on grazing edges, so we’ll use a bright fresnel to bring out the edges. Two: holographic scanlines. Holograms usually feature scanlines moving downwards, as if it’s constantly being drawn and redrawn. It’s like how scanlines move down a CRT screen. We could programmatically generate a regular scanline pattern, but we’ll use a texture so we have more control over the variation in distance and brightness between the scanlines. We’ll tint the scanline texture so that it also glows brightly under the bloom filter.
Fresnel Lighting
Let’s get started. If you’re following along using the GitHub project, then you’ll find the shader at Shaders/Hologram.shadergraph, but if you’re working from scratch, right-click in the Project window and go to Create->Shader->PBR Graph.
We’ll add the fresnel first. A fresnel becomes brighter when viewing an object at a very shallow angle, such as the ‘edges’ of a sphere relative to your view. The greater the angle between the normal vector at a surface point and the viewing direction towards that point, the greater the amount of fresnel lighting on that point. Unity has a built-in Fresnel Effect node which we’ll use - set the Power to around 4 or 5 to make it thinner. Let’s also add a property of type Color called Fresnel Color, with its Mode set to HDR - this lets us give it an artificially high brightness. I’ve set the default colour to white with intensity 2. Multiply the output of the Fresnel Effect node together with Fresnel Color - that’s the fresnel calculation done! Let’s temporarily plug the output of this group into both the Emission and Alpha pins on PBR Master, then set the Alpha Clip Threshold to 0. Also use the cog menu on PBR Master to set the Surface to Transparent.
Before we see any output, also add a Main Color property, give it whatever HDR default colour you’d like - but with a lower intensity than the fresnel - and plug it directly into the Albedo channel on PBR Master. It’ll stay there for the rest of the tutorial.
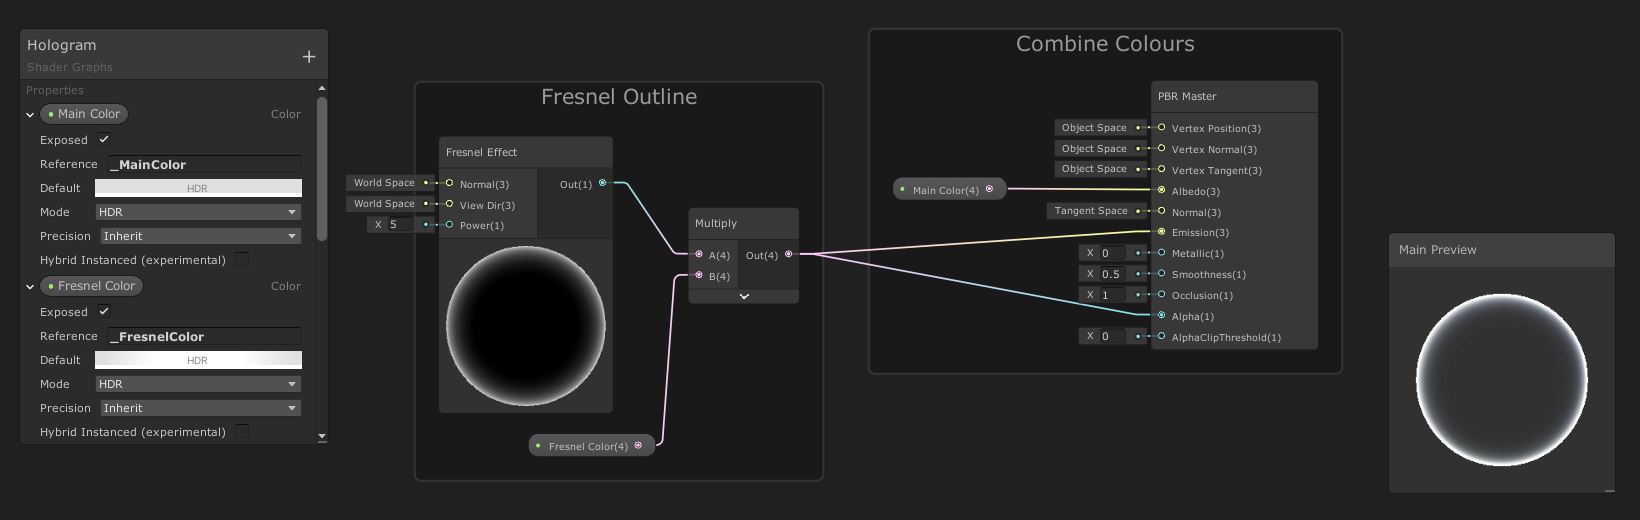 So far, our graph covers the first half of the effect.
Now, if we create a new material using this shader and attach it to a sphere, we get something like this:
 It already looks quite holographic, if a little hollow!
A lot of this effect’s shape is carried by the bright fresnel light. Because of the way fresnel works, this shader will work a lot better on objects with curved surfaces - it’s serviceable on cubes and other objects with sharp corners, but you’ll only see the full potential of the fresnel on curves. That’s good news if you’re aiming to simulate organic objects like people or plants, or even natural environments!
Scanline Lighting
Let’s move ahead with the shader. Now that step 1 is out of the way, it’s time to add some scanlines. Inside the GitHub project, there’s a texture inside the Textures folder called HologramLines.png. We’ll use that. If you want to create your own scanline texture, the basic idea is to mix bright and dark lines together, but introduce a bit of variation where you can to make the texture more interesting, like this:
 The original is 32x32, but you might want to use a higher resolution texture.
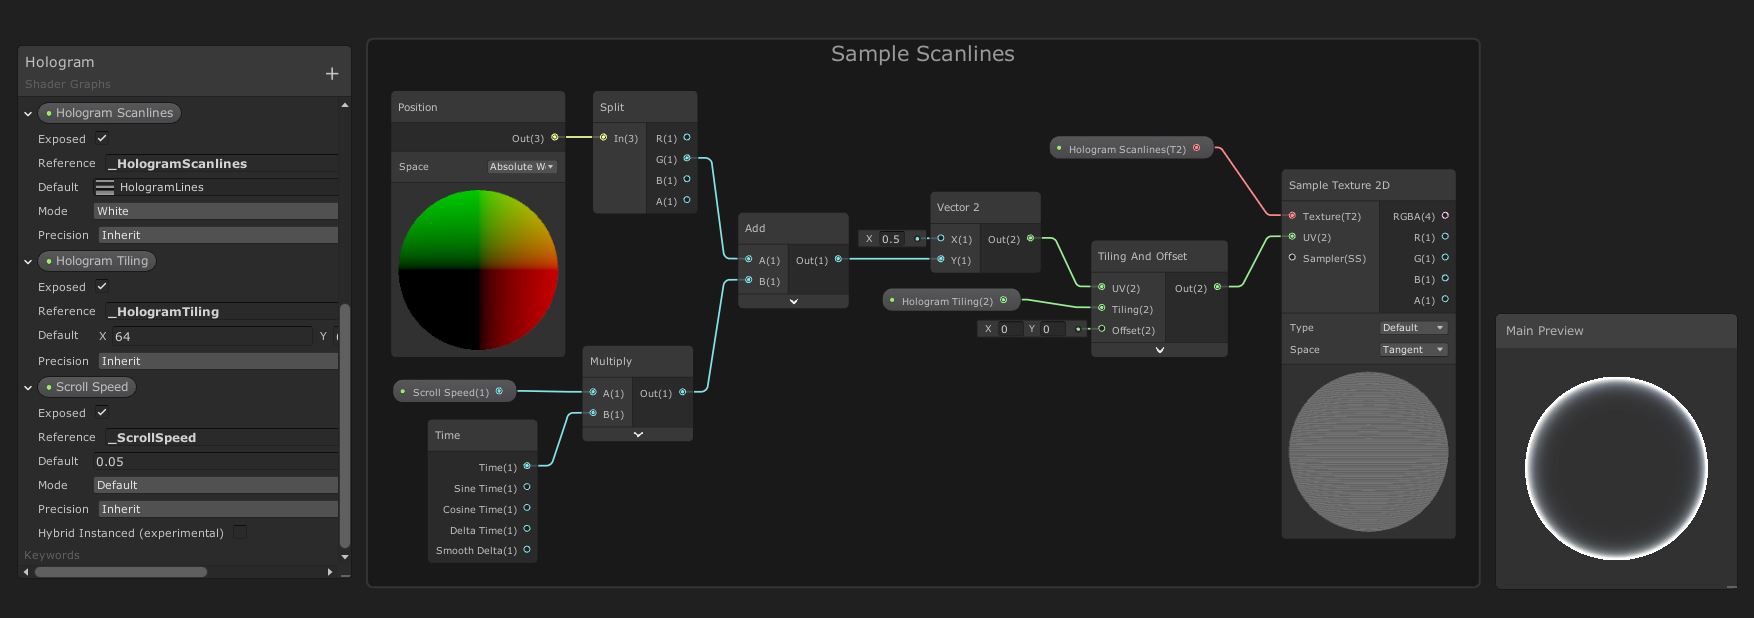
Firstly, add a new Texture2D property called Hologram Scanlines and assign the scanline texture as the default value. As usual, we’ll need a regular Sample Texture 2D node to read the texture, so create one and pass Hologram Scanlines into the Texture pin. We can’t just sample this texture using the object’s UVs - we want the scanlines to move down the object along the world y-axis. For this, we’re going to get the world-space position using a Position node with the Space set to World, then use a Split node to separate the y-component (using the G output pin). We also want to scroll the texture down over time. Add a Scroll Speed property of type Vector1, give it a default value of about 0.05, then Multiply it together with the regular Time output of a Time node. Add this to the y-component we just separated out from the world position and use this as the y-input to a new Vector2 node. I’ve set the x-component to 0.5, but it shouldn’t matter because the texture is uniform in the x-direction.
Almost there now! The final property we need to add is a Vector2 called Hologram Tiling. The amount you’ll need to tile the scanline texture by will depend on the resolution and how thick you want the individual scanlines to appear on the object, but for my 32x32 texture I set the default to (64, 64). From the Vector2 we just constructed, drag out a new Tiling And Offset node and connect the Vector2 to the UV input. Plug Hologram Tiling into the Tiling input, then connect the Tiling And Offset node’s output to the UV input of the Sample Texture 2D node.
 Feel free to use a different kind of
 Time output if you want different scanline behaviour.
Now all we need to do is connect the two halves. From the Multiply node we used earlier for fresnel calculations, drag out an Add node. Connect the Sample Texture 2D node to the other input to Add. Now, connect the output of Add to both the Emission and Alpha channels of PBR Master.
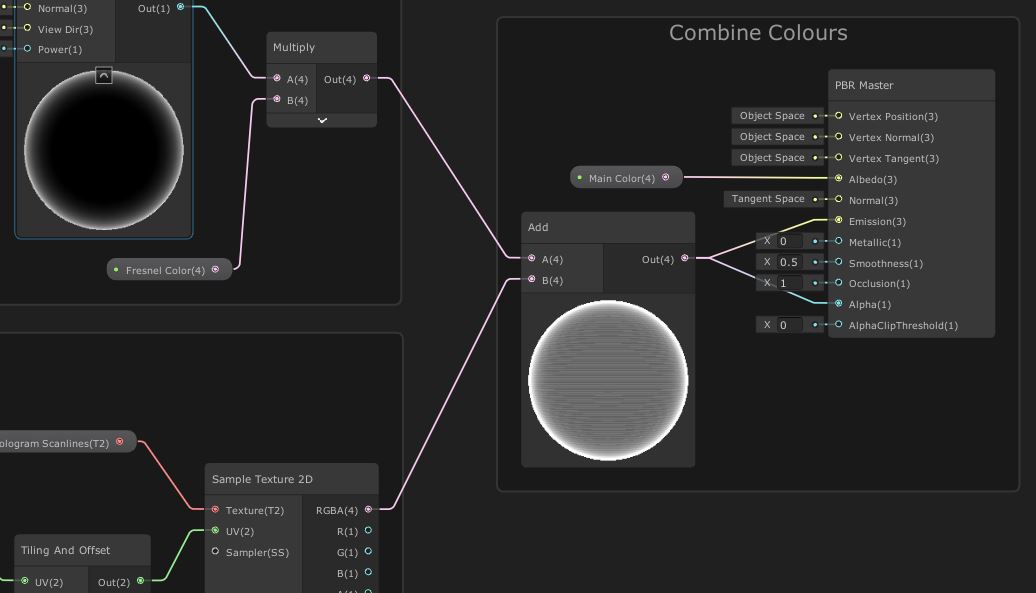
With that, the graph should be complete! If we create a few materials and fill the scene with a handful of objects, we’ll see the effect at its fullest:
Conclusion
When you need to give a location a bit of a sci-fi facelift, you can’t go wrong with a hologram or two. The main parts to a hologram are a slight hazy glow and some interesting motion on the surface - that could be glitchy ‘screen tearing’ or fuzzy noise, but we went with scanlines moving downwards. It’ll also help to add a glowing fresnel to round off the shape of the holographic object.