For many years, the most common way of dealing with object transparency in 3D games was to render all opaque objects in the scene, then render all transparent objects in a back-to-front sorted order, blending their colour values with those of object that had already been drawn in a process called alpha blending. An alternative method called dither transparency (or screen-door transparency) also exists, in which some of the pixels of a transparent object are drawn and others are culled entirely, according to a pre-set drawing pattern. The result is an object that, from a distance, or with a high-enough image resolution, still appears transparent. I first became aware of the effect when I played Metal Gear Solid V: The Phantom Pain, then I noticed it again while playing Super Mario Odyssey - I’m sure many other games out there have used screen-door transparency!
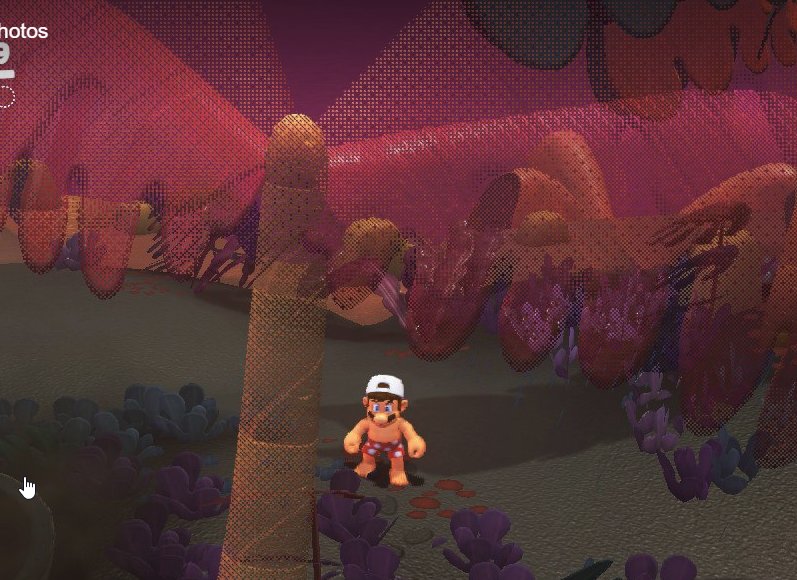 Image from a Twitter thread by Chris Wade. Ignore the mouse cursor.
Dither Transparency
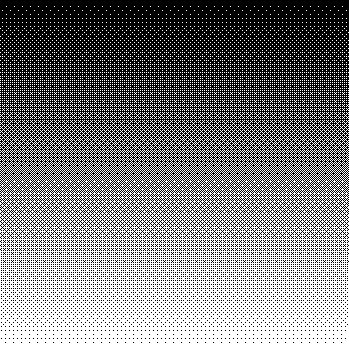
We’ve covered dithering as a technique on this site before when we wrote a Return of the Obra Dinn-style post processing effect. To recap, dithering can be used to “fake” the appearance of intermediate colours using a limited colour palette by arranging pixels in a particular pattern. Usually this involves the use of a Bayer matrix to provide threshold values which the source image pixels are tested against. An example of a smooth greyscale gradient after thresholding can be seen below:
Of course, we applied the effect to the image colours. If we use dithering as an alpha cutoff threshold, we can set each pixel of an object ‘on’ or ‘off’ (rendered or culled). But why would we want to? For some, it is a stylistic choice. Certainly, if you use dithering on a low-resolution scene, dithering can be used to advance an “old-school” aesthetic. However, there can also be performance benefits. By cutting out alpha-blended transparent materials from your scene (in screen-door transparency, technically each pixel is rendered opaque), you eliminate the sorting step that is commonly required for rendering transparent objects. Even algorithms that render transparent objects in an unsorted order have their own overhead, which screen-door transparency eliminates.
Furthermore, dithering techniques can exploit the depth buffer to cull transparent objects if they would be drawn behind another transparent object - in classic alpha-blended rendering, you don’t overwrite the depth buffer when you draw each transparent object, so you can’t perform any depth culling between two overlapping transparent objects. There are other arguments against alpha-blending - for example, in deferred shading it’s difficult to support that kind of transparency - but we could discuss those all day, so let’s crack on with an implementation of dithering transparency in Unity!
The full graph is available on stelabouras.com.
Implementation
This will be a pretty small PBR Graph, with five properties and only a handful of nodes. If you’re using the GitHub source, you’ll find this graph at Shaders/DitherTransparent.shadergraph. We’ll need properties for the Albedo Texture and Albedo Color, as well as the Emission; it’s up to you if you’d also like to add metallic or smoothness maps - I chose those based on the model I had available for testing. On top of that, we’ll have a Vector1 called Opacity to control how opaque the object is - the higher it is, the less the object will be dithered. Finally, the Dither Size property will be used to control how large the dither texture is. A higher value will result in larger “dither pixels”.
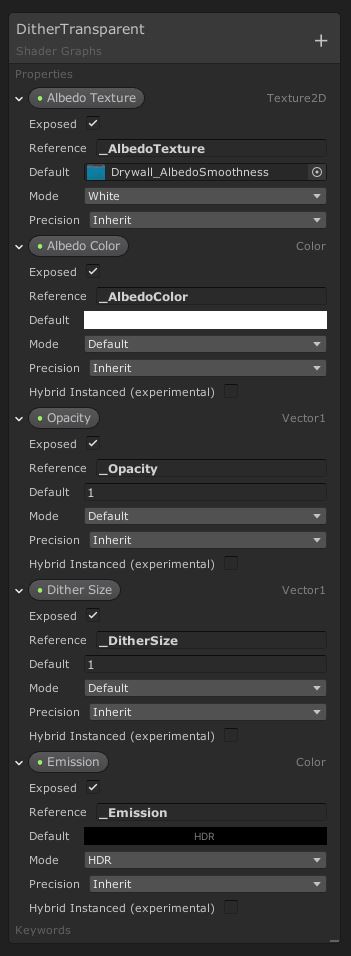 Feel free to add additional properties if you want metallic, smoothness or occlusion maps.
The Emission property will be the easiest to add since all we must do is plug it directly into the Emission channel of PBR Master.
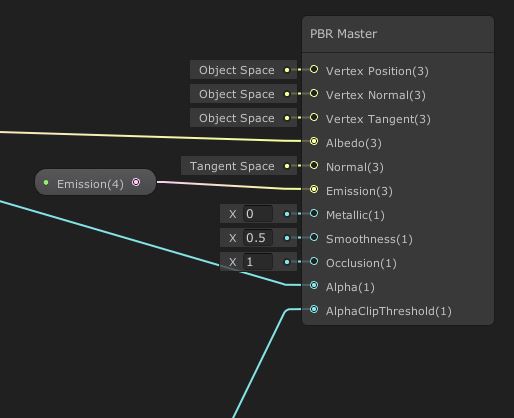 The
The Emission property plugs right into the Emission channel.
Next, we will read the Albedo Texture using a Sample Texture 2D node and Multiply its output with the Albedo Color. This gives us a base colour for the material, but we’ll need more code to modify the opacity of the object - we want to modify a single property to fade the object in and out. That’s where we use the Opacity property. The RGB values of the colour can be passed into the Albedo channel of PBR Master without further modification, but we’re going to use a Split node to separate the alpha channel from the other three, then Multiply it by Opacity. That value will be plugged into the Alpha channel of PBR Master.
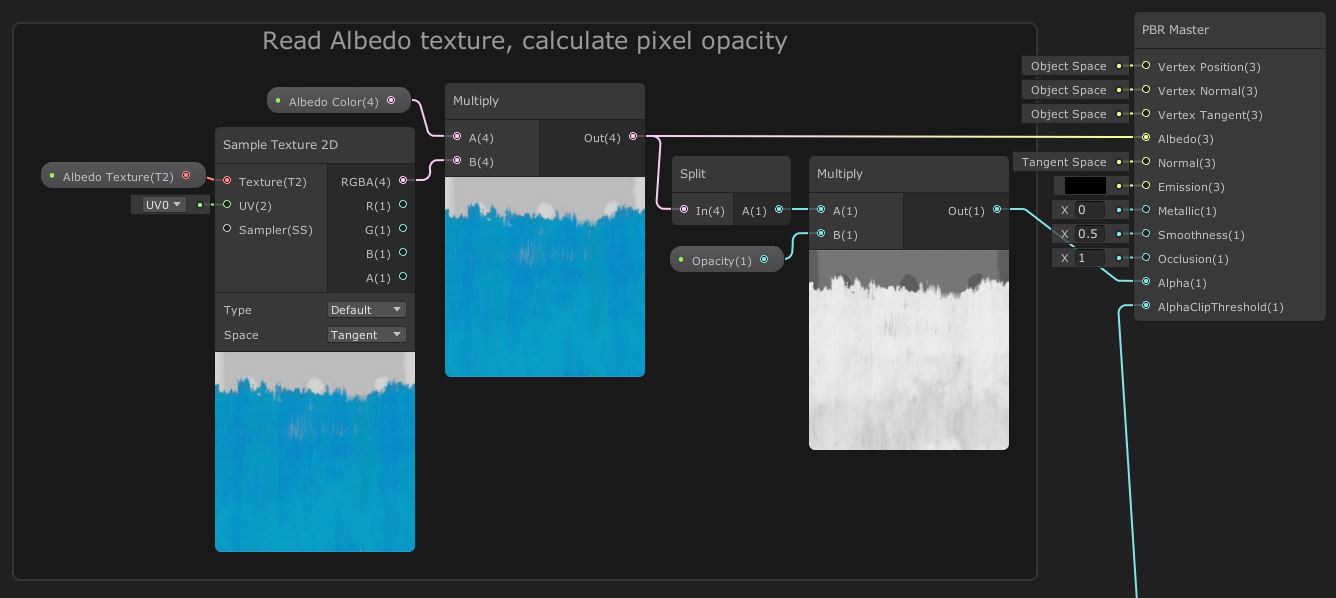 Calculating the Albedo value and pre-threshold Alpha value is straightforward.
If we viewed the object now, we would see the entire object blink out of existence the moment we turn the Opacity value below whatever value the AlphaClipThreshold input on PBR Master is set to. In order to perform dithering during the thresholding step, we’ll need to pass in a dither texture of some sort into AlphaClipThreshold. Unity handily includes one by default with the Dither node, which generates a tilable 16x16 dither texture for us. It takes in two parameters: In denotes how bright the highest threshold value should be (so we’ll set it to 1), and Screen Position lets us modify how the texture tiles across the screen. We included a Dither Size property for this reason - take a Screen Position node and Divide its output by Dither Size before connecting it to the Screen Position parameter of Dither. You can then connect its output to the AlphaClipThreshold parameter on PBR Master.
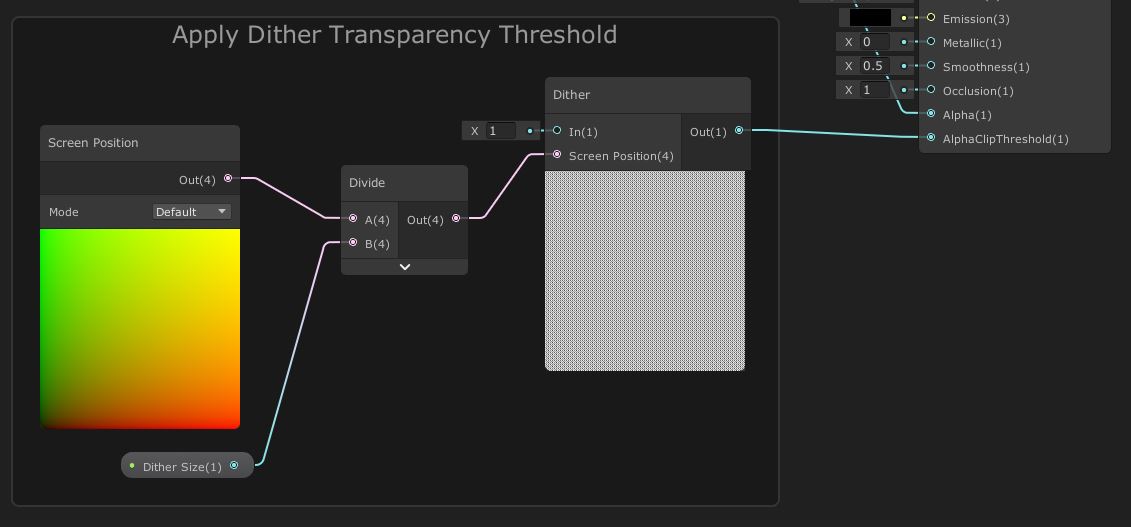 Unity can generate dither patterns for us - just one kind of noise Unity supports.
We’re actually done with the graph now - let’s test it out on an example model:
Conclusion
Dithering transparency, or screen-door transparency as it’s often called, is an efficient way of implementing faux-transparency while, in reality, only rendering opaque pixels. The pattern used for the dithering is important to make the transition between fully transparent and fully opaque look less jarring, so it’s lucky that Unity includes a Bayer pattern in its built-in Dither node in Shader Graph. This technique can be used where alpha-blended transparency is difficult to achieve.
Acknowledgements
Assets
This tutorial uses the following asset pack:
| “Robot Sphere” | Razgrizzz Demon |