Plenty of games feature a dissolve effect when an object teleports into or out of the room, or if it’s destroyed. Combined with a simple glow effect, you can make the dissolving process look very futuristic - today, we’re going to leverage the power of Shader Graph to make it happen. This tutorial was inspired by Brackeys, but we’ll add an extra feature so that we can dissolve based on the world-space location of the object and do a little bit of scripting to control some parts of the effect.
Before we start, I’d like to mention a fantastic new tool that was just released while I was writing this tutorial - Stelios Petrakis has built an in-browser Shader Graph visualiser which makes it a lot easier to share graphs with others. It’s still in early stages - hopefully one day it’ll be capable of embedding graphs directly into webpages so I don’t have to take multiple screenshots of graphs. So. Many. Screenshots.
The shader graph created in this tutorial is available as part of the project’s library - you should be able to download the graph directly from there, although I recommend downloading the GitHub project if you want the script we’ll write later.
Edit: With breathtaking speed, an experimental embed feature has been added to the tool! It already seems to work extremely well - here’s the full Dissolve graph (you’ll probably have a better time navigating it if you use fullscreen mode).
Also, it’s almost the first anniversary of this website! My first post was on April 20th 2019, and since then, I’ve been pumping out primarily Unity tutorials at a rate of just less than one a week. This is now the 45th article - I’m extremely grateful to everyone who has read and shared my work!
Dissolve Effect
A dissolve effect typically culls pixels that exceed some position threshold. For this dissolve effect, we’re going to use the world-space y-position of each pixel. We’ll also add a bit of noise to distort the edge of the dissolving object and an emissive glow around those edges. Let’s dive right in.
Dissolve Graph
Open the Shaders/Dissolve.shadergraph file. It’s a PBR Graph, so you’ll notice the PBR Master node. The first thing we’ll do is provide an albedo colour property so we can change the base colour in the material Inspector - you could just as easily modify this to take a Texture2D instead by using a Sample Texture 2D node. I added a property called Albedo of type Color and gave it a default black value so we’ll be able to see the glowing edge emission more easily. The screenshot below gives a sneak preview of the other properties we’ll add too!
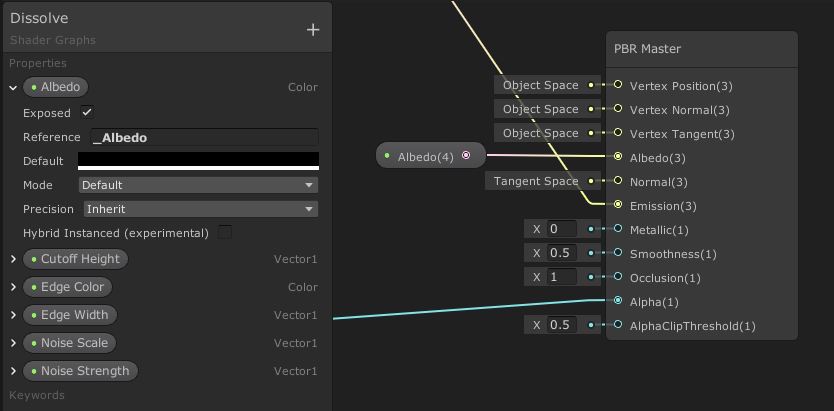 Albedo is the base colour used for the object.
Next, we’ll generate some noise to use at the edge of the dissolve effect. Unity provides a handful of noise nodes by default under Procedural->Noise in the Create Node menu. I’ve chosen Simple Noise, which generates a basic noise cloud, but try swapping it out with a Gradient Noise or Voronoi node if you want to experiment with the effect’s shape. The Simple Noise node takes a new Noise Scale property (of type Vector1) in its Scale input pin.
The values generated by the noise are in the range between 0 and 1, but we’re going to change the range based on how strong we want the noise distortion to be; for this, we’ll add another property called Noise Strength (a Vector1 with a default value of 1) and use a Remap node to change the range from (0, 1) to (-Noise Strength, Noise Strength). We can use the Negate node to negate Noise Strength. Now that we’ve generated the noise, the final step is to Add it to another new property called Cutoff Height (another Vector1) - this gives us a world-space position threshold, above which we don’t want pixels to be rendered.
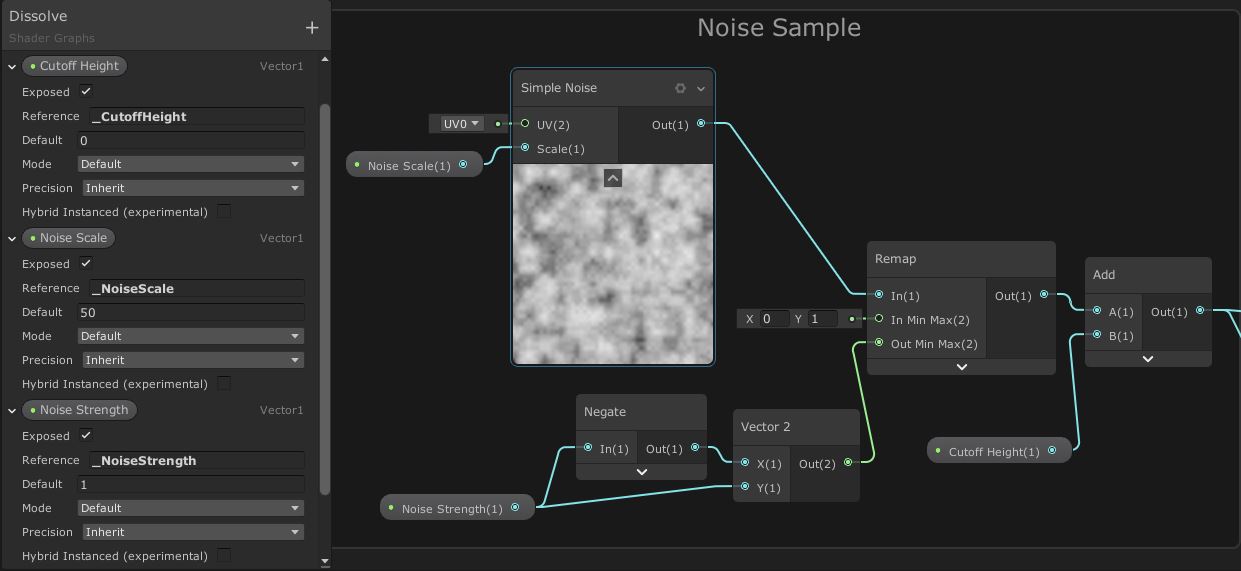 The output of this node group is a cutoff threshold in world-space.
Now we’ll cut off those pixels that exceed the threshold. For that, we’ll need a Position node to get the pixel’s world position - so set its Mode to World. Use a Split node to separate its y-component from the others, then use a Step node to perform the thresholding step. This y-position is used as the Edge input of the Step node, and the output of the noise-generating group we created earlier is the In input; if In is greater than Edge, then Step outputs 1 - otherwise, it outputs 0. Then, plug the output of Step directly into the Alpha channel of PBR Master. You should already see a change in output. While we’re here, also use the cog menu on PBR Graph to tick the Two Sided checkbox - this will make Unity render both sides of each face of the model.
 We can use Step for an easy cutoff point.
Finally, we’ll add an edge glow to the shader. We can use the position values we already calculated and shift them slightly to obtain a new threshold value, beyond which we’ll make pixels glow with an emissive colour. First, take the output of the Split node from the previous graph section and connect it to an Add node. We’ll add it to a new property called Edge Width (yet another Vector1) which determines the thickness of the glowing section - give it a default value of about 0.05. This is the emission threshold. Then, use this as the In input of a new Step node, and use the output of the noise-generation node group as the Edge input. All being well, we should have a slightly shifted noise pattern - Multiply the output by a new property called Edge Color to round it off. We’ll set the Mode of this Color property to HDR - this stands for “High Dynamic Range”, and it allows us to use colours with artificially high light intensity to boost the level of light emission by this material. Play around with the HDR Color widget to get a feel for how intensity affects the colour. The output of these nodes should plug into the Emission channel of PBR Master.
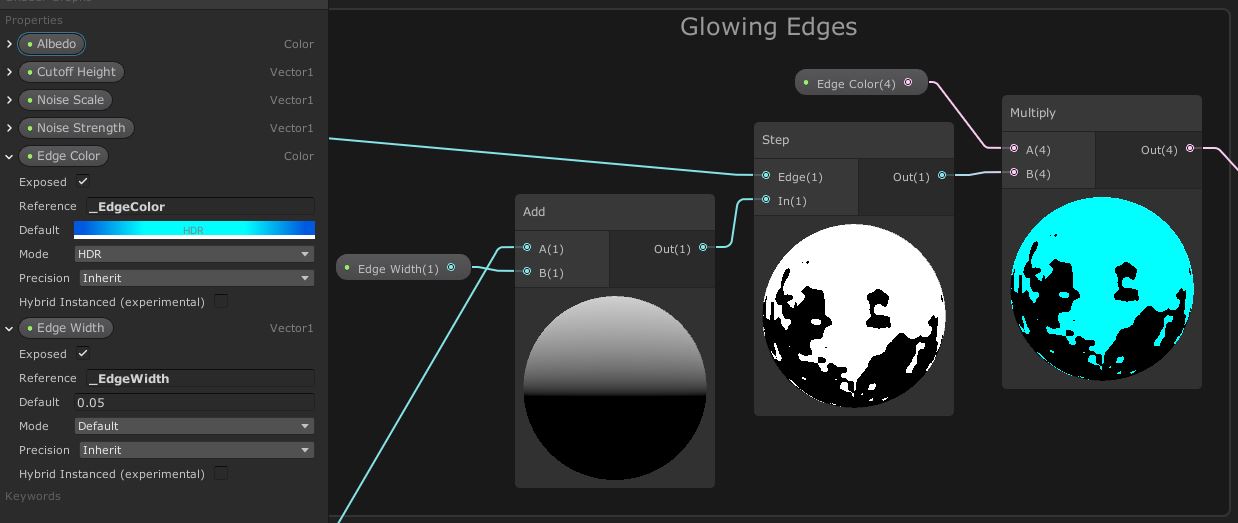 HDR emissive colours made the glow effect a lot more pronounced.
Dissolve Script
It’s easy to control shader graph properties from a script just as easily as you can with a conventional shader. The Reference field of any shader graph property can be used to set a name which we can use in scripts to pass data to this shader at runtime. Open Scripts/DissolveObject.cs for an example of a script which does this.
[RequireComponent(typeof(Renderer))]
public class DissolveObject : MonoBehaviour
{
    [SerializeField] private float noiseStrength = 0.25f;
    [SerializeField] private float objectHeight = 1.0f;

    private Material material;

    private void Awake()
    {
        material = GetComponent<Renderer>().material;
    }

    private void Update()
    {
        var time = Time.time * Mathf.PI * 0.25f;

        float height = transform.position.y;
        height += Mathf.Sin(time) * (objectHeight / 2.0f);
        SetHeight(height);
    }

    private void SetHeight(float height)
    {
        material.SetFloat("_CutoffHeight", height);
        material.SetFloat("_NoiseStrength", noiseStrength);
    }
}
Rather than modify the cutoff threshold in the graph, as the Brackeys example does, we can use material.SetFloat() and similar methods to change those values. In this example, I’m modifying the height cutoff threshold in Update() based on the position of the object plus a sine wave. This opens up the potential of a level of control over the dissolve cutoff point which you wouldn’t be able to achieve in the shader alone. When writing shaders, it’s equally as important to remember you have C# scripting at your disposal to supplement your effects! Let’s see the dissolve effect in action:
Conclusion
Dissolve effects are very popular in games, whether it be for destruction or teleportation. Today, we wrote a dissolve effect which uses the y-position of each pixel, modified a little bit by noise, as a threshold to determine whether each pixel should be drawn. A glow effect was added to the rim of the dissolved object by adding a tiny offset to the threshold and setting an emissive HDR colour for sections that exceed the new threshold.