Back when 3D gaming was brand new, developers suddenly had a war chest of new effects they could afford to put in their games. One of the effects which stuck in people’s minds is the watery ripple that appears whenever Mario jumps into a painting in Super Mario 64. Today, we’re going to make our own magical paintings in Shader Graph. And once we’re done, we can make a small twist to the formula and make some ripples for actual water instead!
This tutorial is aimed at people who have a bit of experience with Shader Graph. We are using Unity 2020.1 and URP/Shader Graph 10.2.2.
Super Mario 64 Paintings
Super Mario 64 is a beloved Nintendo game, which I’ve played exactly once (to get footage for the original video tutorial), so I better do it justice here. I’ve set up my scene to have a blank quad we’ll apply the effect to, a light shining on it so we’ll see it properly, and a painting texture ready to go - you’ll recognise it as the warp painting for Bob-omb Battlefield. I’ve made a new Unlit Shader Graph to start with.

The first thing we’ll add is a Vector3 property called Ripple Center which is going to be where the ripples emanate from, and then we’ll take the Distance between that and the Position in World space, because the ripples are going to expand in a circle from this central point. This value tells us how far a pixel is from the effect center.
 Keep your distance.
We want to be able to control how many ripples appear over time, which we can do by adding another property called Ripple Count - this time, it’s a Float. We will Multiply this with the distance from before. The direction the ripples travel in is important - we want the ripples to travel outwards from the centre. If we continued the graph from here, the ripples would be moving from the edge into the middle, so we will use a One Minus node to reverse the direction.
 More ripples, more money. Or maybe not.
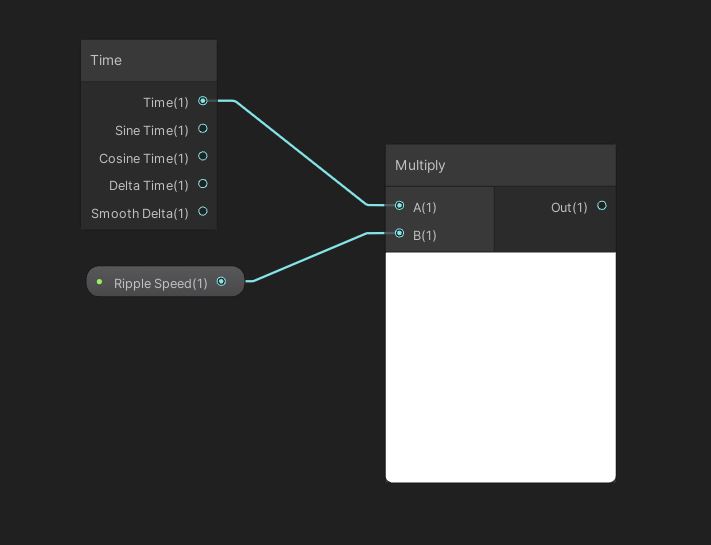
These ripples need to move over time. As you’re probably thinking, we can use a Time node. We will also let the user control this by adding a Float property called Ripple Speed and multiply it by the time value - now we can customise how quickly the effect runs in the Inspector.
 Gotta go fast.
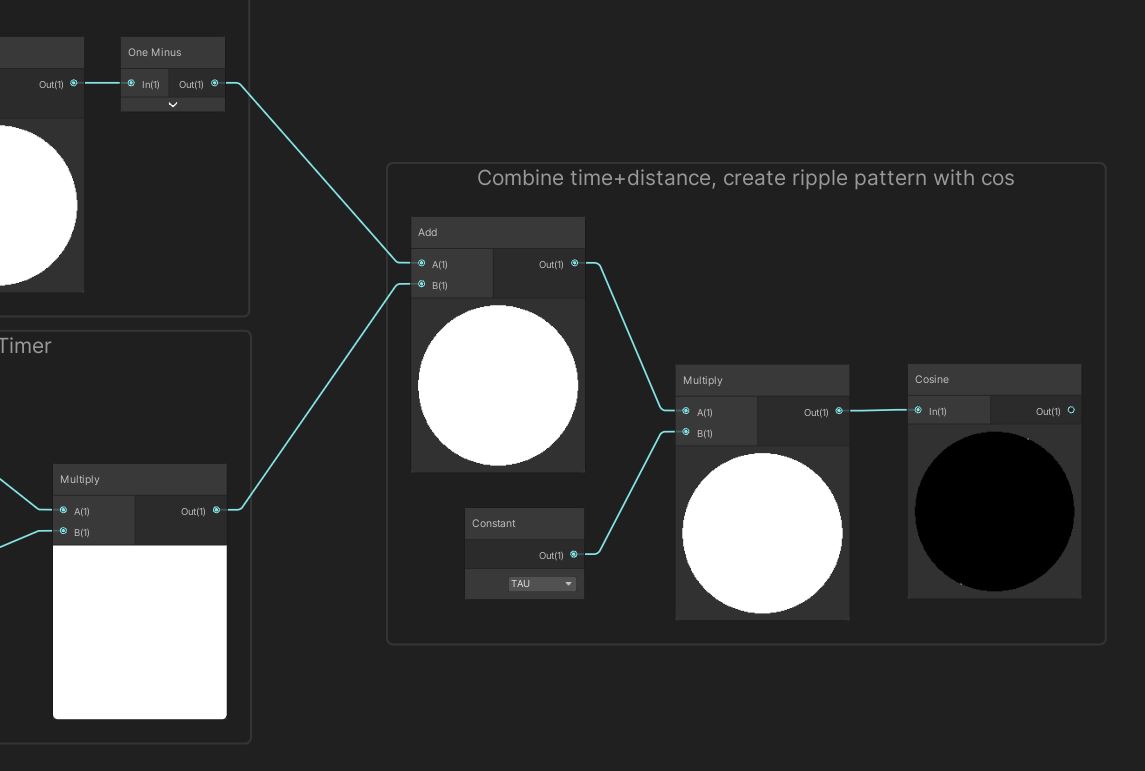
It’s time to add the time and distance metrics together. The eventual goal is to use these values as a heightmap and use that to modify the UVs of the base image, but right now, the height value is continually increasing over time so that won’t work yet. We’re going to fix that by passing it into a Cosine node, which ends up oscillating those values over time. Before the Cosine, we’ll multiply by the Tau Constant, which equals pi times 2, which converts the inputs to radians such that a Ripple Speed of 1 corresponds to a full oscillation cycle per second.
 I went back and forth on whether to use Sine or Cosine.
The values output by the Cosine are between -1 and 1, which is a bit too strong, so we’ll Remap the output so the new minimum is -0.5. For the final height value, we’ll multiply by another new Float property called Ripple Strength, then divide by the existing Ripple Count property. This should give us good values to work with.
 This should give us a good height value.
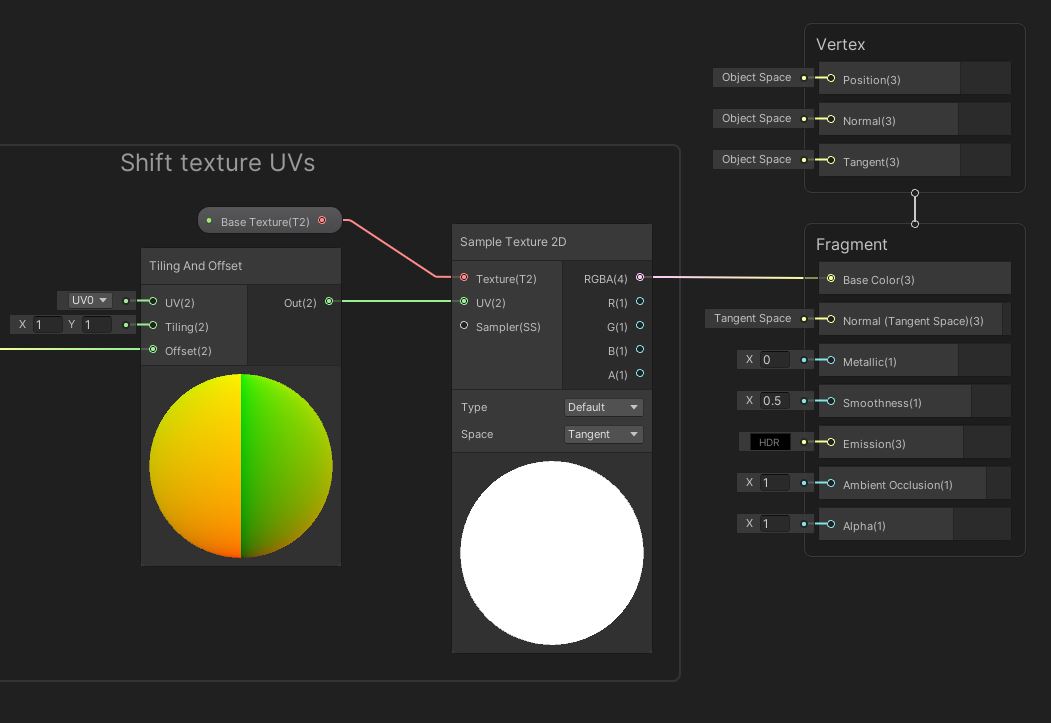
As I’ve alluded to, what we’ve created so far is a kind of heightmap, where each pixel’s value represents how high the ripples should be at that point. Shader Graph has a node called Normal From Height, which is perfect for us - it converts heightmaps like these to normal maps. Then, we can use the resulting normals as a UV offset using a Tiling And Offset node.
 Now we’ve got a UV offset.
Now that we have some UVs, we can finally sample the main texture! Of course, we need to add that as a property first - I’ll call it Base Texture. Then we can finally output the RGBA color to the Base Color on the Master Stack, and we should see some fantastic ripples on the painting now! Just tweak the material until you get speed settings you like.
 Once we’ve got the UVs, it’s as easy as sampling the texture.
Let’s test out the positioning of the ripples with a test script that lets us click the screen, cast a ray forwards from the camera, and set the ripple position of the painting material to the hit point of the raycast. We’ll also throw in a coroutine which decreases the strength over time so that the ripples fade out. And now we can activate the ripple effect so it looks just like it did for Mario back in the late nineties.
using System.Collections;
using System.Collections.Generic;
using UnityEngine;

public class Painting : MonoBehaviour
{
    private Coroutine rippleRoutine;
    [SerializeField] private float rippleTime = 1.5f;
    [SerializeField] private float maxRippleStrength = 0.75f;

    private void Update()
    {
        if(Input.GetMouseButtonDown(0))
        {
            Ray ray = Camera.main.ScreenPointToRay(Input.mousePosition);
            RaycastHit hit;

            if(Physics.Raycast(ray, out hit))
            {
                var mat = hit.transform.GetComponent<Renderer>().material;
                mat.SetVector("_RippleCenter", hit.point);

                if(rippleRoutine != null)
                {
                    StopCoroutine(rippleRoutine);
                }

                rippleRoutine = StartCoroutine(DoRipple(mat));
            }
        }
    }

    private IEnumerator DoRipple(Material mat)
    {
        for (float t = 0.0f; t < rippleTime; t += Time.deltaTime)
        {
            mat.SetFloat("_RippleStrength", maxRippleStrength * (1.0f - t / rippleTime));
            yield return null;
        }
    }
}
 Wibbly, wobbly.
Extra Twists
For this tutorial’s extra twist, we’ll be taking the shader and putting it on the floor instead. I described the effect as ‘watery ripples’ in the intro, so we can very easily use a water texture and make the shader slightly transparent, then apply the ripples so that it looks like water droplets in a bigger body of water. This won’t work for rain or anything else that requires more than one ripple point, because the shader doesn’t support that, but it certainly works for a small waterfull or a dripping pipe.
 Splish, splosh, splash.