Last time, we took a look at holograms using a bright fresnel shell around the object and scanlines passing vertically through it. In many interpretations of holographic technology, artists often add glitches and other effects to make the effect look more believable - a perfect hologram can look too good. Today, we’re going to make a bunch of alterations to our hologram to remove shadows and add imperfections such as distortion and noise grain.
Removing Shadows
Holograms, of course, emit light. One of the oversights in the previous tutorial - one I noticed almost immediately after posting it - is that objects with this shader receive shadows, which looks strange. Unfortunately for us, it’s a bit more cumbersome to turn off receiving shadows in URP - while it’s as easy as unticking a box on any renderer component in the built-in pipeline, we now must add a keyword to the shader graph and then use the Debug Mode in the Inspector to add the keyword to each material using the shader. Yes, really. I found this workaround in a forum post requesting an easy way to do this - go figure! You could also use an Unlit Master node instead of PBR Master, but then we’d lose the Emission channel.
Open up the hologram graph from last time. Under the Blackboard’s plus arrow drop-down, pick the Keyword -> Boolean option at the very bottom and give your new keyword a reference of _RECEIVE_SHADOWS_OFF - the capitalisation and position of the underscores is important. By default, leave it ticked. Then, go to the Inspector and, using the small three-dot menu in the upper-right corner, change the Inspector to Debug Mode. This unlocks a few more options usually hidden from view. Select all materials using the hologram shader and you’ll notice one of those new options called “Shader Keywords”; type _RECEIVE_SHADOWS_OFF in the text box. Now, all your holograms should be shadow-free - you can change your Inspector back to Normal Mode.
Imperfections
In games and movies, holograms often distort and look a bit hazy, presumably due to transmission issues - it’s like a phone call going fuzzy for a second. First, we’re going to add distortion by physically moving the object’s vertices side to side in a noisy pattern. Then, we’ll overlay a different noise pattern over the scanline texture to act like transmission background noise.
Vertex Distortion
Unfortunately, it’s not possible to move the position of the object in the fragment-shading stage of our shader, only the vertex-shading stage. For those who haven’t encountered vertex and fragment shader terminology before, this means that we can’t move individual pixels to the side to model distortion, only model vertices. Because of this, this approach isn’t recommended for use on models with a low number of vertices - only use it on models with a high poly-count such as characters, landscapes or versions of models deliberately modelled with a higher-than-usual number of vertices - I’ll be using the latter approach on a sphere. A feasible alternative for anyone wanting to explore this space further could be reached using a post process effect and moving individual pixels, but they’re already cumbersome in URP so I chose not to explore that avenue.
Let’s start adding nodes to the shader. Our tactic will be to calculate a horizontal offset based on the y-position of each vertex, then apply the offset in screen/view space. You’ll notice PBR Master has three pins for the vertex stage, named Vertex Position, Vertex Normal and Vertex Tangent respectively. We’re going to be using Vertex Position. Start off by creating a new property of type Vector1 called Glitch Strength to control how far the vertices move - I’ve given it a default value of zero. Use a Position node to get the Object space position of each vertex, then output it immediately to a Split node. Then, use the G-component for the UV channel of a new Simple Noise node. What we’re doing here is seeding a random number generator using only the y-position of the vertex, since we need all pixels sharing the same y-position to shift horizontally the same amount. Following this, Multiply the noise together with Glitch Strength and construct a new Vector3 using the result as the x-component and leaving the other two components zeroed out. This vector represents the offset we’ll add to the vertex.
Now that we have calculated the offset, what do we add it to? The original Position node retrieved the vertex position in object space, but we want to apply the offset in view space so that it appears horizontal relative to the camera rather than relative to the object. From that original Position node, use a Transform node to convert the Position from Object to View space, then Add it to the final offset value we just calculated. After that, use another Transform to convert back from View to Object space. Output that to the Vertex Position pin on PBR Master.
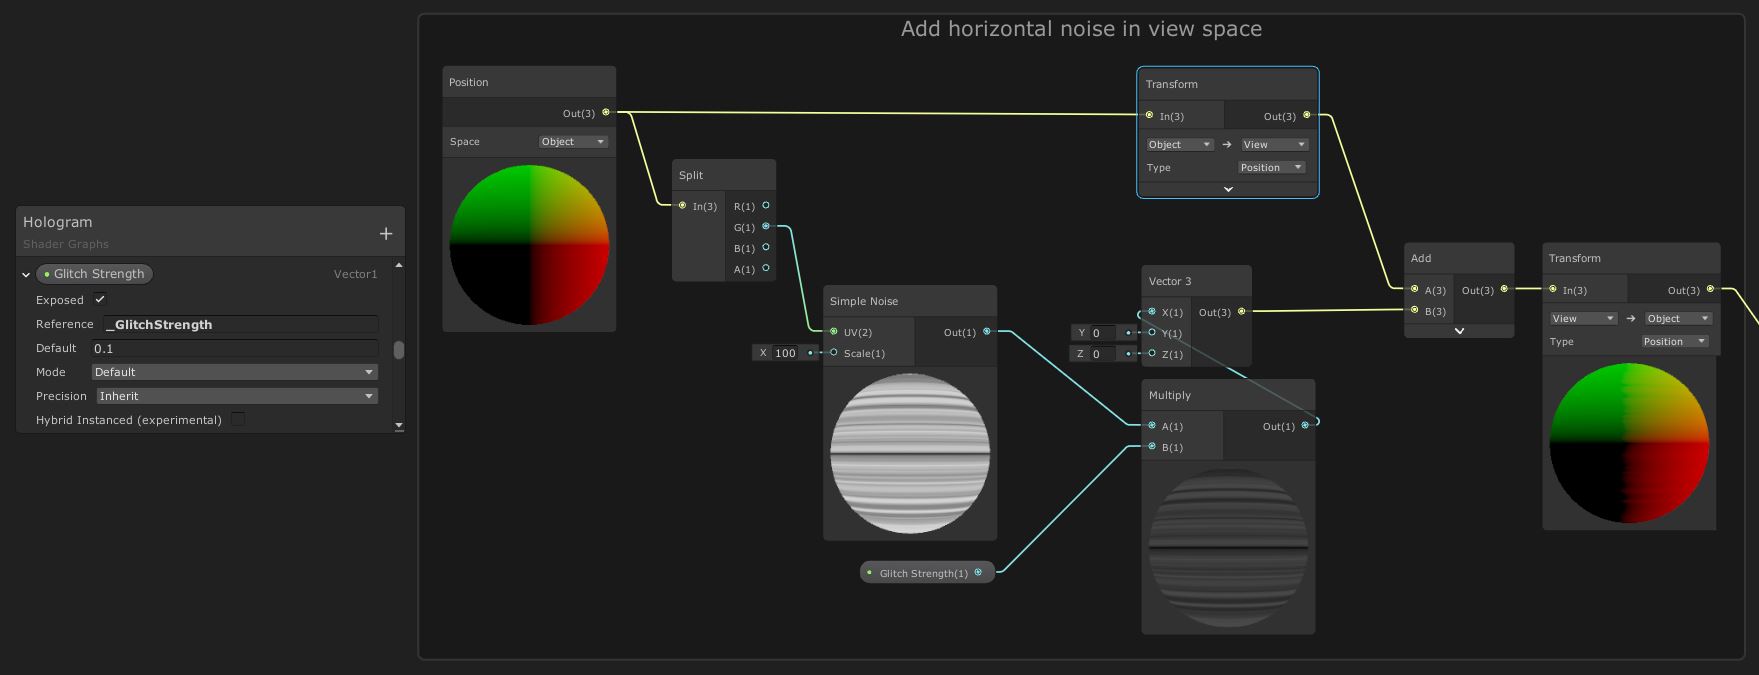 We’re adding a horizontal offset to the vertex position in view space.
With that, we’ve implemented a distortion effect to our holograms. Next up, we’ll add noise grain to the body of the hologram.
Noise Grain
We’ll be using the same Simple Noise node as before, but for a slightly different purpose. Rather than using it for offset values, we’ll add the noise as a colour to the original scanline texture sample. Before we kick off with the noise grain, we’re quickly going to add a new property called Scanline Offset of type Vector1 and insert an additional Add node between the existing Add and Vector2 nodes in the scanline calculation. If we’re using an external script to add random glitches to our hologram, it’ll be nice to shift the position of the scanlines at the same time we add distortion.
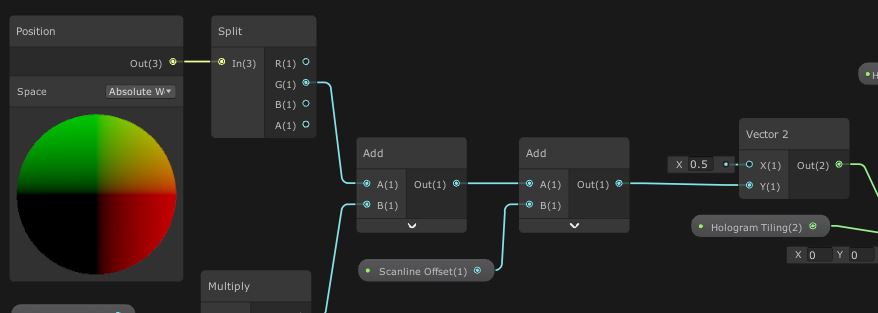 Adding a scanline offset makes it easier to get across the glitch effect.
Let’s move on to the noise grain. For this, add two new properties: Noise Scale, default value 500, is a Vector1 which controls the granularity of the noise texture; Noise Strength is a Vector1 with default value 0.5 which determines how opaque the noise is. Last time, we used a Time node and multiplied it by Scroll Speed - from that Multiply node, drag off a new node downwards and create a new Vector2, using the time as the y-component and leaving the x-component at zero. We’ll then use a Tiling And Offset node with Hologram Tiling in the Tiling slot like last time, but now we’ll put that Vector2 into the Offset slot and leave the UV input as-is. Slot the Tiling And Offset straight into a Simple Noise node’s UV slot and then, unsurprisingly, pipe Noise Scale into the Scale slot - this should give us noise that acts somewhat like TV static.
The final step is to add this noise to the scanline texture. However, if we just Add it, then the resulting hologram will be far too bright! First, we’ll shift the range of noise values from (0, 1) to (-0.5, 0.5). We could use a Remap node, but it’s far easier to just Subtract 0.5. Multiply the result by Noise Strength and Add it to the scanline Sample Texture from last tutorial. The output then goes to the existing Add node next to PBR Master in place of using Sample Texture directly.
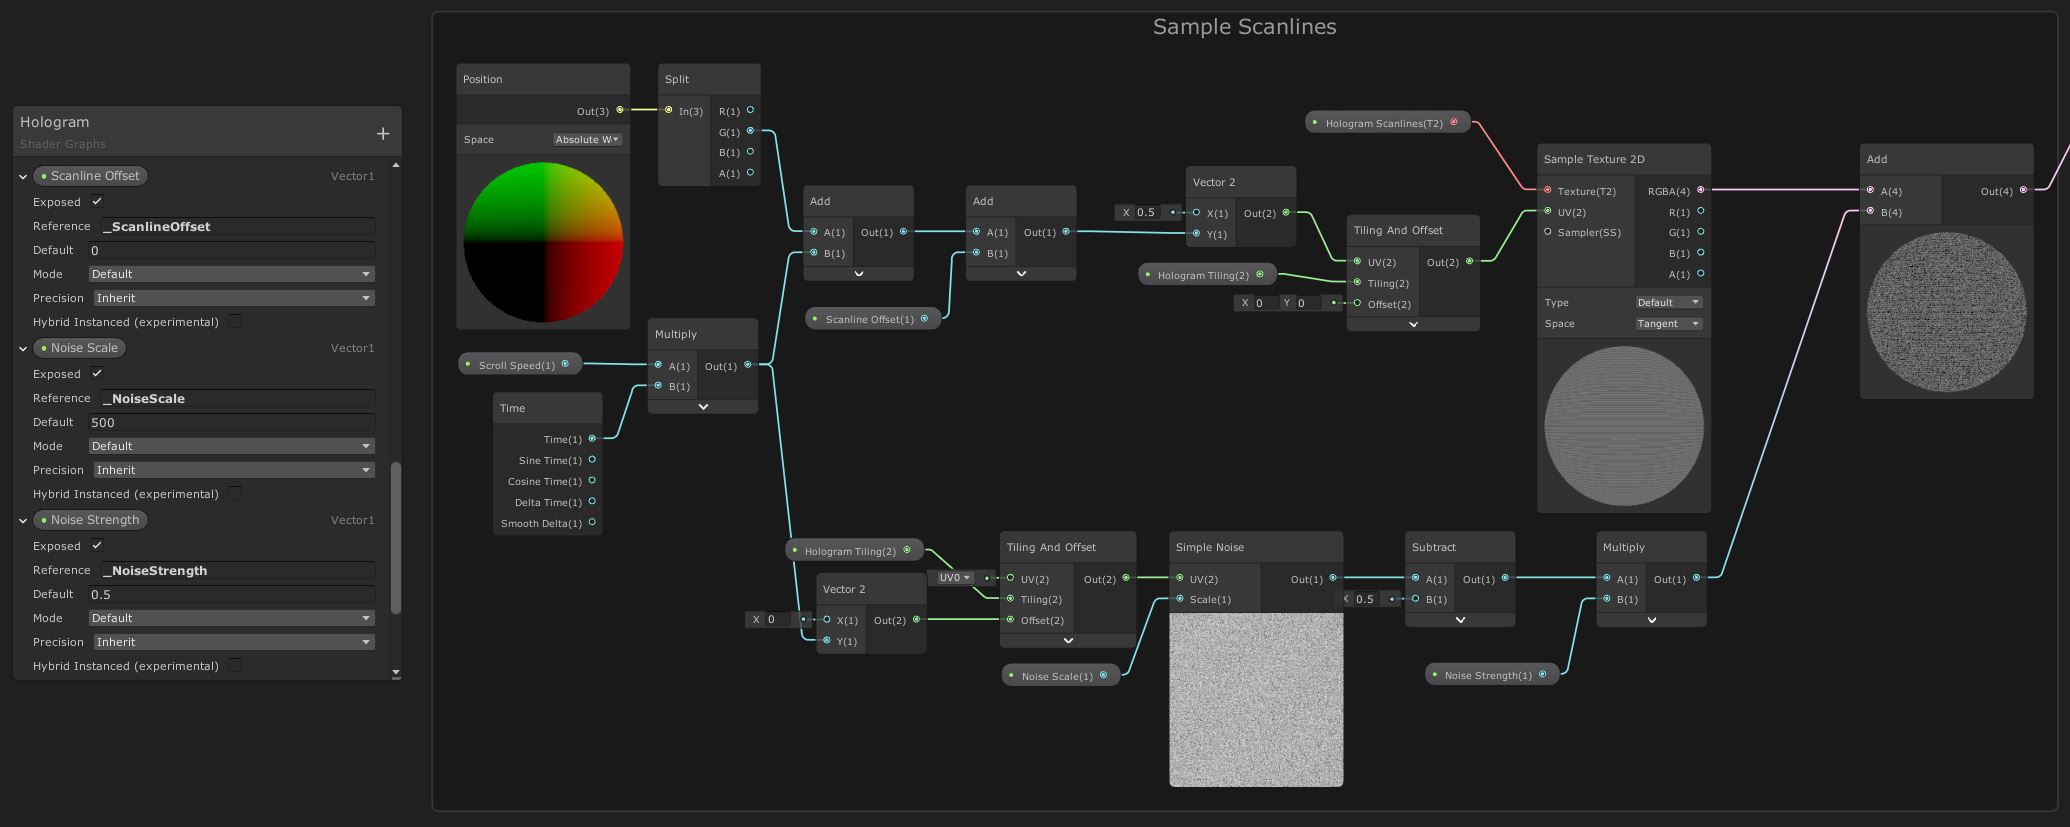 Adding noise grain is made easy because of Shader Graph’s built-in
 Simple Noise node.
Now we’ve added everything we wanted! If we were to write a script which occasionally glitches the hologram, it might look something like this:
Conclusion
In the last tutorial, we made holograms to make our game look more sci-fi. In many interpretations, holograms don’t look perfect - intentional glitches and haziness make the effect a lot more believable. We’ve used noise grain in a couple of ways to add distortions and a fuzzy grain to our holograms to imitate transmission issues that will probably persist if and when holograms become widespread in the real world.