The Legend of Zelda: Breath of the Wild, the game which is basically fuelling my shader journey, will never run out of visual effects for me to dig into and recreate. The Remote Bomb explosion features a giant glowing blue core, with particles flying out in all directions. There are so many moving parts to this effect, and in this article, I will be using Unity Shader Graph and VFX Graph to tackle each bit. I’ll be using URP, but these concepts should carry over to other pipelines if you prefer that.
For this tutorial, we are using Unity 2020.3.21f1 and URP 10.6.0.
Analysis
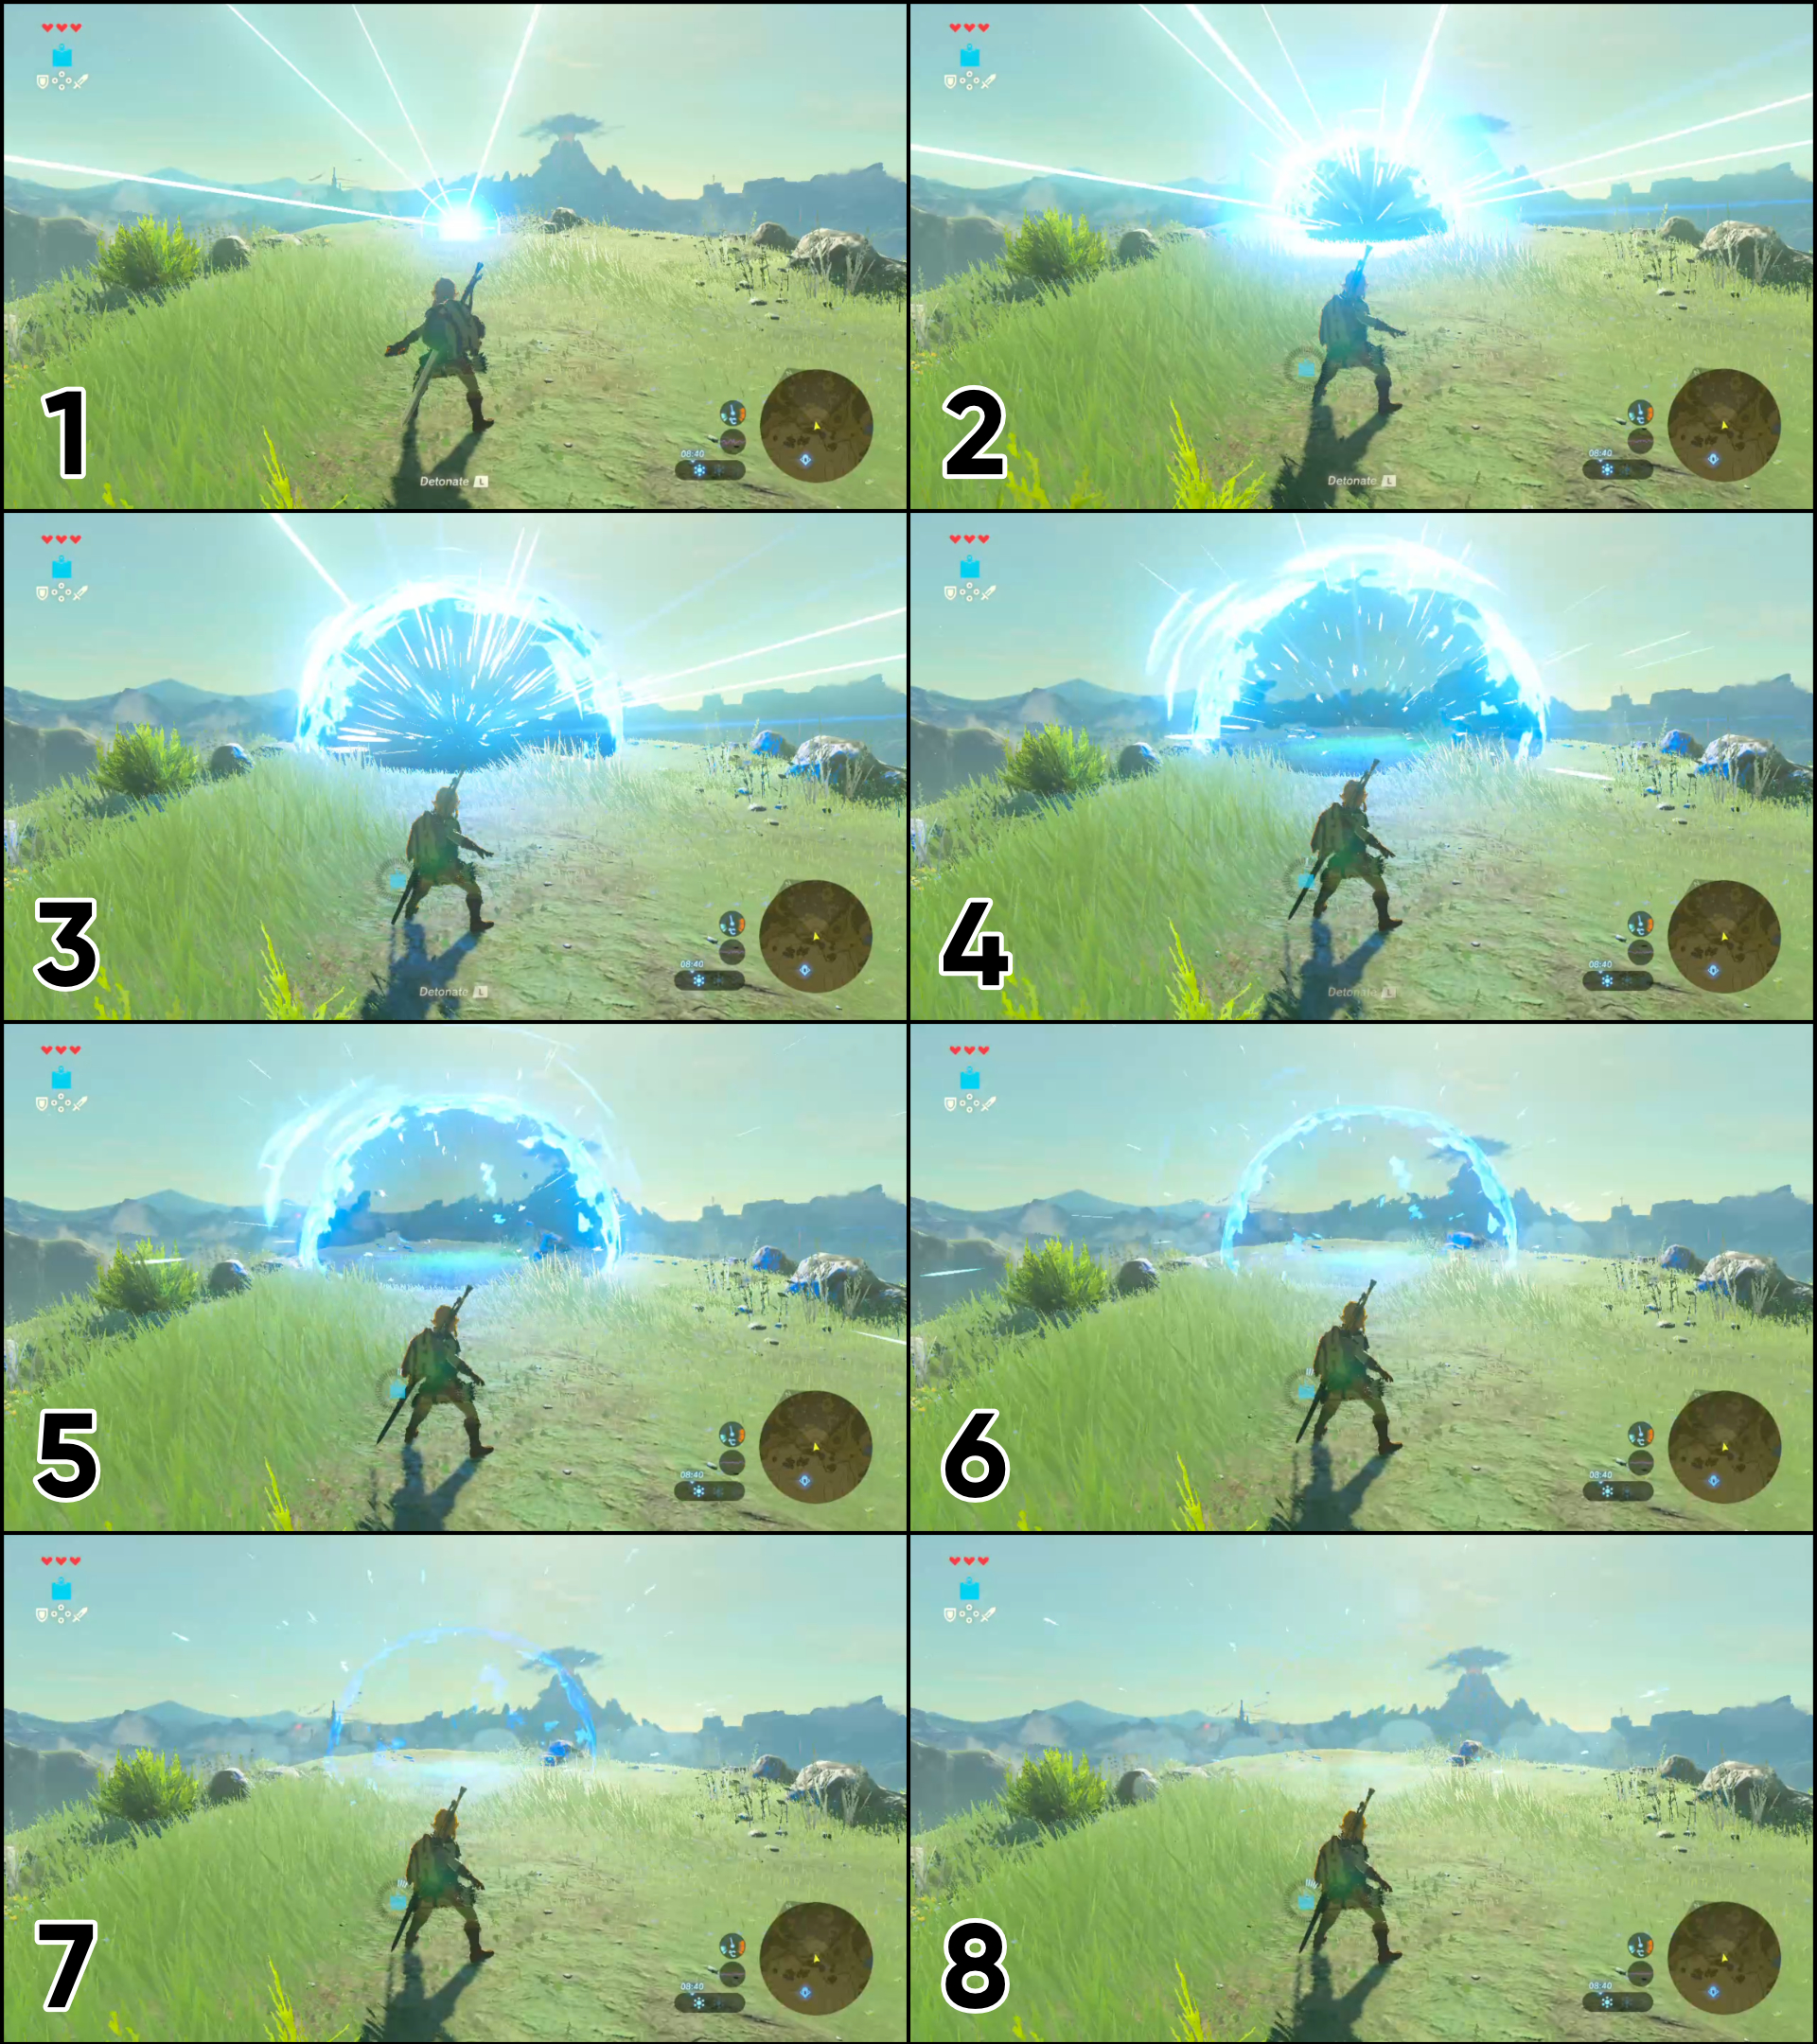
All good recreations start with a breakdown of the source material. In the following screenshot, I’ve noted and numbered the key parts of the effect, which I describe below.

-
The explosion starts with a bright core and some rays blasting out from the middle. We can make the main ‘bubble’ of the explosion with Shader Graph and the rays can be crafted with VFX Graph. Each part appears white with a blue glow, so we’ll need to use high-intensity HDR colors.
-
The core is no longer pure white, and a non-HDR blue color makes up most of the central section. The white-hot edges are still here, and they are distorted rather than appearing as a clean edge to the core. Looking closely, a few extra small rays have appeared, so our VFX Graph will contain two particle systems.
-
The core has roughly reached its maximum size while the rays continue to shoot outwards. In this frame and frame 2, you’ll notice that the bottom section of the core, which is intersecting the ground, is also glowing white, so we will need to factor scene intersections into the Shader Graph.
-
The huge rays from the beginning are starting to fade out.
-
Here, the rays have faded completely, and the rest of the effect is starting to fade. You can clearly see a blue light on the floor in the centre of the core, suggesting that a point light is included as part of the effect.
-
The core is also shrinking and the intensity of the outer edges is decreasing with each frame.
-
The majority of the core is fully transparent now, and the edges are on their way out. Only tiny bits of the second burst of rays remain.
-
Apart from a handful of pixels of rays, the effect is over.
Here is what we’re aiming for from this project:

Now that we know how each part is broken down, we can get started writing the shader.
The Shader
We’ll start off with the hardest part of the effect: remembering to enable the depth texture in URP. Find your Pipeline Asset (the default URP project comes with three templates in Assets/Settings) and tick the Depth Texture box near the top, because part of this shader won’t function without it.

Then, create a new Lit graph by right-clicking in the Project View and choosing Create -> Shader -> Universal Render Pipeline -> Lit Shader Graph, which I will name “StylisedBomb”.

In the Graph Settings, change the Surface to Transparent and tick Two Sided. We want to render the front and back faces of the explosion core, although we will treat both slightly different to one another.

Let’s add a few properties so that we can control the coloration of the explosion from outside the shader. We’ll need two Color properties: one’s called Base Color and we use it for the central section of the explosion so we’ll make it blue with 50% transparency by default, and the other is called Emissive Color and we use it for the bright outer edges, so we change its Mode to HDR. For ease of integrating my shaders with scripting and animations, I rename the reference values on all of my properties something sensible, such as _BaseColor and _EmissiveColor.

The emissive sections of the effect come in two main parts. The first is a Fresnel effect around the edge of the sphere, for which we add a Float property called Fresnel Power with a default value of 1. Increasing this will make the Fresnel effect appear smaller, and vice versa. To use it on the graph, add a Fresnel Effect node and connect this property to the Power slot. There is a wrinkle: the Fresnel will look broken when applied to both the front and back faces, so we only want to use it on the front faces. Use an Is Front Face node in conjunction with a Branch node, which will output the result of Fresnel Effect when true, and 0 when false.

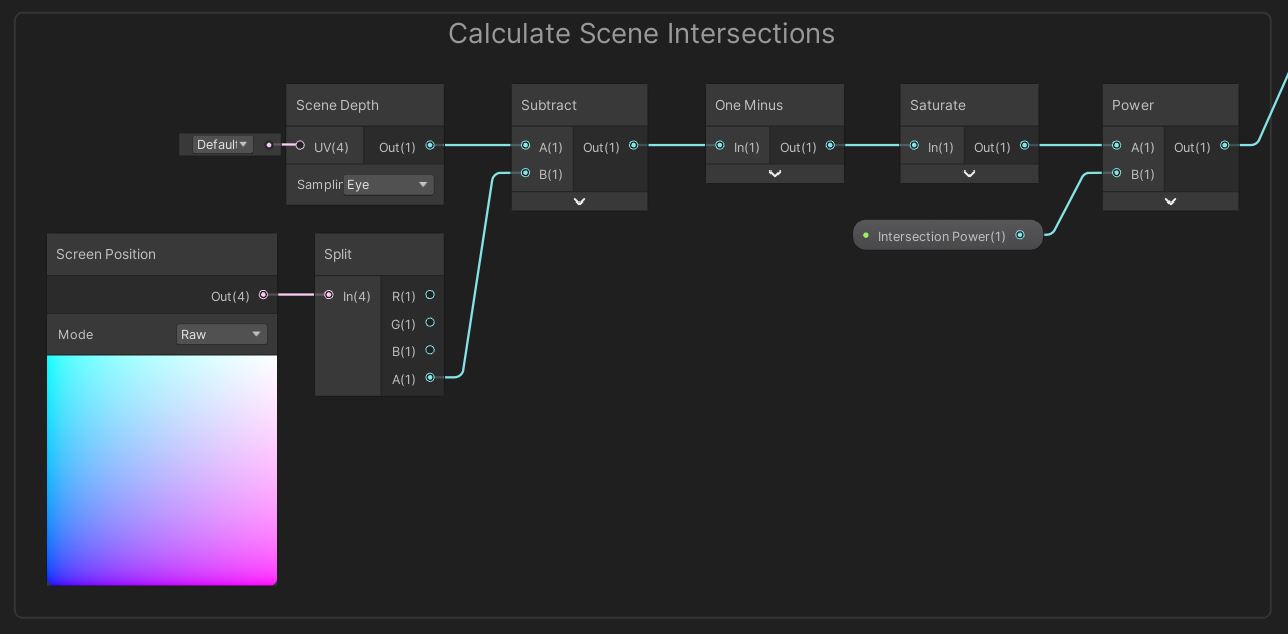
The second emissive part of the effect is the ground intersections. The method we use here is to compute the distance between the part of the explosion we are currently rendering and the camera and compare that with the depth value already rendered at that position, converted to ‘eye space’ units. If those values are within a threshold, then we class the pixel as an intersection because it is close to the ground or a wall.
 The blue segment here is the distance we will be thresholding.
Add another Float property called Intersection Power with a default value of 1; it acts like the Fresnel Power property. To get the distance of the existing pixel from the depth buffer, use a Scene Depth node in Eye mode (‘eye space’ is also called ‘camera space’, where every value represents a distance from the camera). To get the distance of the explosion pixel we are currently drawing, use a Screen Position node in Raw mode, then use a Split node to grab just the fourth component.
By subtracting the second value from the first, we get an estimated distance from the floor. We actually want a value that starts at 1 when the explosion mesh lies exactly on the floor and falls off as it gets further away, so plug the result in a One Minus node, then Saturate to clamp the values between 0 and 1, apply the Intersection Power property using a Power node, then add this intersection value to the fresnel value from before to get a final emission metric.

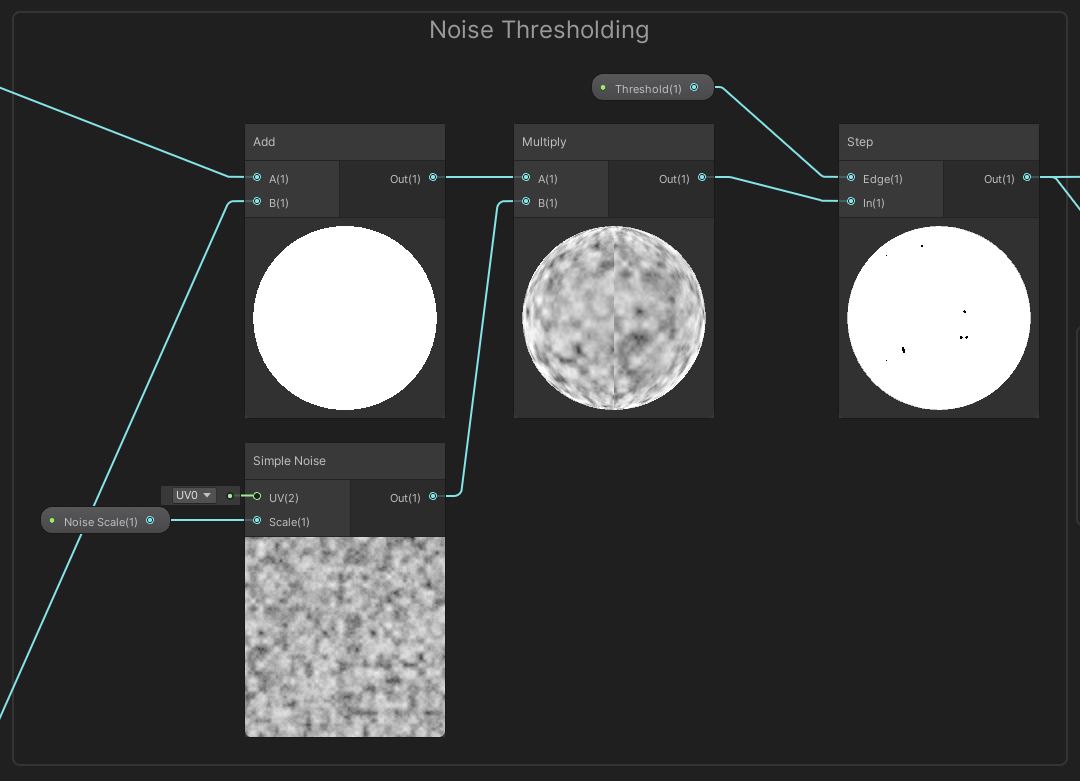
With these values, we end up with a smooth glow falloff, but we want the explosion to be disordered like in BotW. That means we should add some noise. We also want the explosion to mimic the cel-shaded aesthetic of the rest of the game, so we can provide a lighting cutoff. Add two Float properties: one called Noise Scale with a default value of 100, and the other called Threshold with a default value of 0.1.

Shader Graph makes it very easy to use noise in our shaders by providing the Simple Noise node, which is just a 2D Perlin noise implementation. Add one and use Noise Scale in its Scale pin. By multiplying this with the emission metric we calculated before, we end up with a noisier version of the same thing. To apply a hard cut between emissive and normal color, use a Step node with the Threshold property in the Edge pin.

To tie everything together, we’ll add one final Float property called Opacity to act as a global transparency modifier so we can control the fade-out of the effect.

For the emissive sections of the graph, multiply the Step output by the Emissive Color and output directly into the Emission output on the Master Stack. For the Alpha output, we will toggle between the base and emissive alpha values, so output Step into a Lerp node’s T slot. When the Step output is 0, we should use the base color alpha so connect Base Color to the A slot. Otherwise, when the Step output is 1, we want to use Emissive Color, so connect that to the B slot. We only need the alpha component output by Step, so use a Split node to obtain it, multiply by the new Opacity property, and output to the Alpha output on the Master Stack. That’s the graph complete!

With that out of the way, we’ll deal with the particles.
The Particles
You might not have this installed in your project, so go to Window -> Package Manager and find VFX Graph somewhere in the Unity Registry. Once it’s installed, right-click in the Project View and choose Create -> Visual Effects -> Visual Effect Graph. I named mine “StylisedSparks”. Double-click it to open the VFX Graph editor.

When you open a new graph, you’ll be presented with a list of blocks, each of which control some aspect of the particle effect. We don’t need them all, so go ahead and delete, from top to bottom: the Constant Spawn Rate, Set Velocity Random (Per Component), Set Lifetime Random, Orient: Face Camera Plane, and Set Size Over Life blocks.
We will use this system to create the bright long lines that appear right at the start of the explosion. In the Spawn context, we control how particles get generated. We want all the particles in the system to be generated at once, so add a Single Burst block. I’ll use a Count of about 8 since we don’t need too many of these.

Moving down to the Initialize Particle context, we also set the Capacity to 8. We want these particles to emanate in all directions, so we will make them spawn on the surface of a sphere by adding a Set Position (Shape: Sphere) block, then expand the Arc Sphere and Sphere dropdowns to change the Radius to something small like 0.1. This makes them spawn roughly in the centre of the explosion.

Then we’ll use a neat trick to orient the particles correctly. I’ll give them a tiny velocity pointing away from the origin of the sphere the particles are spawning on by using a Set Velocity block (later on, I will make the particles face their velocity direction). The great thing about VFX Graph is that we can funnel values into each of the pins on the left just like we do in Shader Graph, so move your mouse to the empty area on the left, right-click, and pick Create Node.
We can grab the direction attribute of the particle - which is a vector pointing away from the origin - using a node called Get Attribute: Direction, and multiply it a tiny amount like 0.01 so they are almost static. Output that to the Velocity pin.
Now I will make the rays large by adding a Set Scale block. From the very same Get Attribute: Direction block as before, use the tiny arrow drop-down to select just the Z component and multiply it by 500. Then expand the Scale pin and output the multiplied value to its Y component. The X and Z components should be set to about 0.5 so they are relatively thin. To wrap up the Initialize Particle context, add a Set Lifetime block and set the value to 0.25 seconds, because we want all these particles to fade out simultaneously.

The only remaining context is Output Particle Quad. Add an Orient: Along Velocity block, which is going to force the particles to face in the direction of the tiny velocity we set earlier. And finally, we can set the Color Over Life values. As with Shader Graph, we can add properties to VFX Graph, but there is a greater range of types and unlike Shader Graph, Gradient properties can be modified outside the graph environment!
I’m going to add a Gradient property called Emissive Color, whose default value starts at blue with an intensity of 9, and tapers off after 33% to a non-emissive blue with zero alpha. Drag it onto the graph and connect it to the Color field on the final block, and we’re done with this particle system.

However, we’ve got a second particle system yet to make for the smaller rays that burst outwards from the centre. We can include both inside the same graph, so select everything we have and duplicate it (using Ctrl+D on Windows) then drag the new system to one side. Most of the work on this system just requires tweaking values.
Let’s change the Burst Size and Capacity to about 50, then in the Initialize Particle context, we will raise the Velocity multiplier to about 12 and the Size multiplier to about 10. These values are going to make the particles actually move outwards at considerable speed this time, and they will be far shorter. Change the X and Z size components to about 0.15 each so they are thinner than the first system’s rays. We’re going to replace the Set Lifetime block with a Set Lifetime Random block with values 0.5 and 1 so that not all the particles die at the same time.

In the Update Particle context, which was previously left empty, we will add a Gravity block which makes the particles realistically fall downwards over time. That’s the final tweak we need to make, since we don’t need to make changes to anything in the Output Particle Quad context, so that’s the graph complete!


Conclusion
Shader Graph and VFX Graph work together extremely well when trying to make complex visual effects with lots of moving parts. The Stasis Bomb in Breath of the Wild is one such effect, with a bright core that we can recreate with Shader Graph and additional particles that further the effect, which are best to make with VFX Graph. If you liked this article and want to bring your game closer to BotW’s cel-shaded aesthetic, try this article next!
If you’re looking for other VFX Graph based effects, then I think you’ll like this pack on the Asset Store: