Following on from last week’s introduction to Universal Render Pipeline, we’re going to step away from Shader Graph for a while and explore some of the other aspects of URP. I’ve always wanted to play around with fluid simulation in Unity, and we can use metaballs with gravity applied to each particle as an approximation of a fluid system. But what are metaballs? And how will we use the unique features of URP to render them?
Metaballs
According to Wikipedia, metaballs (not to be confused with “meatballs”) are “organic-looking n-dimensional isosurfaces, characterised by their ability to meld together when in close proximity to create single, contiguous objects”; the mesh created by the metaball algorithm is called an isosurface (or an isoline in 2D). Translated to English, they are n-dimensional balls that “smoosh together” graphically when close to each other. In two dimensions, which we’ll be working in today, they’re circles which connect with smooth curves. Metaballs are most often used in 3D, with applications ranging from medical imaging to, yes, fluid simulation.
There’s a range of algorithms for creating metaball systems. The basic one is marching cubes (or marching squares in 2D), which divides a space into a set of cubes and calculates which edges are intersected by each of the metaballs, building a final smooth mesh based on those intersections. Other algorithms improved on the formula. Our approach, however, doesn’t seem to fall into any of those algorithms in a traditional sense - instead of building a mesh, we’ll use a post-processing effect and add the “isosurface” in the fragment shader. It’s based on the approach taken by Artjoms Neimanis which, unless you count each pixel to be a cell in a marching squares-style algorithm, seemed to be a novel approach to me.
We will add a set of GameObjects with Rigidbody2D components attached and throw them into a scene, but without any Renderer component attached - those are our metaballs. Then, we’ll pass the position and radius of each metaball to a post-processing shader, which will calculate the distance between each pixel and each metaball. Based on those distances, we’ll try to find a distance threshold value which includes pixels between two metaballs, as well as pixels directly intersecting the metaball itself - pixels over the threshold get recoloured. And here we meet the elephant in the room: there is currently no official support for custom post processing in URP. But there is a work-around.
Custom Post Process in URP
For the new Scriptable Render Pipelines, Unity went back to the drawing board and threw out a lot of the old code regarding post-processing in order to replace it with better-integrated effects. Several MonoBehaviour callbacks have been removed including OnRenderImage, OnPreRender, OnPostRender and OnPreCull to prevent arbitrary rendering code injection partway through frame rendering. The replacement callbacks provide safe zones to modify rendering state, but needless to say, post processing in Unity has changed significantly (this forum post has a great breakdown on what’s changed). The High Definition Render Pipeline already has official support for custom post processing - as a shameless plug, I managed to update my Snapshot Shaders Pro package to HDRP relatively painlessly, once I’d got to grips with the new system. However, that system doesn’t yet exist for URP so we will have to go a bit lower-level to get custom post process working.
URP supports custom renderer features. Unity’s own GitHub features a great showcase of effects which use ScriptableRenderFeature and ScriptableRenderPass to, amongst other things, draw outlines on meshes in the scene. We’re going to use those classes to draw our metaballs.
Download the GitHub repository for this project if you’re following along at home - it’ll be a lot easier to see how this all works up close!
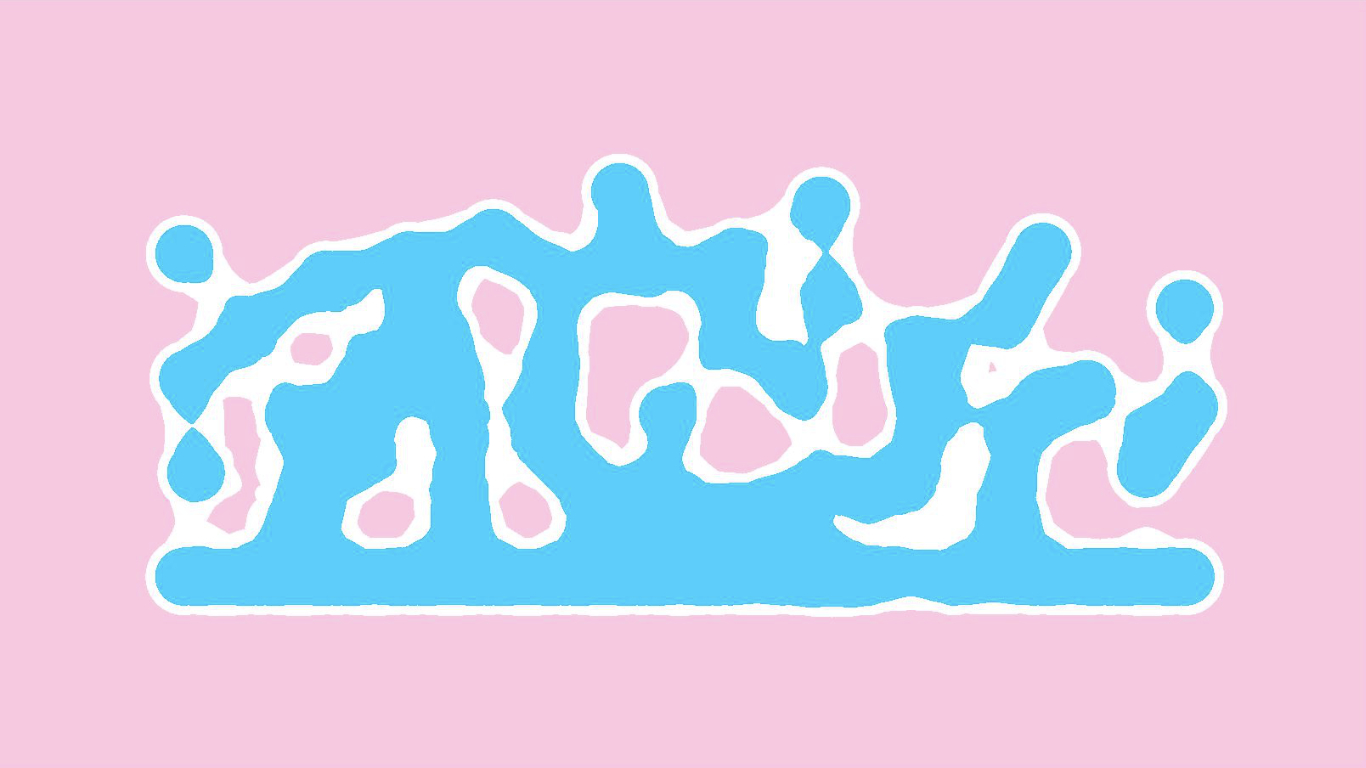 This is what the metaballs will look like when complete.
URP includes a list of all additional features being used inside a Forward Renderer asset (there is also a 2D Renderer type of asset, but it doesn’t seem to include a similar list). Navigate to Assets/Settings/ForwardRenderer/asset and, if you downloaded the project off GitHub, there will be one feature in the list called MetaballRender2D. If you expand the Settings dropdown, you’ll see the feature is set to render “After Rendering Post Processing” (referring to the stage where built-in URP post processing is performed) - essentially, this is a post-process. Let’s look at how this class was built.
Open Scripts/MetaballRender2D.cs. It contains the MetaballRender2D class, which extends ScriptableRenderFeature - this is what makes it appear in the Forward Renderer drop-down - which itself contains MetaballRender2DPass, which extends ScriptableRenderPass. The pattern here is that a Feature can contain one or more Passes which it uses to render all or part of a scene. There are a lot of moving parts so I’ll explain things as fully as I can!
public class MetaballRender2D : ScriptableRendererFeature
{
    ...
    class MetaballRender2DPass : ScriptableRenderPass
    {
        ...
    }
    ...
}
MetaballRender2D also contains a Serializable class which contains a few rendering options, and one instance of that class - settings - which appeared as the Settings drop-down we just saw. It’s just a regular class - it doesn’t extend any more exotic Unity classes. It’s good practice to encapsulate the optional settings into their own object, and besides, Unity doesn’t seem to serialise other public variables defined on this Feature.
[System.Serializable]
public class MetaballRender2DSettings
{
    public RenderPassEvent renderPassEvent = RenderPassEvent.AfterRenderingPostProcessing;

    [Range(0f, 1f), Tooltip("Outline size.")]
    public float outlineSize = 1.0f;

    [Tooltip("Inner color.")]
    public Color innerColor = Color.white;

    [Tooltip("Outline color.")]
    public Color outlineColor = Color.black;
}

public MetaballRender2DSettings settings = new MetaballRender2DSettings();
For our metaballs, we’ll include the renderPassEvent which controls which part of the pipeline the feature is rendered in, as well as the thickness of the outline around the isosurface (outlineSize), the colour of the liquid (innerColor) and the colour of the outline (outlineColor). It’s all bundled into the settings variable.
Now we’ll talk about what MetaballRender2DPass looks like. It needs to override and implement the Execute method on the ScriptableRenderPass base class, which will define exactly what the pass does each frame; this is where we will pass data to the shader and execute the pass. However, most of the behaviour of this method is directly related to the metaballs shader, so we will go over its contents in the next section. The rest of this class is used for setup. It contains references to a material to use for the shader, as well as copies of most of the data we defined in the settings variable of the Feature.
class MetaballRender2DPass : ScriptableRenderPass
{
    private Material material;

    public float outlineSize;
    public Color innerColor;
    public Color outlineColor;

    private bool isFirstRender = true;

    private RenderTargetIdentifier source;
    private string profilerTag;
}
We’ll see why we include an isFirstRender flag when we talk about what the Execute function is doing. Finally, we’ll include a reference to the screen texture - source - which we perform the post processing on, and a profilerTag which can be used to easily search for this pass in the Profiler. We’ll write a Setup method to create the material and send over the source texture externally, as well as a constructor which will be used to define the profilerTag.
public void Setup(RenderTargetIdentifier source)
{
    this.source = source;

    material = new Material(Shader.Find("Hidden/Metaballs2D"));
}

public MetaballRender2DPass(string profilerTag)
{
    this.profilerTag = profilerTag;
}
Now we can return to MetaballRender2D. After defining the Pass, we’ll define an instance of the MetaballRender2DPass object (we’ll call it pass), as well as overrides for the Create and AddRenderPasses methods which are part of the ScriptableRenderFeature base class.
MetaballRender2DPass pass;

public override void Create()
{
    name = "Metaballs (2D)";
    pass = new MetaballRender2DPass("Metaballs2D");

    pass.outlineSize = settings.outlineSize;
    pass.innerColor = settings.innerColor;
    pass.outlineColor = settings.outlineColor;
    pass.renderPassEvent = settings.renderPassEvent;
}

public override void AddRenderPasses(ScriptableRenderer renderer, ref RenderingData renderingData)
{
    pass.Setup(renderer.cameraColorTarget);
    renderer.EnqueuePass(pass);
}
Create is simple - it creates the MetaballRender2DPass object and stores it in the pass variable, then funnels the data contained in settings to the pass object. Remember those same variables on the settings object are visible on the pass object. AddRenderPasses is used to construct the list of passes used by this Feature - we’ll only be using the single pass we’ve created, and we use the Setup method on the Pass to send over the cameraColorTarget - this is the screen’s colour texture - as the source texture to perform the post process pass on. Simple!
That covers the setup required for a new render feature - if you were writing from scratch, this should already be visible on your Forward Renderer, although nothing will happen if you add it to the feature list. This setup was inspired by Sebastien Hein’s URP Kawase Blur project - do give it a look on GitHub! Now, we’ll talk about metaballs.
Metaballs Post Process
The approach we’ll take is somewhat inspired by the approach Artjoms Neimanis took, in that it doesn’t directly use the marching squares algorithm. This approach rendered overlapping fuzzy circles with additive alpha so that pixels in between two metaballs ended up with high alpha values due to falling inside more than one fuzzy area. Then, an alpha cutoff shader took away all the parts below an alpha threshold - those were the parts outside the metaballs that didn’t fall in the overlap region between two metaballs. This required rendering all the circles to a separate RenderTexture first and blurring the entire thing to get the “fuzz”, but we want to avoid the extra texture and blur passes so instead, we’re going to do all the distance calculations inside the shader.
We’re going to attach a script called Metaball2D to each metaball object - those objects have a CircleCollider2D and Rigidbody2D attached too (although the rigidbody is not required unless you want a physical simulation - it’ll still work with stationary metaballs). We also need a way of keeping track of all metaballs, so I’ve created a static class called MetaballSystem2D. It’s not the most elegant way of doing this, but it works for demonstration purposes.
public static class MetaballSystem2D
{
    private static List<Metaball2D> metaballs;

    static MetaballSystem2D()
    {
        metaballs = new List<Metaball2D>();
    }

    public static void Add(Metaball2D metaball)
    {
        metaballs.Add(metaball);
    }

    public static List<Metaball2D> Get()
    {
        return metaballs;
    }

    public static void Remove(Metaball2D metaball)
    {
        metaballs.Remove(metaball);
    }
}
All the class does is maintain a list of active Metaball2D instances and allow those instances to register and deregister themselves from the list. MetaballRender2D will request this list using the Get method during the Execute process.
[RequireComponent(typeof(CircleCollider2D))]
public class Metaball2D : MonoBehaviour
{
    private new CircleCollider2D collider;

    private void Awake()
    {
        collider = GetComponent<CircleCollider2D>();
        MetaballSystem2D.Add(this);
    }

    public float GetRadius()
    {
        return collider.radius;
    }

    private void OnDestroy()
    {
        MetaballSystem2D.Remove(this);
    }
}
The Metaball2D class is also simple - it’s used to provide information about its radius to other classes.
Now we’ll talk about the shader. It’s a regular post-processing shader which I created using the Create->Shader->Image Effect Shader dropdown, and you can find it at Resources/Shaders/Metaballs2D.shader; the reason for including it in Resources is so that it’s included for certain inside a build, which will allow us to locate it using Shader.Find.
This shader needs variables. We’ll pass the main texture in _MainTex like we would in any other image effect shader. Then, we’ll pass over the array of metaball data. Arrays in shaders work a little strangely, because you can’t vary the length - it’s common to create an array with a size limit above what you’d expect the program to use alongside a variable denoting how many objects you’re actually sending over - in our case, we might vary the number of metaballs but we need to set a cap in the shader. I’ve set a cap of 1000.
sampler2D _MainTex;
int _MetaballCount;
float3 _MetaballData[1000];
float _OutlineSize;
float4 _InnerColor;
float4 _OutlineColor;
float _CameraSize;
Arrays work just like they do in other C-like languages. In this case, each array member is a 3-dimensional vector containing the x-position, y-position and radius of the metaball respectively; the position is passed to this shader in screen-space. We also need to pass the _OutlineSize, _InnerColor and _OutlineColor - three of the parameters we included in MetaballRender2DSettings - as well as the _CameraSize. We’ll discuss why we need that last one soon.
Let’s jump into the fragment shader. Start off by sampling _MainTex. This value will be used for all pixels which don’t contain a metaball.
float4 frag (v2f_img i) : SV_Target
{
    float4 tex = tex2D(_MainTex, i.uv);

    ...
}
Now, we’ll discuss what the strategy is. For each metaball, we’ll measure the distance between it and the pixel and calculate how many metaball radiuses that is. If it’s less than one radius, the pixel is inside a metaball and it’ll fall below a threshold value. In order to account for pixels in between two metaballs, we will actually use a distance of two radiuses in the check and modify the threshold value accordingly.
Let’s write the shader and explain in detail why each stage works. We start by defining the dist variable, which keeps track of whether a pixel falls inside a metaball, then we’ll create a for-loop to iterate over the metaball data list. The smaller the final value of dist, the closer we are to the centre of a metaball.
float dist = 1.0f;

for (int m = 0; m < _MetaballCount; ++m)
{
    ...
}
Inside the loop, we’ll extract the metaball position. The position is converted to screen space before it is passed to the shader, so it’ll give us the pixel coordinates of the metaball’s centre; array access works like any other C-like language.
float2 metaballPos = _MetaballData[m].xy;
Then, we’ll calculate the distance of the pixel from this metaball. The distance function is built in and does what we need. We’ll multiply the UV coordinates by _ScreenParams.xy to give us the pixel coordinate of the pixel.
float distFromMetaball = distance(metaballPos, i.uv * _ScreenParams.xy);
Now we need to compare this to the radius of the metaball. We passed the radius data in the z-component of _MetaballData, and we need to use _ScreenParams to convert it to screen pixel space. However, the size of the radius in pixel coordinates also depends on the orthographic size of the camera, which is why we passed _CameraSize to the shader - we’ll use it to divide the radiusSize. Usually we need to multiply _CameraSize by 2 in this context because the orthographic size of a camera is equal to only half the number of Unity units visible to that camera in the y-direction; however, we need to double the size of the radius to account for pixels between metaballs, as we mentioned, so we will skip this.
The final step inside the loop is to multiply dist according to the rules I set out. We can use the saturate function to bound the value between 0 and 1 - this means that pixels well outside a metaball multiply dist by 1, preserving its value, but pixels inside or between metaballs will slightly decrease its value. I appreciate the explanation here is a bit laboured but it’s difficult to word concisely!
float radiusSize = _MetaballData[m].z * _ScreenParams.y / _CameraSize;
dist *= saturate(distFromMetaball / radiusSize);
After the loop, we’ll compare dist to two threshold values. The first threshold checks if the pixel is inside a metaball; the second one checks if it should be an outline. The main threshold is set to a value of 0.5 based on how we calculated dist. If the pixel is outside the metaballs, the frag shader returns tex; otherwise, outlines are coloured with _OutlineColor and the rest is coloured using _InnerColor.
float threshold = 0.5f;
float outlineThreshold = threshold * (1.0f - _OutlineSize);

return (dist > threshold) ? tex :
    ((dist > outlineThreshold) ? _OutlineColor : _InnerColor);
That’s it for the fragment shader. Now, let’s return to MetaballRender2D and wrap up the Execute method. We start off by creating a new CommandBuffer; these buffers contain a list of instructions for the GPU to execute such as ‘clear the render target’ or ‘draw a mesh’. The pass is essentially made up of a list of commands inside this buffer which get executed in sequence after we submit; it’s important to note that these commands are not executed at the point of adding them to the buffer - they’re processed all at once when the buffer is executed. Once we’re done with a command buffer, its contents are cleared and it’s released back to the CommandBufferPool.
public override void Execute(ScriptableRenderContext context, ref RenderingData renderingData)
{
    CommandBuffer cmd = CommandBufferPool.Get(profilerTag);

    // Add to the command buffer here.
    ...

    cmd.Clear();
    CommandBufferPool.Release(cmd);
}
Next, we’ll deal with a strange edge case caused by how Unity’s underlying graphics APIs handle array allocation in shaders. The very first time during the program’s runtime that we bind data to an array, the graphics context fixes the size of the array on the GPU side - we cannot make it larger. To get around this, we must bind an array of 1000 empty vectors (1000 is the size of the array on the shader side). Worse still, Unity’s built-in functions for sending vector data can only send Vector4s even if we only need to send Vector3s. So, if this is the first time rendering a frame, we’ll send the fake metaball data list to fix the size of the GPU array.
if(isFirstRender)
{
    isFirstRender = false;
    cmd.SetGlobalVectorArray("_MetaballData", new Vector4[1000]);
}
Then, we’ll retrieve the real metaball data from the MetaballSystem2D class. We can build a List<Vector4> to contain the data - we just need to iterate over every Metaball2D in the scene and grab their position and radius data.
List<Metaball2D> metaballs = MetaballSystem2D.Get();
List<Vector4> metaballData = new List<Vector4>(metaballs.Count);

for(int i = 0; i < metaballs.Count; ++i)
{
    Vector2 pos = renderingData.cameraData.camera.WorldToScreenPoint(metaballs[i].transform.position);
    float radius = metaballs[i].GetRadius();
    metaballData.Add(new Vector4(pos.x, pos.y, radius, 0.0f));
}
As we mentioned when writing the shader, we need to send the position data in screen space - thankfully, the Execute method’s parameters allow us access to the camera rendering the scene, on which we can call WorldToScreenPoint to convert between world space and screen space. Then, if we have at least one metaball in the scene, we’ll send the position and radius of each one to the shader, alongside all the settings and the camera’s orthographic size - each of those operations is a command to add to the buffer. Finally, we will apply the post processing shader to the screen texture. We’ve used the Blit method a lot before - it’s available as a command, and we can Blit between source and itself, which makes things easier as we won’t need intermediate temporary textures. The final step is to execute the buffer using ExecuteCommandBuffer.
if(metaballData.Count > 0)
{
    cmd.SetGlobalInt("_MetaballCount", metaballs.Count);
    cmd.SetGlobalVectorArray("_MetaballData", metaballData);
    cmd.SetGlobalFloat("_OutlineSize", outlineSize);
    cmd.SetGlobalColor("_InnerColor", innerColor);
    cmd.SetGlobalColor("_OutlineColor", outlineColor);
    cmd.SetGlobalFloat("_CameraSize", renderingData.cameraData.camera.orthographicSize);

    cmd.Blit(source, source, material);

    context.ExecuteCommandBuffer(cmd);
}
We’ve finally reached the end! If we run the scene now with about 50 metaballs in the scene, we get something like this:
Or, we can add a bouncy physics material to all of them and watch them connect, disconnect and reconnect with each other in realtime!
Conclusion
To write custom post processing effects in Universal Render Pipeline (as of URP 7.1.8), you must use ScriptableRenderFeatures and ScriptableRenderPasses to create your effect. We can use one to take a list of points and draw a connected area of liquid, and if those points are attached to physics objects, then the water will flow reactively.