Games use weather effects to enhance the mood or atmosphere of a scene, or to reflect a realistic outdoor environment. The most common way of simulating weather effects such as rain is to use a combination of environment details, such as materials or lighting, and particle effects. In this tutorial, we’re going to use a combination of these techniques to recreate a rain effect, using particles for the raindrops and a custom material for puddles on the ground. We’ll use Shader Graph for the puddle material and take a first look at Visual Effect Graph for the rain particles. I was inspired by an effect I saw on Reddit in which someone detailed their approach to a rain effect, so I followed a similar process.
Puddle Material
We’ll start with a material we can apply to the ground to simulate puddles. First, we will need to include a texture to denote where the puddles appear, and we will apply it to the entire floor. The material will simulate puddles in the areas defined by the puddle texture and display the floor as normal elsewhere. We could alternatively create a separate puddle mesh and place puddles where we want, so feel free to tweak the graph if that’s what you want. I’m doing it the first way so I don’t need to create new objects or worry about z-fighting on puddle meshes. The puddle map texture looks like this:
 The white areas of the puddle map define where puddles will appear on the floor.
Next, we’ll need the puddle to interact with the raindrops. For those of you who have ever been outside in the rain, you might be aware that rain causes ripple effects in a puddle’s surface when they land, and with the unmatched might of the Unity Engine and my barely-passable texturing skills, we can recreate those ripples ourselves. We could do this in several ways, including a particle system that spawns a ripple whenever a raindrop collides with a puddle, but it’d be extremely difficult to cut off the ripple particle at the edge of the puddle. By baking the ripples into the ground surface material alongside the puddle map, we can use the map to determine the cutoff point. That said, the Reddit post I’m basing this effect on does use a secondary particle effect to simulate more basic ripples on the entire floor surface, which you might consider adding too. We’ll need to animate the ripple texture, so I’ve made a basic 9-frame animation texture:
 This texture is a 3x3 animation sheet.
With these textures created, we can get started on the shader graph. As always, you can download the project source on GitHub or work from scratch - I’ve created a new PBR Graph located at Shaders/Raindrops.shadergraph. Let’s add all the properties we’re going to need first.
- A
Texture2DnamedAlbedo. This is going to be the floor’s base texture which appears underneath all puddles. - The raindrop texture sheet, called
Raindrop Sheet, which is also aTexture2D. You can supply your own texture or use the one in the project, found under Textures/Raindrops.png - I’ve made that the default value. Raindrop Tiling, aVector1, will control the number of times the ripple effect is replicated across the floor. Give it a default of about 10.- The
Puddle MapTexture2Dwill, of course, denote which parts of the floor contain a puddle. This texture will depend on how large your floor is, but the one I made (under Textures/PuddleMap.png) works fine in the URP default scene, so I’ve set it as the default. - We’ll need to control the animation speed of the ripples (especially if you make your own with more animation frames), so make a
Vector1property calledSpeed. 1 is a good default value. - We don’t want just the puddles to appear wet, so add a
Base Wetnessproperty, anotherVector1, which controls how wet the rest of the floor is. This one should have a low default of about 0.1. - To control how visible the ripples are, use a
Vector1namedRaindrop Strengthwith a default of about 0.25. - Finally, we may want to tint the colour of the puddle, so add a
Colorproperty calledPuddle Tint. I made the default colour full white, full alpha.
Here’s the full property list:
 Here are all the properties we’ll need for this shader graph.
Puddled Areas
Let’s crack on with the graph. To start off, we have only a PBR Master node, a list of properties and a wish to make it rain. The easiest place to start is the albedo. Create a new Sample Texture 2D node to sample the Albedo property. We won’t plug this directly into the Albedo field because the albedo colour also depends on the Puddle Map; the areas covered by water will be tinted by the Puddle Tint.

To tint the puddles, first we need to sample the Puddle Map using a second Sample Texture 2D. Then, I pass the result of the texture sample into a Power node to sharpen the edges of the puddle colouration - a value of 2 should do it (without this step, the map remains blurry, which is useful for a later step but here I prefer them to be sharper). After that, Multiply by the Raindrop Strength property to give us an overall measure of how opaque the puddle will be. Finally, Multiply by the Puddle Tint and Add all of this to the original albedo sample. You can then connect the output of that Add node to the Albedo pin on PBR Master.

Puddles tend to reflect bright lights like the sun very well, so the sections of ground covered by a puddle are going to have their smoothness ramped up high, while the rest of the ground will be lower. We included a Base Wetness property which denotes the smoothness of unpuddled ground, so we’ll just Add that to the alpha channel of the puddle texture sample from earlier (since the alpha value is the same as the greyscale colour of the texture) and stick that into the Smoothness channel of PBR Master.

Ripples
Now we’ll add the ripples. This is a bit more involved than the simple steps we’ve made so far. To break it down, we’re going to turn the ripple texture into normals and pass those into the Normal field on PBR Master. To do that, we need to pick the correct ‘animation frame’ from the texture, which contains a 3x3 set of frames. And, to apply the ripples to the puddle correctly, we need to tile the ripples appropriately and factor in the portions of the ground where puddles exist. We’ll start by calculating the appropriate UV tiling. Unity provides a useful Tiling And Offset node which we can pass the Raindrop Tiling property into. However, it doesn’t quite do everything we need - this node doesn’t seem to clamp the UVs between 0 and 1, so we’ll pass its output into a Modulo node with a value of 1. You’ll see what’s happening by looking at the preview:
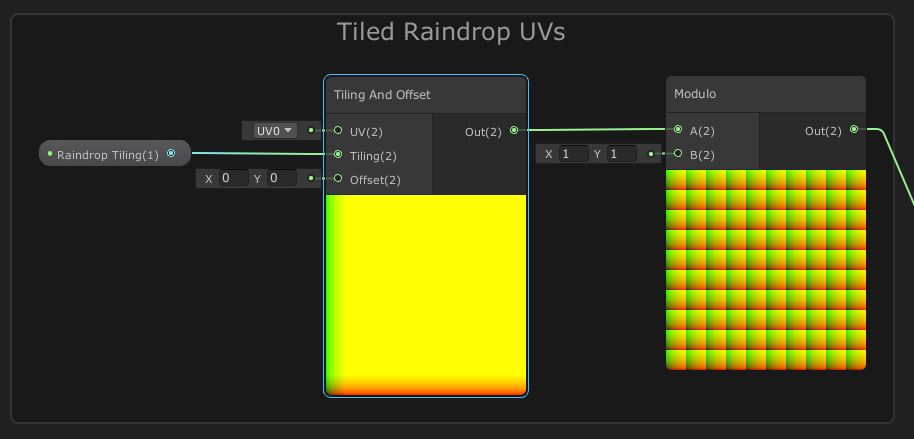 We need the
 Modulo step to make sure the UVs are applied correctly.
Next, we need to determine which animation frame to pick. Use a Time node’s regular Time output and Multiply it by the Speed property. Then, Modulo by 1 to get a value between 0 and 1 - this gives us a cycle. Multiply that by the number of animation frames - in our case, that’s 9 - then pass that into a Truncate node to get rid of whatever’s after the decimal point. Now, we have an integer which goes from 0 to 8 over time - because of the way Modulo works, it’ll never quite reach 9, which would break this whole thing. We can use this to pick the correct animation frame using a Flipbook node, which takes in a UV (we want the tiled UVs we just calculated), a Width and Height (both are 3) and a Tile parameter; the Truncate node gets fed straight into Tile.
This node outputs an appropriate UV coordinate which can be used to sample an animation texture - make sure you also tick the Invert Y option but not Invert X, because the default behaviour is to read frames left-to-right, bottom-to-top, but I created the texture left-to-right, top-to-bottom, because that’s how I read normally. Finally, connect that to the UV channel of a Sample Texture 2D node and sample the Raindrop Sheet texture. When Speed is set to 1, you’ll see the preview for the texture animate at a slick nine frames per second, just like the PC Master Race intended.
 The next-generation consoles might be targeting 120 frames per second, but I think the real power play is 9.
From this, we’ll turn the greyscale values into a normal map using a Normal From Height node. Before we can use that node, Multiply by the result of the Raindrop Strength Multiply we did earlier. The Normal From Height node uses the greyscale colour as a heightmap of sorts and calculates the normals based on that. Output it directly into the Normal field on PBR Master.
We’re done with the graph now - if we apply it to the ground, we should already see a rain puddle as intended:

The nice thing about using normals for the ripples is that they interact with Unity’s lighting system, so you get these sparkles where the light reflects just right - these are amplified by any Bloom effects applied to your camera. If you don’t like this, you can modify the strength of the normals accordingly, or turn down the Bloom post-processing effect. Now let’s add some rain particles falling into the puddle to make things look right.
Rain Particles
Visual Effect Graph is the modern equivalent of Unity’s Shuriken particle system. Like how Shader Graph gives developers a visual scripting environment for working with shaders, VFX Graph moves particle systems away from the narrow, cluttered Inspector window and into a graph environment with a whole two dimensions of scrollable workspace to use. The old built-in particle system still exists and holds up very well, although its UI contained a lot of redundant information - all the modules you weren’t using were still displayed in the list. Not only does VFX Graph remove most of this information and thereby remove the clutter problem, it allows you to add notes and organise your particle systems how you want. VFX Graph runs on the GPU, so it promises millions of particles where the old system promised thousands. With the sales pitch out of the way, let’s start working with VFX Graph.
You’ll need to install it first using Window -> Package Manager -> Visual Effect Graph and clicking Install. Once it’s installed, also go to Edit -> Preferences -> Visual Effects and click the Experimental Operators/Blocks option - this will enable a few features required for our particles. I created a new Visual Effect at VFX/Rain.vfx by right-clicking in the Project window and selecting Create -> Visual Effects -> Visual Effect Graph. You can add the particle system to the scene by dragging it from the Project window into the Hierarchy - I’ve positioned mine 10 units in the air so that particles can fall downwards from there.
 A brand new VFX Graph already has a handful of blocks.
Let’s step through the graph. At the top you’ll see a Spawn Event which lets us control how particles are spawned into the system. By default it has a Constant Spawn Rate block, but you can also add a Single Burst or Periodic Burst if you want a system to spawn several particles at once, or a Variable Spawn Rate if you want the system to spawn faster or slower at certain points. To add a block, hover somewhere inside the Spawn Event and press Space, then select the block you want. Or, right-click and select Create Block. We’ll keep the Constant Spawn Rate but bump up the rate to a much higher value like 1500.
Next is the Initialize Particle Context. Contexts are how Visual Effect Graph organises blocks - everything inside the Initialise Particle context is related to the start state of the particles - here, we can set the particle’s initial size, velocity, lifetime, colour and so on. Like in the existing particle system, we can set all those variables using constants, curves or randomness. For our rain, it’s easiest if we use a constant lifetime, so remove the default Set Lifetime Random block by left-clicking it and pressing Delete, then add a Set Lifetime block with a lifetime of 5 seconds. We’ll also Set Size at 0.1, and add a downwards velocity with a small amount of randomness along the x- and z-axes, so use a Set Velocity Random block using -4 for the y-axis, and between 0.1 and 0.2 for the other axes.
We also need to set the position of particles inside Initialize Particle, so use a Position (AABox) block. For our basic scene, all we need is a thin box in the air - set the size to (7.5, 1, 7.5). You could also use other Position blocks - I encourage you to play around with this and find a setting you like! We’ll also name this system by right-clicking inside the dotted line and selecting Name System - call it something like “Raindrops”. The Initialize Particle context also comes with a few properties which can’t be removed. First off is Capacity, which is the maximum number of particles which can exist simultaneously in the system - set this to the rate multiplied by the lifetime. Then, we need to set the bounds - the camera needs to be within these bounds for the particle system to be rendered. For our small scene, make this (100, 100, 100) and the effect will always be rendered where we want it to be. I’ve also found I need to select the VFX effect asset and change the Culling Flags option to Always recompute bounds and simulate.
 We only need to add the blocks we use for our Visual Effect.
Next, skip over the Update Particle context for now and go to the Output Particle Quad context. There are several types of output contexts you can use instead of Quad, but luckily Quad is just what we need. We don’t need the Set Size over Life block, so go ahead and remove that. We start with an Orient block, but we want the rain particles to orient themselves in their direction of travel, or else we’ll have raindrops travelling at an angle, but visually pointing straight down, and that’d look silly. Change its Mode to Along Velocity. You’ll notice some variables on some blocks have tiny circles like those in Shader Graph - that’s because we can use properties in the same way in VFX Graph. Go to the Blackboard in the top-left corner and use the plus arrow to add a new Gradient property, and call it Rain Color. I’ve made the default a dark, low-opacity blue colour which fades in and out at the ends - tick the Exposed option if you’d like to override this option on instances of the VFX. We can drag this property onto the graph and connect it to the Color pin on Set Color over Life.
This context also comes with a few built-in variables. We’ll skip over most of them and pay attention only to the Main Texture variable - we need to set this to a raindrop texture. I’ve included one under Textures/Rainfall.png - feel free to attach that one or use your own.
 We can use properties like those in Shader Graph.
Now let’s go back to the Update Particle context which we conspicuously skipped over. Our particles don’t need to do much except fall downwards, and because we set the downwards velocity already, we don’t need to modify it in Update. However, it’d be nice if we can spawn rain splash particles when the raindrops hit the floor. For this, we need to add collision to the floor, kill the particles upon collision, and trigger an event when particles die to spawn a rain splash. This is one instance where VFX Graph is a bit more cumbersome than the built-in particle system, perhaps owing to the fact it is driven by the GPU, which makes passing data between the visual effect and the physics engine a bit harder. Instead of interactions with regular Colliders in the scene, we define collision surfaces inside this graph. Go ahead and add a Collide with AABox block. This defines a cuboid which our particles collide with - we can make them bounce off the collider or add friction so they lose a proportion of their velocity on impact. However, we don’t care about those options - we want to kill the particle upon collision, so set the Lifetime Loss variable to 1, which means 100% of the particle’s remaining lifetime will be lost. You’ll have to play around with the Center and Size properties of the box according to your scene, or just use the values I’ve used.
Following this, we need to spawn a rain splash when a rainfall particle dies. We can use a Trigger Event On Die block - we needed to enable experimental blocks earlier specifically for this reason - which fires a particle subsystem upon particle death. From the Evt variable, drag out a new GPUEvent block.
 We can fire subsystems using trigger events like these.
From the GPUEvent context, we can create an entirely new secondary particle system. It’ll need its own Initialize Particle, Update Particle and Output Particle Quad contexts; although we will leave the Update context empty, it still needs to be present. We can name this system in the same way as the primary system - call it “Rainsplash”. The Initialize context is straightforward - set the Capacity to 7500 (this setting acts upon all secondary particles, not just the capacity of individual GPUEvents) and add a Set Lifetime block with 0.25 seconds, a Set Size block with a size of 0.075, and finally an Inherit Source Position block, which places this particle at the location of the raindrop collision.
 Secondary effects are structures just like the primary one it branches off.
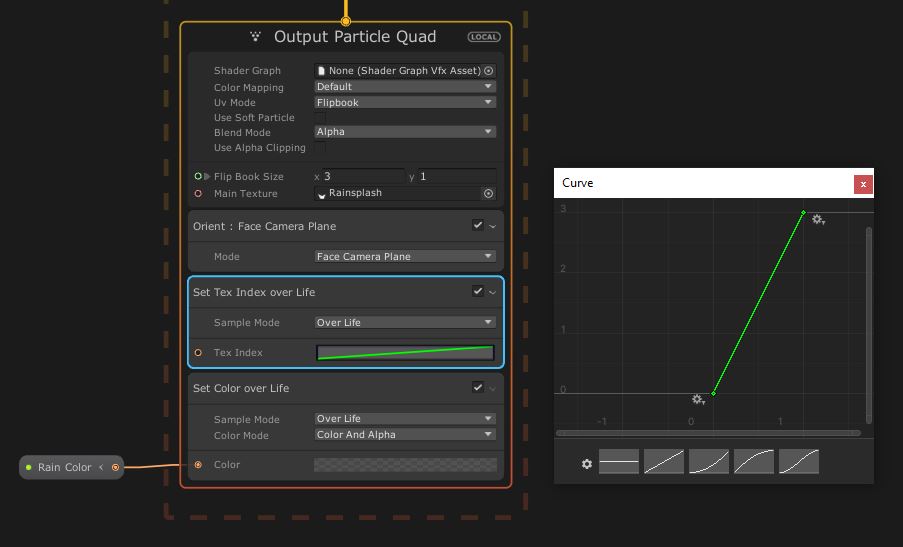
The final step is the Output Particle Quad context. This is a little different to the other output context because the rain splash particles are going to be a flipbook animation with three frames.
 Feel free to improve on what I’m charitably calling my “texturing skills”.
We can add two easy blocks first: we want these particles to face the camera, so add an Orient block with the Face Camera Plane mode, then add a Set Color over Life block using the same Rain Color property as before. To make this particle use a flipbook texture animation, we can set the UV Mode of the context to Flipbook, then set the Flip Book Size to (3, 1) - if you’re using your own flipbook, then those numbers might differ. Set the Main Texture to the rainsplash flipbook, which I’ve added at Textures/Rainsplash.png. All that’s left to add is a Set Tex Index over Life block, which changes the stage of the flipbook over the lifetime of the particle. Open the gradient editor for the Tex Index variable and create a straight line with endpoints at (0, 0) and (1, 3).
Now that the visual effect is complete, we can see the rain and puddle effects working together in motion! To make the scene a bit moodier, I turned the lighting slightly darker blue, lowered the intensity, and turned the skybox slightly dark blue.
Conclusion
The flexibility of Shader Graph and Visual Effect Graph make it easier than ever to create effects in Unity, and if you’re experienced with one then the other will likely feel familiar enough that it shouldn’t be too difficult to get to grips with it. Using these systems in tandem, we were able to make a rain effect using raindrop particles falling onto a surface with a custom material.