Lately, I’ve been really into Pokémon. I’ve been playing Pokémon Sword and Shield, two games which are unanimously loved by the fanbase, and for the first time ever in a Pokémon game I even finished the Pokédex, including the Isle of Armour DLC. But that’s not the only Pokémon game that’s been on my mind lately. Earlier this year, Pokémon Mystery Dungeon: Rescue Team DX, a remake of the Game Boy Advance and Nintendo DS originals, released on Nintendo Switch, with full 3D models and a fetching hand-drawn art style. I promise this tutorial isn’t just a sales pitch for the Pokémon series - today, we’re going to make a shader similar to (but not exactly mimicking) the hand-drawn style of PMD.
Drawing Shader
Some of you might be thinking: “but Dan, didn’t you do this shader already in your Image Effects series?”. And you’d be right! However, due to being an image effect, we applied the drawing texture to the entire screen instead of just an individual model. This time, I want to customise the effect for each model it’s being applied to. This gives us more control over how the drawing effect gets rendered, too; we can apply the drawing texture in screen space, which will look identical to the image effect version, or we can apply the drawings using the model’s UV coordinates, so the pencil sketches line up with the contours of the model.
Let’s run down the components of this effect. A drawing effect like this is commonly called a “hatching” shader, after an art technique which involves drawing parallel lines to add shade. In PMD, the hatching effect isn’t applied to every part of the image uniformly. Instead, it’s most prominent on shadowed areas of the scene, with bold black lines seen underneath Pikachu and underneath the tree in the following screenshot:
 An appropriate usage of the Shocked Pikachu meme.
If you play the game or watch a trailer, you’ll probably also notice that the texturing on the Pokémon seems to stay static - it looks like the painting texture is applied in screen-space. Finally, most of the objects in the game have a cartoonish outline so that everything stand out. I’m going to combine the spirit of the shadow lines with the paint texture to arrive at an effect which slathers pencil lines over whatever object you’d like. I like the idea of animating the pencil lines over time to look like the model is being sketched in realtime. We’ll start with a quick outline shader.
Geometry Outlines
There are many ways to paint outlines on objects in Unity and Shader Graph. One way, if you’re using post processing, is to run a shader that detects the edges of an object by calculating the difference in colour, normal vector or depth of the neighbouring pixels - this gets you very accurate edges, but it’s a bit harder to do in URP with Shader Graph and it’s a bit overkill for our effect. Instead, we’re going to do an age-old trick: copy the object geometry, scale it up slightly, and render only back-faces which are tinted dark.
For my examples, I’m using a Pikachu model stolen from the Internet which already has several materials attached. Luckily, we can just add an extra material slot using the outline shader. To get started, create a new Unlit graph by right-clicking in the Project window and selecting Create->Shader->Unlit Graph. It’s a bit more complicated than you’d think to render only back-faces in Shader Graph, because there’s no single option to do so. First, you must select the cog menu on Unlit Master and tick the Two Sided option. This will render both the front and back faces, so next we need to disable front-faces. We can do that by checking whether the fragment being rendered is on a front or back face and setting its alpha to 0 or 1 accordingly. For that, we have access to the Is Front Face node, which we’ll output to the Predicate field of a Branch node. Set the True value to 0 and the False value to 1 then connect the output to the Unlit Master Alpha field and set the Alpha Clip Threshold to 0.5, which will make front faces invisible. I think it’s a shame you can’t just select back-face-only rendering as a simple option somewhere, but at least we can hack our own solution.
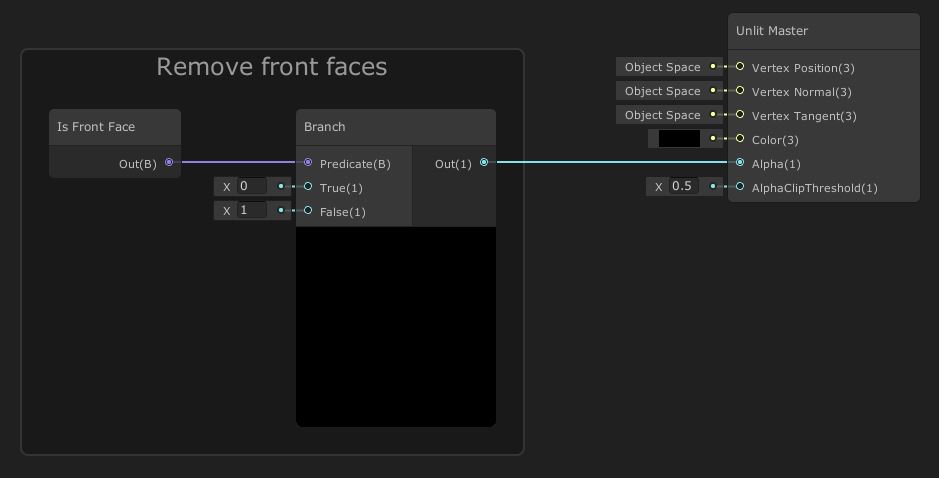 For some reason, this isn’t a simple drop-down option anywhere, but we can get round it ourselves.
Now we’ll blow up the mesh slightly. This will happen in the vertex stage of the shader, so the following code will run on each vertex of the mesh rather than its fragments. First, add a new Vector1 property to the graph using the plus arrow on the Blackboard and name it Outline Thickness (with a default value of, say, 0.02) - this controls how many Unity units the mesh will expand by. On the graph, start by adding a Normal Vector node in Object space, set the vector’s magnitude to 1 with a Normalize node, then Multiply the result together with the Outline Thickness property. Grab the vertex position using a Position node, also in Object space, then Add it to the output of the previous Multiply. Pipe the output into the Vertex Position field on Unlit Master, select Save Asset in the top-left corner of the Shader Graph editor, and our outline shader is complete!
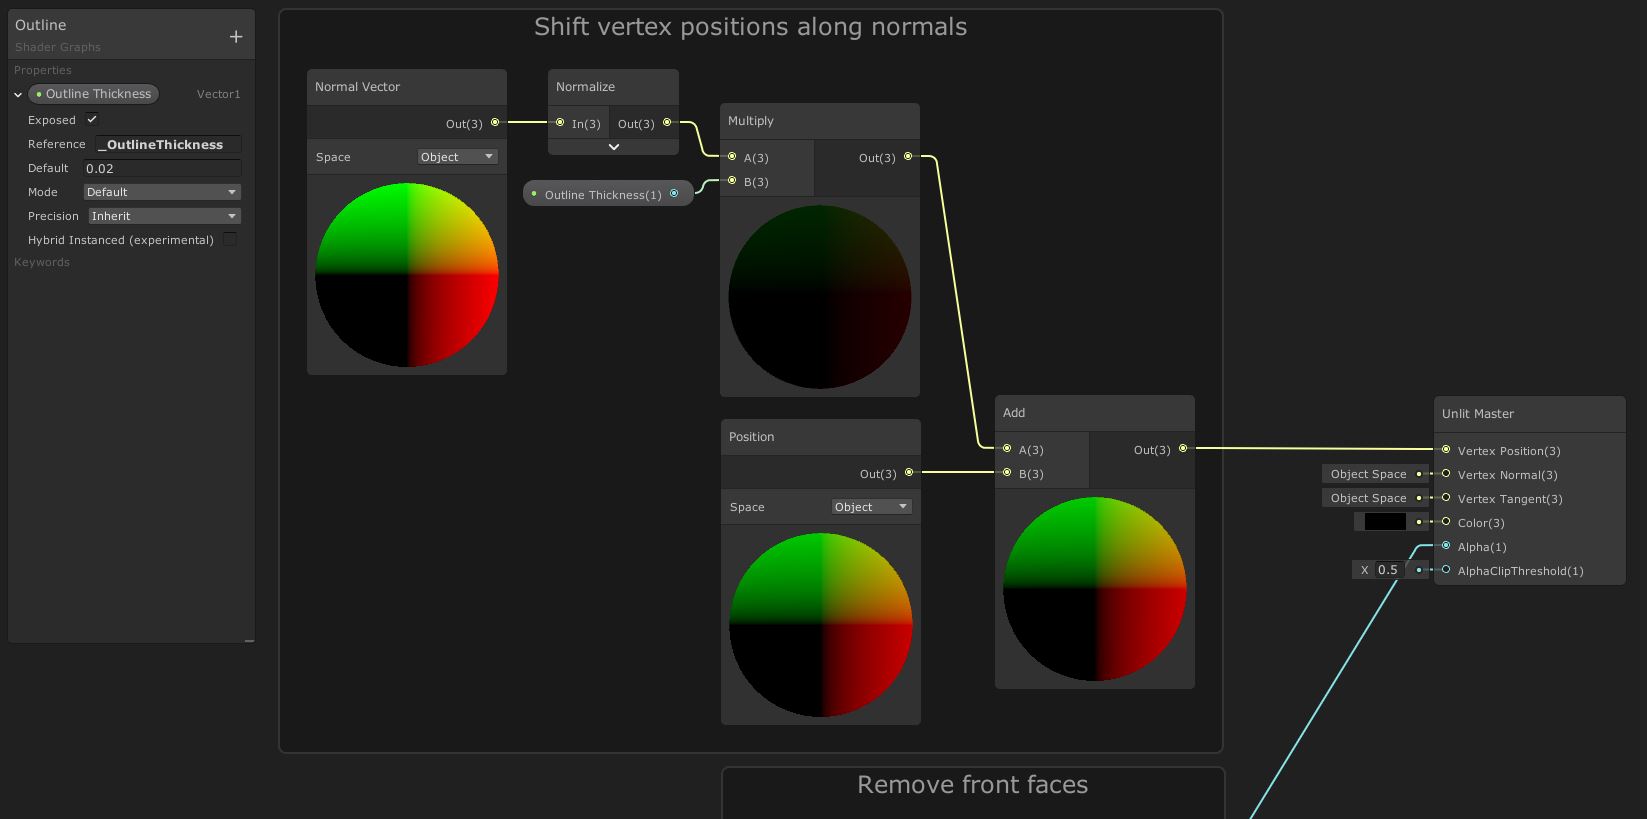 It sounds a lot cooler if I say we’re “exploding the mesh”.
If we put this material on the Pikachu mesh, we get something like this. It’s definitely good enough for our purposes, even if we could put in more work for a better effect.
 Copyright infringement.
Hatching
To achieve the hatching effect, we’ll use a texture I made beforehand. We’re going to set up a timer that will let us animate the texture, then we’ll sample that texture twice - one time it’ll be larger than the other sample - then average them both. That texture will be used twice: to add a small UV offset to the main texture so that it looks sketched with a pencil a bit, and to add to the main texture’s colour.
We’ll kick off with a new shader called “Hatching” - make it another new Unlit Graph (although you can make it a PBR Graph if you’d like lighting and everything will work the same). The first thing we’ll add is the animation, for which we’ll add a Vector1 property called Speed (with a default of 2.5). The animation is going to set up a UV offset value that switches between a value of 0 and 0.5. Add a Time node and Multiply its Time output with the Speed property, then Modulo that value by 2. This results in a clock which rises to 2 then resets immediately to 0. However, we want the animation to switch between values with no smoothness in between, so Floor the clock value and you’ll see it blink between black and white - we used modulo 2 so that the clock spends half its time floored to 0, and the other half of the time floored to 1. Finally, Multiply by 0.5.
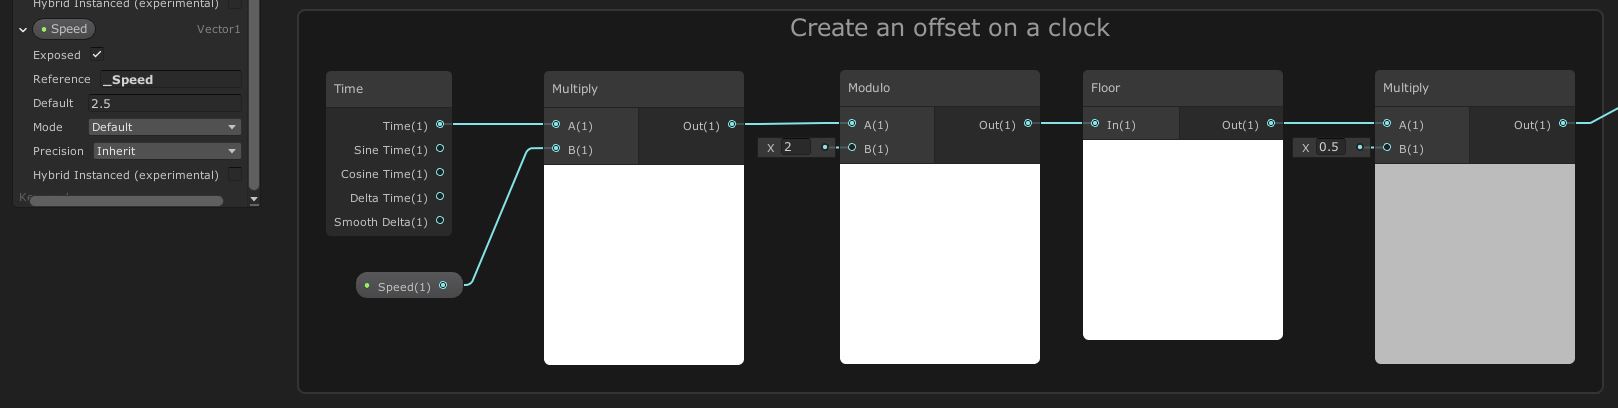 Tick, tock, tick, tock.
Next, we’re going to sample the hatching texture. Before we can do that, we need a Hatching Texture property of type Texture2D, and two new Vector2 properties called Tiling and Offset, with values of (50, 50) and (0, 0) respectively. We’re going to apply the hatching in screen space, so we start off with a Screen Position node, but to make sure the hatching texture isn’t stretched on the x-axis, we need to divide by the screen’s aspect ratio. We do this by using a Screen node, which gives us the pixel resolution of the screen, and dividing its Height by its Width. Multiply that by the Screen Position node. Before we use this UV to sample the texture, pass it into a Tiling And Offset node, using the Tiling property for the Tiling input, and the Offset property multiplied by the result of the animation clock for the Offset input. Now we can use this in a Sample Texture 2D node with the Hatching Texture property! If we just use one sample, then the texture will very obviously tile, so we’ll use a second sample. For this, take the output of the Tiling And Offset node and Multiply by, say, 0.37 (or whatever similar value looks good to you) and use that as the Sample Texture 2D UV input - this will give us a ‘larger’ texture. Use a Lerp node with a T value of 0.5 to mix the two samples together. This gives us our final hatching value.
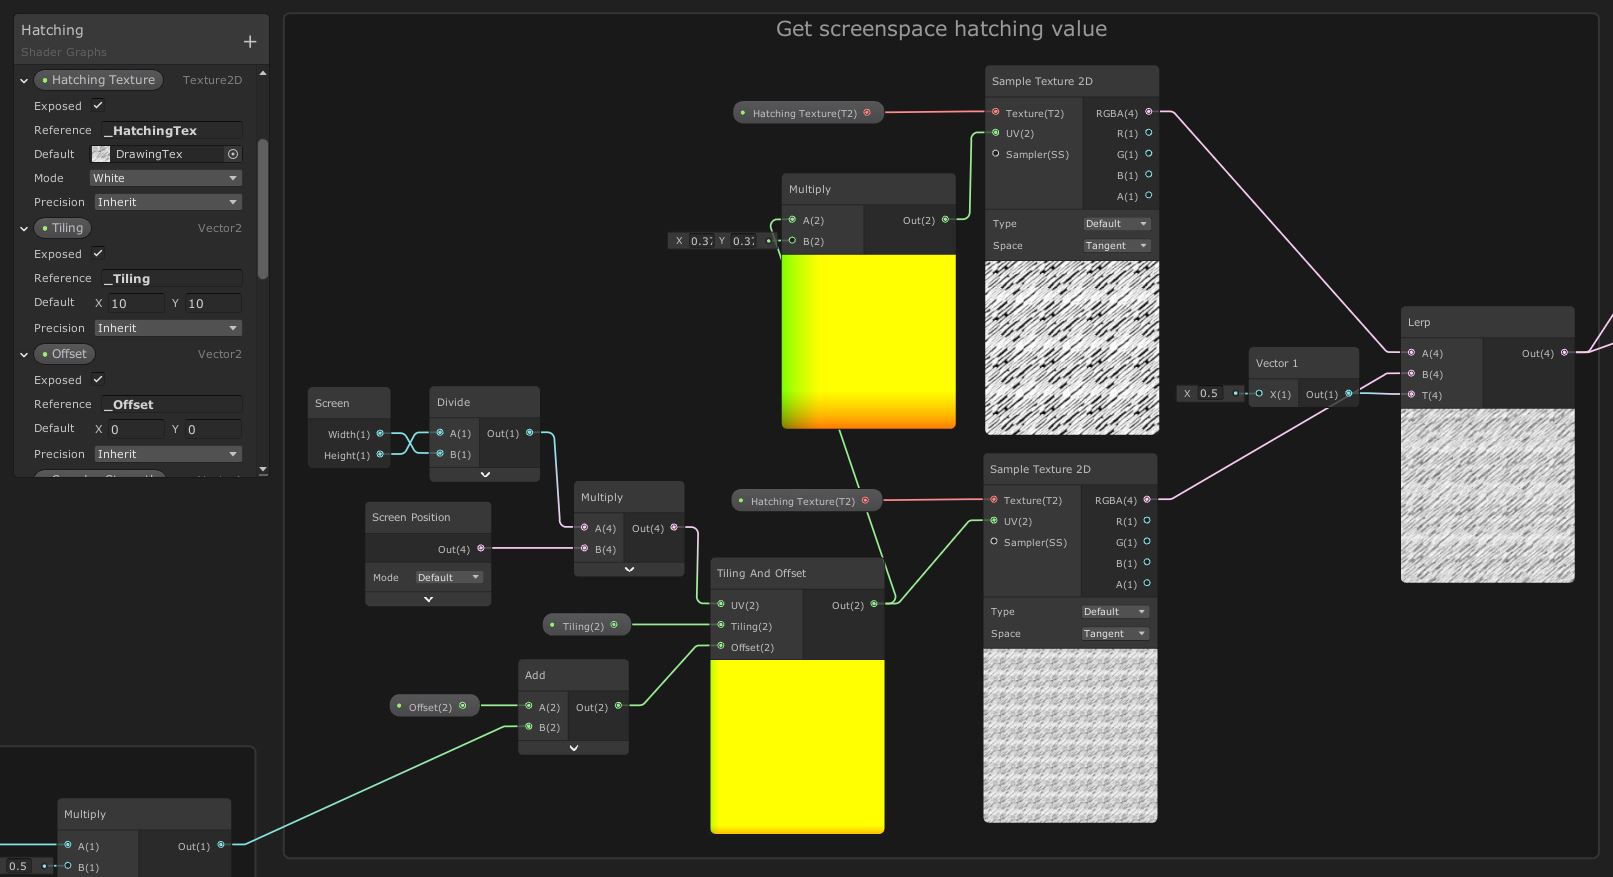 When I read “hatching value” in the context of Pokémon, I have flashbacks to shiny hunting.
Now we’ll apply it to the model. We’ll need three final properties: Main Texture, a Texture2D; Smudge Strength, a Vector1 with a default of 0.002; and Drawing Strength, also a Vector1, with a value of 0.35. Smudge Strength will control how far the UVs of the Main Texture sample gets offset, and Drawing Strength controls how strongly the hatching texture is overlaid onto the Main Texture.
Start off with a UV node to get the model’s UVs. To this, we’re going to add an offset based on the hatching strength. Currently, the hatching value is between 0 and 1, but we want the range to be between -0.5 and 0.5, so Subtract 0.5 from it. Then Multiply by Smudge Strength and Add it to the UV node output. Use this value as the UV input to a new Sample Texture 2D node to sample the Main Texture - this gives us a base texture to apply to the model.
Now we want to apply the hatching value to modify the colour of the model. For that, we can use the value between -0.5 and 0.5 that we just calculated and Multiply it by the texture sample we also just calculated. Lerp between the pure texture sample and the multiplied texture sample in the A and B slots respectively using the Drawing Strength in the T slot. Output that to the Color slot on Unlit Master and we’re done! Save the asset in the top-left corner and look at the result in the Scene View.
 Finally applying some Pikachu colour.
Conclusion
As with most of my tutorials, you can go a long way by just using textures in a novel and weird way. We started off by creating geometry-based outlines, which is a bit more complicated in Shader Graph and URP than you’d expect. Then, using just a basic drawing stroke texture in screen space, we modified the UVs of the base texture and the luminance of the image to arrive at an animated drawing aesthetic.