Prefabs have been a core Unity feature since the very first release of the engine. The basic purpose of a prefab is to bundle up assets and behaviour into pre-defined units which can be cloned in-editor or at runtime, saving us the trouble of creating the individual components of a GameObject and binding them together whenever we want to clone something. We can also override some of the properties of a prefab in the editor, and those changes will be propagated to all instances of the prefab in your scene. In this tutorial, we’ll look at what other features prefabs have and some examples of how they might be used in your projects. This tutorial was created with Unity 2019.3 in mind, but many of the concepts will apply to previous versions.
Prefab Basics
If you come from a programming background, you might find it useful to think of a prefab and its instances in the same way you think of a class and instances of that class. If you’re not a programmer, the prefab is like a blueprint for a house which defines its layout, dimensions, positions of doors and windows, and so on; the built houses themselves are instances of that blueprint which we can interact with. Prefabs, at their core, are GameObjects with scripts, meshes, textures, materials, colliders and all manner of other Components attached with their variable values tweaked, and we are telling Unity: “I want to use this object, with these exact components and values, in my scene at least once”. The powerful thing about prefabs is that we can create several instances of them and they’ll all be clones of the prefab, and any changes we make to the prefab will be propagated across each instance. The non-prefab alternative is to copy and paste a basic GameObject a bunch of times, but the big drawback is that changes to the original GameObject don’t get propagated to the copies.
Creating Prefabs
Let’s talk about using prefabs in practice. Prefabs are held inside the Project window as prefab assets - to create one, drag any GameObject from the Hierarchy to the Project window - any attached scripts and child GameObjects will also be included in that prefab. The small icon for the object in the hierarchy will change to a blue cube and its name will turn blue - this is an easy way to tell which objects in your scene are prefabs. Conversely, if you were to then delete the source prefab, then the object’s name in the Hierarchy will turn red to signify that its source prefab is missing. If we want to create multiple instances of the prefab, then that’s easy - we can duplicate any instance that’s already in the scene, or we can drag the prefab asset from the Project window onto the Hierarchy or into the Scene View.
Updating Prefabs
Now that we’ve created a prefab, let’s talk about updating the values on that prefab. If we need to make a quick change such as modifying some script values, then it’s usually easiest to tweak the value on an instance, then select the Overrides drop-down. Unity will list every difference between the source prefab asset and this prefab instance, which we can Revert or Apply, individually or all at once.
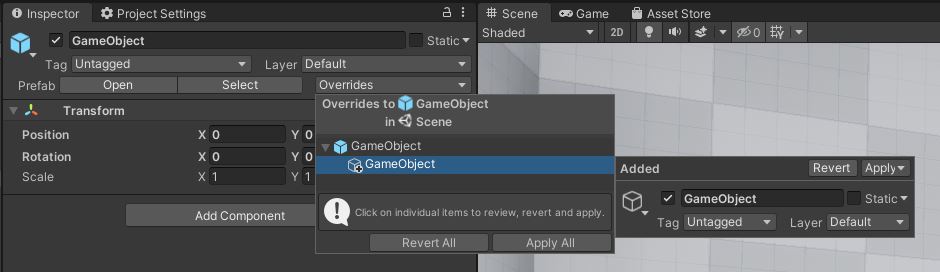 Overriding a prefab to add a new child
 GameObject.
The other way to modify a prefab is to enter Prefab Mode. You can either select the tiny right-facing arrow icon to the right of a prefab instance’s name in the Hierarchy, click the Open button seen on the screenshot above, or double-click the prefab asset in the Project window, and Unity will bring up a Scene View-like window containing only the prefab. Any changes or additions you make to the prefab’s scripts or children here will automatically get saved to the prefab asset. The Select button in the screenshot finds the prefab asset inside the Project window and highlights it for you.
Instance Overriding
It’s worth mentioning that you can change properties on a prefab instance without applying those changes to the prefab asset. You can perform any script variable modification, component addition or removal, or child addition or removal you want, and if you choose not to Apply the changes, then that specific instance will be different to other prefab instances; this is called an instance override. This is helpful if you need a few objects which are almost exactly the same, but have a very small handful of different properties - those modified properties won’t get updated if the prefab asset changes, but any unmodified properties will.
Unity displays which properties have changed by making script variable names bold and adding a small blue line next to the name. for added components, a blue line will be added next to the entire components and a plus sign will be displayed on the component’s icon, and for removed components, its name will still be visible in the Inspector, but it’ll be greyed out with a minus sign on the icon. However, doing this extensively can leave your Hierarchy looking a bit messy. If you find yourself needing to make small changes constantly, you might find the section on Prefab Variants helpful.
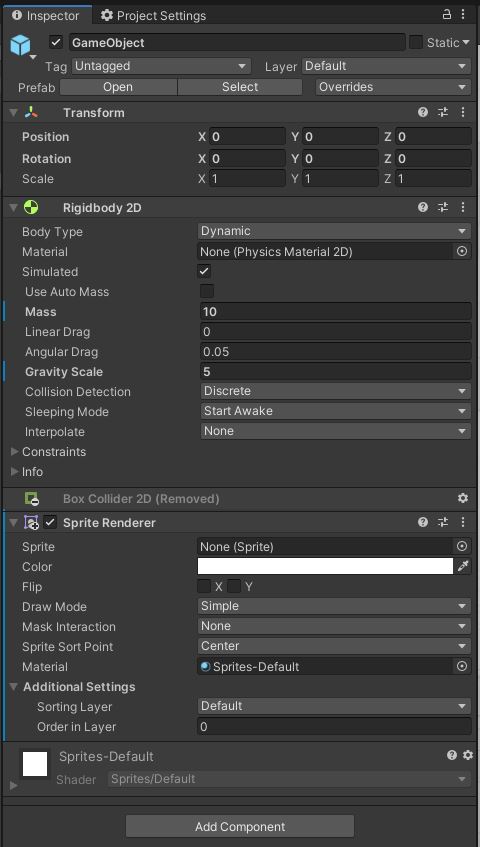 Changes and additions are marked in blue, and removals are greyed out.
There are a few things you can’t override. For starters, you can’t delete child GameObjects of the prefab instance which are part of the prefab asset (but you can add new child GameObjects), and you can’t rearrange the order of prefab children in the Hierarchy. Deactivating them or adding/removing components to/from any child is fine - you just can’t delete or rearrange them.
Nested Prefabs
One of the biggest feature requests Unity has had since 2005 was nested prefab support - the ability to include a prefab inside another prefab. It took a staggering 13 years for them to be added in Unity 2018.3. This is in stark contrast to Godot Engine, which seems to bundle Unity’s idea of scenes and prefabs into just one construct - scenes - and has built its scene system using the concept of instancing scenes within scenes from the start. It’s a super flexible workflow and I’m happy they’re now part of Unity!
To nest a prefab, it’s dead easy. If we drag a prefab instance, which we’ll call Nested, onto any other prefab instance, which we’ll call Master, we can apply those changes to the Master prefab and now we’ve got one prefab nested inside another. You’ll not only see a Prefab Mode arrow for the Master prefab instance in the Hierarchy, but you’ll see an additional one for the Nested instance. Any changes to the Nested prefab will get propagated even to the instance nested under the Master prefab; in previous versions of Unity, it “forgot” that the Nested instance was connected to a prefab entirely.
When overriding properties on the Nested instance in the scene, you have two choices when applying the changes. The Overrides drop-down won’t appear on the Nested object, so you’ll need to use the one on Master - if you select an individual change to Nested then you’ll notice two options. The first option is to Apply as Override in Prefab ‘Master’, which does not modify the Nested prefab asset in any way, but propagates the override to all Master prefab instances. The other option is to Apply to Prefab ‘Nested’, which will propagate the change across all Nested prefab instances.
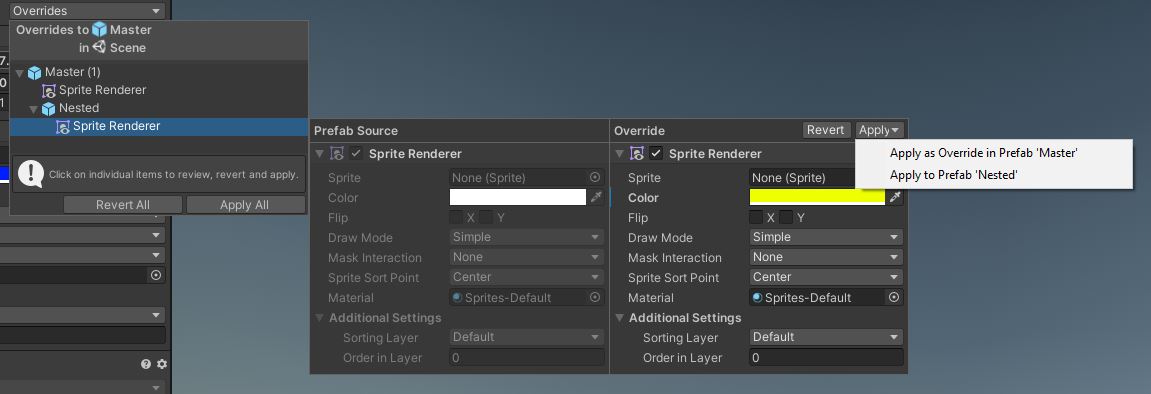 You can override a nested prefab on the master/parent, or the nested child.
Prefab Variants
It’s generally considered good practice to keep everything, even objects which will exist once in a single scene, saved as prefabs. However, there are plenty of reasons you’d want to make changes to a prefab - perhaps you have an enemy prefab, but some enemies are differently coloured and do a bit more or less damage than other variants of that enemy. That’s where prefab variants might become useful. They’re very easy to create: override a few variables on a prefab instance, then drag the instance into the Project window and choose “Prefab Variant” on the dialog box. Alternatively, right-click the prefab asset in the Hierarchy, and select Create -> Prefab Variant. The icon for prefab variants has grey stripes on one side of the blue cube.
If you want to modify the properties on a prefab variant, you can make those changes on a prefab variant instance inside the Hierarchy/Inspector, then use the Overrides drop-down to propagate those changes to the prefab variant asset. This works the same way as overriding regular prefab assets. You can even leave certain properties overridden on prefab variant instances without saving them to the asset - instance overriding works the same way as before.
You can open the prefab variant in Prefab Mode the same way as other prefabs, but some things work differently. Any changes made in this mode are automatically propagated to all prefab variant instances. However, unlike regular prefabs, a prefab variant will have the Open, Select and Overrides controls enabled in this mode. You can make changes to the prefab variant in this window, but be warned: choosing to use the Overrides drop-down will override the base prefab, NOT the prefab variant. Use this drop-down carefully.
Unpacking Prefabs
If you have a regular prefab instance in your scene and you want to turn it into a regular GameObject, you can right-click it an select Unpack Prefab. Now that this GameObject is disconnected from any prefab asset, any changes to an asset won’t propagate to the GameObject. However, any nested prefab instances will remain as prefab instances, and unpacking a prefab variant will turn it into an instance of the base prefab. If you don’t want prefab variants or nested prefabs to behave like that, select Unpack Prefab Completely instead - that’ll turn everything into a regular GameObject no matter what type of prefab it was. It’s also possible to remove nesting from a prefab by going into Prefab Mode on the “outer” prefab and selecting Unpack Prefab on the nested prefab, at which point it becomes a regular child of the outer prefab.
Instantiate
Now that we’ve covered all the basics, it’s time to create prefab instances at runtime. As you’ll very well know if you’ve been using Unity for a while, the Instantiate function can be used to create a clone of any GameObject, including prefabs: all we need is a reference to the prefab. A very basic script that takes a prefab and creates a new instance looks like this:
using UnityEngine;

public class CreateObject : MonoBehaviour
{
    public GameObject prefab;

    private void Start()
    {
        var prefabInstance = Instantiate(prefab);
    }
}
Generally speaking, you’ll use Instantiate to spawn objects into the scene at runtime wherever the player, an enemy or any other entity needs to create new objects which weren’t already present in the scene when it was loaded. You can also specify the position and rotation of the clone in world space - if you leave those out, the position and rotation of the prefab will be used. By default, Unity will place the clone in the object hierarchy with no parent, but you can specify a parent object and choose whether to position the clone relative to that parent or in world space. See more details on the Scripting API page for Instantiate.
However, Instantiate gets a lot of flak for being slow, and that’s because it gets used a lot for things like spawning bullets from a gun, which, if you have several people shooting in your game, could end up spawning several objects every frame. The problem is two-fold: firstly, cloning an entire object is quite slow, because you need to create the base GameObject and all scripts attached to it, as well as all child objects. The more complicated the prefab, the more expensive this is. Then there’s a second hit when the object is removed from the game - usually, if you’re using Instantiate to create objects on the fly, you’re probably also using Destroy to remove them once you’re done with them. Doing this often can result in huge garbage collection issues. We actually discussed the problems with Instantiate and Destroy back in Unity Tips Part 1, so please check that out if you want to know more!
Conclusion
This Unity Tips was a little shorter than usual! We discussed the different types of prefabs in Unity, some of which were only added recently - if you’re the kind of older Unity user who finds it difficult to keep up with every addition to the engine (and there have been a lot of new features added lately!) then hopefully you learned a bit about how prefabs work in the newest versions of Unity.