The MonoBehaviour class is probably the class you most commonly inherit from in Unity. It derives ultimately from UnityEngine.Object through a couple of other classes and represents an object which must be attached to a GameObject to function properly – they are user-created Components. However, there is another core class built into Unity which inherits directly from UnityEngine.Object but does not need to be attached to a GameObject to function: ScriptableObject. Let’s explore this powerful class and its features.
Data Storage
The primary usage for scriptable objects is to store data inside a Unity asset as an alternative to reading data from a file at runtime or containing the data inside a component attached to a GameObject. Unity assets are anything found inside the Project pane – audio clips and scripts fall under this category too. Creating a new type that derives from ScriptableObject works the same way as for any C# class – colloquially, when we inherit this class, we will say that we’re “creating our own types of scriptable object”.
using UnityEngine;
public class NewSO : ScriptableObject
{
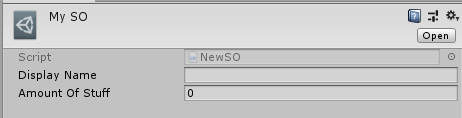
public string displayName;
public float amountOfStuff;
}
As with MonoBehaviour, the ScriptableObject class is contained within the UnityEngine namespace. Now we’ve created our first type of scriptable object! We can’t yet create instances of it inside the Editor without creating an Editor menu, but since it’s a class like any other, we can create instances of NewSO at runtime. The only special consideration to make is that the instance should be created with the ScriptableObject.CreateInstance method rather than the new keyword due to the way Unity serialises objects. We will discuss serialisation in greater detail throughout the article.
var thing = ScriptableObject.CreateInstance<NewSO>();
You may use a scriptable object to store data at runtime like this, but you’d get similar results from creating a base class type. The real power comes from manipulating data in the editor outside of Play Mode, and for that we need to add the CreateAssetMenu attribute just above the class definition of NewSO. This enables a menu which we may use to create instances of NewSO in-editor.
[CreateAssetMenu(fileName = "NewSO", menuName = "Tutorial/NewSO", order = 1)]
public class NewSO : ScriptableObject
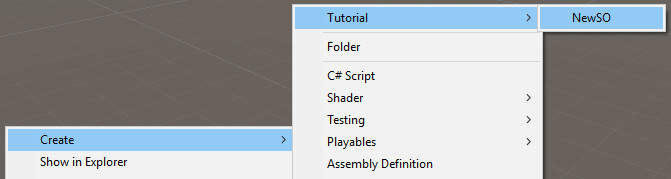
The menu is available by right-clicking in the Project view or using the Assets->Create menu on the toolbar. You can tweak the location of the option using the menuName and order variables, and the default name of the resulting asset file using the fileName variable. The result will be a new object in the Project view in whichever folder is active.
Let’s look at a few ways we can use this powerful tool to overhaul our projects.
Asset-based Variables
A good measure of how easy it is to change a piece of code without far-reaching ill effects is if there are few other parts of code that rely on it. Two portions of code are called decoupled when a small modification to one requires no or very minimal changes to the other. In order to make code easy to change, as is especially common in game development, it’s a good idea to keep classes as loosely coupled as possible.
On top of that, the Unity Editor’s interface is geared towards designers. While it’s possible to expose variables to designers inside the Inspector through use of regular MonoBehaviour components, it can be clunky because you must attach them to a GameObject which needs to be instantiated in the scene either in-editor, cluttering up the hierarchy, or at runtime, which requires extra code to instantiate the object. The designer must find the correct object instance in the hierarchy or prefab in the project view and modify values, which can be cumbersome.
C# Variables
Now picture the following. In my game, I have a Player class with an integer member variable to represent the player’s health. Other portions of the code, such as the UI, need to read that health value in order to display the health value. Let’s call that part of code PlayerUI. The ‘traditional’ way to do this is to reference the Player directly via a variable on the PlayerUI script and read the variable directly. Since the PlayerUI class directly depends on Player, those classes are closely coupled. The scenario gets even more complicated if additional classes such as enemy AI need to access the player’s health, but we’ll consider only the UI class for now.
public class Player : MonoBehaviour
{
    public int health;

    private void ChangeHealth(int change)
    {
        health += change;
    }
}
The Player class also contains a function for modifying its health, although the details of how that function is called isn’t important for this example. The following PlayerUI example uses a Text component to display the player’s health.
using UnityEngine;
using UnityEngine.UI;

public class PlayerUI : MonoBehaviour
{
    public Text healthText;
    public Player player;

    private void Update()
    {
        healthText.text = player.health.ToString();
    }
}
ScriptableObject Variables
We can work to reduce the coupling between the two classes. The following strategy comes from a Unite talk by Ryan Hipple. We’ll introduce a level of indirection between Player and PlayerUI. The Player updates a value contained outside of its class, and PlayerUI reads that value. We’ll create a new type of scriptable object to store the value.
using UnityEngine;

[CreateAssetMenu(menuName = "Variables/Int", order = 1)]
public class IntVariable : ScriptableObject
{
    public int value;
}
Now we can create a new asset in our project to represent the player’s health but first, we’ll need to modify the Player and PlayerUI classes to take advantage. Player no longer requires a public member variable to track health. Any code on the Player that previously updated its health member should now update health.value.
public class Player : MonoBehaviour
{
    public IntVariable health;

    private void ChangeHealth(int change)
    {
        health.value += change;
    }
}
Likewise, PlayerUI no longer needs to access the Player class directly. It can keep track of changes to the IntVariable that represents player health instead.
public Text healthText;
public IntVariable playerHealth;

private void Update()
{
    healthText.text = playerHealth.value.ToString();
}
Finally, we shall create the new IntVariable asset to store health by right-clicking the Project View and selecting it from the menu under Variables/Int. In the Inspector, you would drag this asset onto the health variable on a Player component so that it can write to the asset, and onto the playerHealth variable of a PlayerUI component that will read the asset.

Let’s evaluate the changes we’ve made. Player and PlayerUI are now decoupled, with a layer of separation between them. A significant change to the way Player handles health requires no change to the way PlayerUI reads health. Furthermore, this is more designer friendly. If the designer needs to tweak the initial value for the player’s health, they can find the corresponding asset rather than having to deal with a Player prefab, assuming the project directory is structured well.
Be mindful that changes to the IntVariable will persist when you exit Play Mode. To avoid this, you could choose to use this variable to represent maximum health and never change its value at runtime or opt to copy the public-facing value to non-serialised copy at runtime and use that during Play Mode.
Event Systems
Let’s expand this example and introduce the EnemyAI class into the mix. The enemies in our game become more aggressive when the player is below 50% of their max health – they must be informed when the player loses or gains health to cross that threshold in either direction. It’s also inefficient to update the PlayerUI every frame, so we’ll move its logic out of the Update loop and listen for player health changes in a different way.
C# Events
“Events enable a class or object to notify other classes or objects when something of interest occurs.” - MSDN Documentation
We’ll demonstrate this with C# events. The Player will define a special type of function called a delegate which is like a blueprint for a function with a return type and set of parameters. In our case, the delegate function will take two integers to represent the player’s health before and after their health changed. Then, Player defines an event whose return type is that delegate function. It can be quite confusing to wrap your head around the first time you use them, so let’s define these functions on Player and dissect what everything means.
public delegate void HealthChange(int before, int after);
public event HealthChange OnPlayerHealthChange;

private void ChangeHealth(int change)
{
    int oldHealth = health.value;
    health.value += change;

    OnPlayerHealthChange?.Invoke(oldHealth, health.value);
}
In this example, we have defined an event called OnPlayerHealthChange. Its return type is HealthChange, which is the name given to a delegate function with a return type void and two int parameters. Inside the health-changing function, we set the new value for health on the IntVariable we created earlier, then we call the event.
When you call an event – or “fire”, “send” or “raise” an event – C# will cycle through all subscribers to the event in turn and call a function on them. The ?. operator might look new – it’s the null conditional operator, which in this case means that the event stops execution immediately.
Currently, the event does nothing. Let’s look at how we subscribe to events by introducing the EnemyAI type.
public class EnemyAI : MonoBehaviour
{
    public Player player;
    private bool aggro = false;

    private void Start()
    {
        player.OnPlayerHealthChange += OnPlayerHealthChange;
    }

    private void OnPlayerHealthChange(int before, int after)
    {
        if(before > 50 && after <= 50)
        {
            aggro = true;
        }
        else if(before <= 50 && after > 50)
        {
            aggro = false;
        }
    }
}
The EnemyAI has a reference to the Player and a variable to denote whether it is aggressive. In its Start function, the enemy subscribes to the OnPlayerHealthChange event on the player by using the addition assignment operator, +=. Think of it like adding the enemy’s own OnPlayerHealthChange function to the player’s list of subscribers. You’ll notice that the function has two ints as parameters and a void return type – this function is the one that is delegated to. Now, when the player calls the event, its subscriber list will contain an entry for each EnemyAI.
We can also modify PlayerUI to listen on changes to the player’s health using the same event.
public class PlayerUI : MonoBehaviour
{
    public Player player;

    public Text healthText;
    public IntVariable playerHealth;

    private void Start()
    {
        player.OnPlayerHealthChange += OnPlayerHealthChange;
    }

    private void OnPlayerHealthChange(int before, int after)
    {
        healthText.text = playerHealth.value.ToString();
    }
}
Using events in this way decouples the state change on Player from the concrete classes listening for that change of state. Player has no idea who is listening to its events – nor does it need to know. Additionally, no two classes listening to the event have knowledge of each other. Events are an implementation of the Observer design pattern, which is best described in Robert Nystrom’s book, Game Programming Patterns. For all the benefits of events, however, they are geared exclusively towards the programmer, not the designer. Furthermore, the subscribing class must access the publishing class directly in order to register itself; a one-way dependency between those classes is created, so only half the coupling between the two classes is removed.
ScriptableObject Events
There’s another way to implement events in a designer-friendly manner – this is a tutorial on scriptable objects after all! This is also based on Ryan’s Unite talk. We shall encapsulate the event inside a scriptable object. Essentially, where C# events acted as a one-way messaging system, where a class had ownership of firing the event, a scriptable object-based event system separates the act of firing an event from the event itself. The subscribers only need to access the event itself, so they do not know which class will fire the event, nor do they need to.
The system is built up of two classes – GameEvent, which extends ScriptableObject, and GameEventSubscriber, which is a MonoBehaviour that can be attached to GameObjects which wish to subscribe to any event.
using System.Collections.Generic;
using UnityEngine;

[CreateAssetMenu(menuName = "Events/Basic Event", order = 2)]
public class GameEvent : ScriptableObject
{
    private List<GameEventSubscriber> subscribers =
        new List<GameEventSubscriber>();

    public void FireEvent()
    {
        for(int i = 0; i < subscribers.Count; ++i)
        {
            subscribers[i].OnEventFired();
        }
    }

    public static GameEvent operator+(GameEvent evt, GameEventSubscriber sub)
    {
        evt.subscribers.Add(sub);
        return evt;
    }

    public static GameEvent operator-(GameEvent evt, GameEventSubscriber sub)
    {
        evt.subscribers.Remove(sub);
        return evt;
    }
}
GameEvent must implement a lot of the things the C# event keyword did the heavy lifting for. For starters, it maintains a list of subscribers and defines a way to add or remove a subscriber. For the latter, I’ve opted to overload the + and - operators so we may use the same syntax as we did for subscribing to C# events. The FireEvent function iterates over the subscribers and calls the OnEventFired method on each of them. Now, we can create an asset to denote an event that could be fired.
In order to receive the event, we’ll also define a MonoBehaviour class called GameEventSubscriber. Only classes extending from GameEventSubscriber can listen on the event.
using UnityEngine;
using UnityEngine.Events;

public class GameEventSubscriber : MonoBehaviour
{
    public GameEvent gameEvent;
    public UnityEvent unityEvent;

    public void OnEventFired()
    {
        unityEvent?.Invoke();
    }

    private void OnEnable()
    {
        gameEvent += this;
    }

    private void OnDisable()
    {
        gameEvent -= this;
    }
}
This script is simple. In OnEnable, we subscribe to the GameEvent referenced by the component, and conversely unsubscribe in OnDisable. Recall that GameEvent will call the OnEventFired function directly when the event is triggered. Up until now, you’re probably wondering how GameEventSubscriber manages to control behaviour on an arbitrary GameObject – it’s time to expose our secret weapon: UnityEvent.
For some of Unity’s built-in components, such as UI buttons, you may recall the ability to hook up arbitrary public functions on a GameObject’s components to call when the button is pressed? That’s handled by UnityEvent, and here they work the same way. A GameEventSubscriber exposes two member variables: a GameEvent to listen on and a UnityEvent to trigger whenever the former was triggered.
Let’s recap. We create a GameEvent asset in our project. Any given object can reference that and choose to invoke the event. The GameEvent loops through all GameEventSubscribers that have subscribed to it and calls their corresponding OnEventFired methods, which in turn calls each of their UnityEvents. A UnityEvent can consist of any public function on any referenced GameObject, although if your project is well-architected, the function will probably be on that GameObject itself or a child, contained in a sensible prefab hierarchy. In fact, a single UnityEvent can contain several function calls with additional parameters, lending a designer significant amounts of flexibility.
Let’s look at what we’ve gained. A programmer only needs to implement two things. Firstly, a variable on any event-firing class that a designer may assign a GameEvent to, giving the designer flexibility to choose which event is fired by each class. Secondly, public functions on objects which might be controlled through events. Then, a designer can add a GameEventSubscriber to any GameObject and hook up those functions – and any built into Unity – to the corresponding UnityEvent. The benefits are all about increasing the flexibility for the designer to control the behaviour of the game through the Unity Editor. If they need to swap out the even for some placeholder event, it’s dead easy to do so. Plus, event assets can be named for easier searching and increased descriptiveness. It’s easy to debug the response of the subscribers by adding a dummy script that fires the event on demand, making it far easier to produce automated tests for the event.
Management Systems
The final thing that Ryan talks about is the idea that scriptable objects don’t necessarily represent data and can be used to replace behaviour, particularly any system that must persist between scenes. Traditionally, you might call DontDestroyOnLoad on those types of MonoBehaviour objects and access its functions through a Singleton (see http://gameprogrammingpatterns.com/singleton.html), but this approach suffers similar problems as we’ve seen so far – namely, you must write extra code to ensure the GameObject is instantiated in every scene appropriately without erroneous duplicates. By moving common systems such as inventories or character customisation into a scriptable object asset, you remove the overhead that comes with putting these systems on a GameObject – the Transform component and Unity’s game loop functions such as OnEnable, Start and Update.
Let’s look at an oversimplified inventory system implemented as a MonoBehaviour, discuss the implications this has on our scene architecture, and design an alternative using scriptable objects.
using System.Collections.Generic;
using UnityEngine;

public class InventorySystem : MonoBehaviour
{
    private List<string> items = new List<string>();

    public void PickupItem(string itemName)
    {
        items.Add(itemName);
    }

    public void DropItem(string itemName)
    {
        items.Remove(itemName);
    }

    public bool FindItem(string itemName)
    {
        return items.Contains(itemName);
    }
}
Here are the basic functions required to add or remove something from the inventory and to poll the inventory for an item’s existence. Since the player has a single entity, but our game’s structure means the player could load up the game inside any scene, we’re going to add a dummy GameObject with this component attached to every scene in the game. This means we’ll need to also implement a way for the inventory to persist between scenes and for external objects such as Player or perhaps an inventory UI to access the content of the inventory. Since there is precisely one inventory at any one time, you’d probably be tempted to use a Singleton design pattern.
public static InventorySystem instance = null;

private void Start()
{
    if(instance != null)
    {
        Destroy(instance.gameObject);
    }

    instance = this;
    DontDestroyOnLoad(gameObject);
}
This solution works. However, there are implications of designing the system in this manner. Firstly, you must create a GameObject in every scene for instantiation of the inventory to work as intended. When the project is built, this means every single scene contains data pertaining to a separate instance of a game object with an associated InventorySystem script, increasing the final build size. You must remember to add the object to all scenes, which is prone to human error when one scene is forgotten about. And finally, it’s inflexible to a designer, who might want to easily edit the starting contents of an inventory inside the Inspector for quick playtesting – that would be easier with scriptable objects. Since they’re classes just like any other, you can have a significant amount of behaviour defined on a ScriptableObject.
using System.Collections.Generic;
using UnityEngine;

[CreateAssetMenu(menuName = "Inventory System", order = 3)]
public class InventorySystem : ScriptableObject
{
    public List<string> items = new List<string>();

    public void PickupItem(string itemName)
    {
        items.Add(itemName);
    }

    public void DropItem(string itemName)
    {
        items.Remove(itemName);
    }

    public bool FindItem(string itemName)
    {
        return items.Contains(itemName);
    }
}
To properly reference the inventory, include a public variable on any class that uses it – for example, Player – instead of accessing it at runtime using a singleton. In the case of Player, you would probably have a prefab instance you can modify, which automatically rolls out the change to all instances of your player character in all scenes. Now, there is no need to add a near-empty GameObject to each scene. This reduces the build size because now, only a single instance of InventorySystem needs to be included in the compiled project instead of a GameObject, associated variables, and an InventorySystem per scene. Secondly, a designer could swap out the default InventorySystem asset for a test inventory to play around with specific items. As we have seen before, using a scriptable object has benefits for non-programmers without taking power away from the programmer.
Other Tips
There’s a couple other tips and comments I have that don’t really belong in the other sections of this article. Firstly, a good rule of thumb I’ve heard is to use scriptable objects only for things that could be changed at design time – much of the article so far has discussed these cases. Where you need to store complex data structures at runtime, you would be better served by using structs or traditional class that don’t inherit from ScriptableObject or MonoBehaviour.
Secondly, it’s possible to design custom gizmo icons for your custom scriptable object asset types. Save a file with the syntax [Class name][single space][“icon”][.jpg/.tif] inside a folder named “Gizmos” at the root of your project’s Assets folder. For example, the InventorySystem asset type would have a custom icon saved under “Gizmos/InventorySystem icon.jpg” which would turn the icon for every InventorySystem asset inside the Project View into that icon.
Coming Up
The next article in this series, which will be published on September 30th, will be about Persistent Data! It is already available in PDF format for $5 Patreon backers.