Unity provides several functions for interpolation – the estimation of a value some fraction between two data points. It’s an invaluable tool for smoothing numbers, vectors and quaternions over time – this article will discuss interpolation on straight lines, flat surfaces and spheres.
Linear Interpolation
It’s likely one of the first functions you’ll encounter in Unity. Lerp is used frequently where you need to smooth between two floating-point numbers, vectors, colours, quaternions or even materials. The first two parameters to a lerp function are two values being interpolated between and the third parameter controls what percentage between the first two inputs the output should be. Let’s look at an example.
float output = Mathf.Lerp(1.0f, 4.0f, 0.5f);
In this line of code, output is 50% between 1.0 and 4.0 – so its value is 2.5. That’s because the third parameters should be between 0.0 and 1.0, where 0.0 represents 0% between the two values and 1.0 represents 100% between them. Let’s state the Lerp function for numbers mathematically.
Mathf.Lerp(float a, float b, float t);
The output will be equal to a when t = 0.0 and equal to b when t = 1.0 in all cases. Numbers are the simplest case. From there, we can interpolate two-, three- and four-dimensional vectors.
Vector3 vec1 = new Vector3(1.0f, 2.0f, 3.0f);
Vector3 vec2 = new Vector3(1.0f, 4.0f, 9.0f);

Vector3 output = Vector3.Lerp(vec1, vec2, 0.5f);
Here, the output vector is the result of lerping each of the components of the two input vectors in turn.
float x = Mathf.Lerp(1.0f, 1.0f, 0.5f);
float y = Mathf.Lerp(2.0f, 4.0f, 0.5f);
float z = Mathf.Lerp(3.0f, 9.0f, 0.5f);

Vector3 output = new Vector3(x, y, z);
As we did for numbers, we may state the Lerp function for two-dimensional vectors mathematically - it extends easily to higher dimensions.
Vector2 output = Vector2.Lerp(Vector2 a, Vector2 b, float t);
Lerping two colours is the same as lerping two four-dimensional vectors where the red, green, blue and alpha/transparency channels are the four components of the vector.
Color col1 = new Color(0.1f, 0.3f, 0.5f, 1.0f);
Color col2 = new Color(0.5f, 0.7f, 0.7f, 1.0f);

Color output = Color.Lerp(col1, col2, 0.75f);

On the colour gradient above, the left and right edges represent col1 and col2 respectively and the black dot marks 75% of the way between the two where the output colour lies.
We’ll discuss quaternions in a later section, leaving only materials. Lerping between two materials – ideally two that use the same shaders and textures – returns a new material where all numbers and vectors are interpolated accordingly. See the Unity documentation for more information. The important take-away is that the first two parameters to a Lerp function are values we are interpolating between and the third is always a float between 0 and 1.
It’s useful to use Lerp to control the change of a value over time in Update or in a coroutine. We saw the use of coroutines alongside Lerp in the previous Unity Tips article – let’s look at an example in which we change a UI element displaying score over time.
private Text scoreText;

private IEnumerator ChangeValue(float startVal, float endVal, float speed)
{
    for(float t = 0.0f; t < 1.0f; t += Time.deltaTime * speed)
    {
        float score = Mathf.Lerp(startVal, endVal, t);
        scoreText.text = score.ToString();

        yield return null;
    }

    scoreText.text = endVal.ToString();
}
The t variable inside the loop is used to control the third parameter of the Lerp function. The speed variable passed as a parameter to ChangeValue and Time.deltaTime are used to control the rate of change of t; by using yield return null, the coroutine resumes execution immediately after Update each frame. The final line is used to correct for the loop timer under-shooting.
Rigidbody Interpolation
By default, Unity physics does not interpolate. Due to the way Unity calculates physics in fixed timesteps that do not always match up to graphics rendering frames, object motion sometimes appears jittery. In order to avoid this problem, Rigidbody components – those which are controlled by the Unity physics engine – can be made to extrapolate or interpolate their positions.
“Interpolation allows you to smooth out the effect of running physics at a fixed frame rate.” - Unity Documentation
Under normal behaviour, the position of an object is calculated immediately after FixedUpdate and the last recorded position is used when the object is rendered in subsequent Updates. If several frames are rendered before the next FixedUpdate runs, then each frame will display the object in the same location.
rigidbody.interpolation = RigidbodyInterpolation.None;
Under extrapolation, when a frame is rendered, Unity will attempt to guess where the object would be based on its linear and angular velocities and the time since the last internal physics update. This might cause issues where an object is rendered partially inside another object because the collision has not been registered yet – remember its ‘rendering position’ and ‘physical position’ have deviated slightly. The “actual” physical position is only recalculated just after FixedUpdate.
rigidbody.interpolation = RigidbodyInterpolation.Extrapolate;
The other option is interpolation – that’s why this section is included in this article! Whereas extrapolation looks into the future, interpolation looks into the past. Each time the frame is rendered, Unity calculates how far between the previous and next FixedUpdate steps you are. Then, it looks at the previous two recorded physical positions recorded during physics updates and interpolates between those; if the current call to Update is 20% of the way between the previous and next FixedUpdate, then the ‘rendering position’ for that Update frame will be 20% of the way between the second-to-last physical position and the last physical position.
rigidbody.interpolation = RigidbodyInterpolation.Interpolate;
Unlike extrapolation the ‘rendering position’ calculated via interpolation is accurate, although there is a latency of one physics timestep. The documentation recommends enabling interpolation only for the main character or any other object being followed by the main camera.
Lerp Smoothing
Let’s look at a common Lerp idiom used to move a value incrementally closer to some other value by interpolating between its own value and the target value each frame. As more frames are processed, the value moves some fraction closer towards the target. Whereas the typical usage of Lerp changes a value at a constant rate, this method is useful if you need the value to change faster at the start and slow down as it gets closer to the desired value. You could use this method inside the Update loop or inside a coroutine in which the loop break condition is met when the value is close enough to its target. Since the value only moves a fraction closer to its target each frame, it’s not advisable to check for exact equality.
private Vector3 playerPos;

private IEnumerator MovePlayerToTarget(Vector3 targetPos, float speed)
{
    while(Vector3.Distance(playerPos, targetPos) > 0.1f)
    {
        playerPos = Vector3.Lerp(playerPos, targetPos, Time.deltaTime * speed);
        yield return null;
    }

    playerPos = targetPos;
}
Think of this as a way to interpolate a value non-linearly by using a linear interpolation function in a novel way. However, we will soon see a better way of smoothing movement when it is near its goal.
LerpUnclamped
So far, we have discussed a Lerp function where the progress parameter is bound between 0.0 and 1.0. If you provide a value lower than 0.0 or above 1.0, Unity clamps the value to those bounds. Unity provides an alternative – LerpUnclamped – which extrapolates outside the bounds when progress values outside the usual bounds, even negatives, are used. The underlying equation is the same as for Lerp.
Mathf.LerpUnclamped(0.0f, 2.0f, -1.0f);
This example function call would return -2.0.
Mathf.LerpAngle
Sometimes the numbers you are interpolating represent angles. If you interpolate an angle just below 360° towards an angle just above 0°, the intended behaviour would be to increase the angle slightly, as angles “wrap around” at the 360° mark. Tracing the interpolation of those angles over time would leave a very small arc crossing the 360° threshold. However, Mathf.Lerp receives no contextual information regarding the input numbers so it would greatly decrease the angle – tracing would leave a massive arc starting at under 360°, crossing the 180° mark and ending at the angle just above 0°.
Mathf.LerpAngle performs the interpolation correctly. For any two angles, there is a choice of interpolating across the shortest or longest arc – Mathf.LerpAngle always chooses the shortest. For the edge case in which the two angles are 180° apart, the function will take the clockwise arc. The value you receive after the operation won’t be necessarily bound between 0° and 360°, but it will be correct modulo 360°.
Non-linear Interpolation
Unity provides ways to interpolate non-linearly aside from the above trick. Unlike Lerp, there’s no one function implemented for each different type so we shall explore them in turn.
SmoothStep
For motion to look more natural, a good trick is to accelerate in the middle of movement and slow down at the start and end. That’s what SmoothStep does – it takes two floats to interpolate between and a third parameter to control timing according to a sigmoid function (an S-shaped curve). However, unlike Lerp, this function only exists on floats. Let’s state it mathematically.
Mathf.SmoothStep(float a, float b, float t);
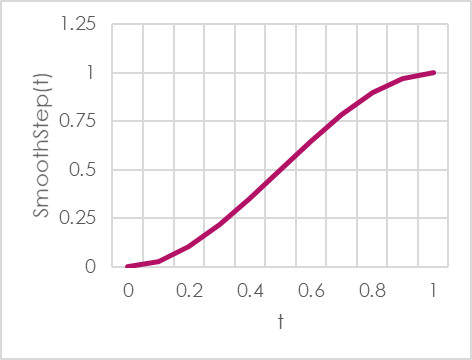
It’s a bit more complicated than Lerp was! The equation is similar, but the time parameter is swapped out for a third-order polynomial. A nice property of the curve is that the first derivative is equal to zero at the t=0.0 and t=1.0 endpoints so when calculated over one dimension – which, in our case, is time – it will look smooth, hence the name. The Wikipedia page for SmoothStep contains more detailed information and explores higher-order versions such as SmootherStep.
SmoothDamp
In a physical system, damping is the act of reducing the amplitude of a vibration – you’ll often see it used to describe springs. In Unity, SmoothDamp has the effect of reducing the rate of change of a variable’s value as it approaches its target value.
float approxTime = 0.3f;
float velocity = 0.0f;

float pos = 0.0f;
float target = 5.0f;

void Update()
{
    pos = Mathf.SmoothDamp(pos, target, ref velocity, approxTime);
    Debug.Log(pos);
}
In this example, the value of pos smoothly increases towards 5.0, starting off quickly and getting slower as it approaches the target. You must supply an estimated amount of time for the system to come to a rest – approxTime in this example – and a variable in which to store the instantaneous velocity of the movement – here it is named velocity. The variable is passed by reference due to the use of the ref keyword, meaning that the value of the velocity variable is modified inside the function.
Mathf.SmoothDamp(float value, float target, ref float velocity,
    float smoothTime, float maxSpeed, float deltaTime);
“The most common use is for smoothing a follow camera.” - Unity Documentation
There are two optional parameters. maxSpeed limits the velocity and deltaTime (which, by default, is Time.deltaTime) tells Unity the time since the function was last called. You should modify this if you utilise the function outside of Update. SmoothDamp is supported by float, Vector2 and Vector3, but oddly not Vector4. It’s recommended by the Unity Documentation for use with a follow camera.
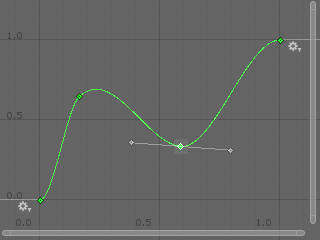
Animation Curves
The functions described so far cover the most common cases, but it’s useful to define custom interpolation and extrapolation methods. We could define these in code ourselves, but for floating-point values, Unity provides a programmable solution that can also be modified inside the Unity Editor. It’s the same solution used in Unity’s Animation view for creating animation clips!
[SerializeField] private AnimationCurve animCurve;

AnimationCurve objects can be exposed to the Unity Editor and come with a custom editor window. When its Inspector entry is clicked, a larger window will appear, allowing a designer to add or remove keyframes, augment the shape of the curve and modify the start and end times or values of the curve. You may also pick from a set of predefined curves in-editor or in code.
AnimCurve.Constant
animCurve = AnimationCurve.Constant(0.0f, 1.0f, 1.0f);
AnimationCurve.Constant(float startTime, float endTime, float constant);
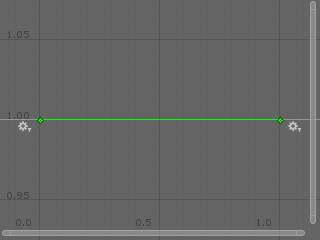
The first type of AnimationCurve defines an animation with a constant value for its entire duration. The constructor for this type of curve has three parameters – the startTime and endTime, in seconds, which define the duration of the animation, and the constant value the curve will possess.
AnimCurve.Linear
animCurve = AnimationCurve.Linear(0.0f, 0.0f, 1.0f, 1.0f);
AnimationCurve.Linear(float startTime, float startVal, float endTime, float endVal);
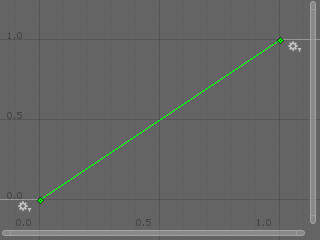
The next type looks a bit more useful! We may define a Linear AnimationCurve using a startTime and endTime to control the speed, and a startVal and endVal to define the endpoints of the curve. If the startTime and endTime are set to 0.0 and 1.0 respectively, this type of curve has the same practical effect as the Lerp function; this curve defines a linear interpolation.
AnimCurve.EaseInOut
animCurve = AnimationCurve.EaseInOut(0.0f, 0.0f, 1.0f, 1.0f);
AnimationCurve.EaseInOut(float startTime, float startVal, float endTime,
    float endVal);
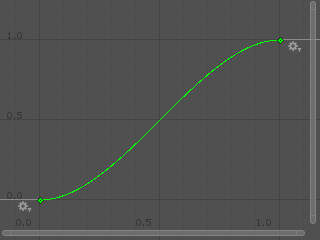
If a Linear curve is parallel to Lerp, then EaseInOut is parallel to SmoothStep. This type of AnimationCurve takes the same parameters as the Linear curve but produces a curve with steeper gradient in the middle than the endpoints, making it useful for natural-looking movement in one dimension.
Evaluation
In order to use the values of the curve at a specific point in time, we use the Evaluate function. As with previous interpolation methods, a common use case is inside a coroutine.
private float value;

private IEnumerator MoveValue(AnimationCurve curve)
{
    float startTime = animCurve[0].time;
    float endTime = animCurve[animCurve.length - 1].time;

    for(float t = startTime; t < endTime; t += Time.deltaTime)
    {
        value = animCurve.Evaluate(t);
        yield return null;
    }

    value = animCurve.Evaluate(endTime);
}
Here, the Evaluate function takes in a time parameter corresponding to the timestep you wish to retrieve the value for. On a curve where the first keyframe is placed at 0.0 seconds and the final keyframe is at 5.0 seconds, the start and end times are 0.0 and 5.0 respectively, although the start time, confusingly, can be after 0.0 seconds.
What happens if you Evaluate at times outside the endpoint keyframes? There are several possible types of behaviour, although the options available to you differ depending on whether you modify via code or in-editor. Some options have strange behaviour because these modes – called WrapModes – are also used for animation clips, so I’d suggest sticking to Clamp, Loop and PingPong.
WrapMode.Clampis the default behaviour. CallingEvaluateat a timestamp outside of the curve returns the value at the endpoint keyframe;WrapMode.ClampForeveris the same thing as the above, but is unavailable in-editor;WrapMode.Oncealso seems to be the same thing asClampin this context, and is also unavailable in-editor;WrapMode.Loopcopies the curve infinitely, so callingEvaluatewith a timestamp just past the end of the curve returns the value of the curve just at its start;WrapMode.PingPongalso copies the curve infinitely past its bounds, but it mirrors the curve shape on the time axis every other instance;WrapMode.Defaultis code-only and seems to break the behaviour ofAnimationCurveandEvaluate, so I would recommend against using it in this context.
You can modify the WrapMode behaviour for both endpoints individually in-editor by selecting the small cog dropdown icon that appears next to each endpoint keyframe and selecting the appropriate option. In code, you must set the preWrapMode or postWrapMode variable values for the AnimationCurve to the desired WrapMode.
animCurve.preWrapMode = WrapMode.Clamp;
animCurve.postWrapMode = WrapMode.Loop;
Custom Curves
We’re not restricted to the types of curve provided by Unity. Inside the editor, we can add keyframes wherever we like and mess with the shape of the curve by selecting one of the keyframe control points and moving the handles that appear either side of it. As with other types of curves, it’s possible to set the behaviour of the curve before the start and after the end – select the small cog drop-down menus next to the endpoint keyframes to pick an option.
Bilinear Interpolation
We have discussed linear interpolation in one dimension so far, but it is easily extended into two or more dimensions by performing individual linear interpolations across each axis to obtain a value. Linear interpolation in two dimensions is known as Bilinear Interpolation.
However, there is a key difference between bilinear interpolation and, say, performing the Lerp function on the Vector2 type. The latter is comprised of two separable linear interpolation steps using the same ‘progress value’ – one on the x-axis and the other on the y-axis – which are combined back into a tuple containing both results – a new Vector2. Bilinear interpolation, on the other hand, is used to obtain a singular value from some 2D data structure; data values are known at discrete points and we wish to calculate the value at an intermediate point. Where Lerp took a single interpolation factor as a parameter, bilinear interpolation takes two factors.
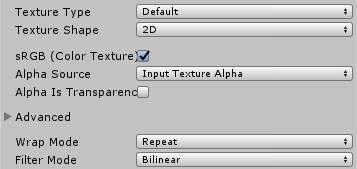
Bilinear Filtering
You’ve probably encountered bilinear interpolation in Unity while importing textures. One of the options in the texture import menu is the ‘filter mode’ – the default value for which is Bilinear. One of the alternatives, Point, is common for pixel art as it performs no smoothing between pixels – you end up with a crisp, blocky texture. For photorealistic 3D games, though, you may prefer bilinear filtering.
A texture is a 2D grid of colour values. If the texture has a resolution of 128x128 but it’s mapped to geometry that spans 256x256 pixels on the screen, under bilinear filtering we need to ‘invent’ some bonus colour values for the extra pixels. There are four times as many pixels on the screen as in the texture, so between each 2x2 grid of existing texture pixels, we have three interpolation factors: \((\frac{0}{2},\frac{1}{2})\), \((\frac{1}{2},\frac{0}{2})\) and \((\frac{1}{2},\frac{1}{2})\).

For texture samples \(T_{0,0}\), \(T_{0,1}\), \(T_{1,0}\), \(T_{1,1}\) and each of the interpolation factor pairs \((I_x,I_y)\) we do the following:
- Perform a linear interpolation across the \(T_{0,0}\), \(T_{1,0}\) line using \(I_x\) to obtain \(x_a\);
- Perform a linear interpolation across the \(T_{0,1}\), \(T_{1,1}\) line using \(I_x\) to obtain \(x_b\);
- Perform a linear interpolation across the \(T_{x_a,0}\), \(T_{x_b,1}\) line using \(I_y\) to obtain the final pixel colour value.
Let’s look at an example. We’ll take a 2x2 texture and work out what would be the colour of an additional pixel in the centre of them – the interpolation factor is \((\frac{1}{2},\frac{1}{2})\). In this texture, all values are greyscale and \(T_{0,0}\) is 80% white; \(T_{1,0}\) is 60% white; \(T_{0,1}\) is 30% white; and \(T_{1,1}\) is 10% white.

Because both interpolation factors are \(\frac{0}{2}\), all interpolation steps end up being unweighted averages of two colours. Let’s follow the algorithm steps we outlined above, recalling the formula for Lerp, to obtain the greyscale colour at \(T_{0.5,0.5}\).
\[\begin{align*} Lerp(a,b,t) &= a+(b-a)t \\ x_a &= 80\% + (60\%-80\%)\Big(\frac{1}{2}\Big)=80\%-10\%=70\% \\ x_b &= 30\% + (10\%-30\%)\Big(\frac{1}{2}\Big)=30\%-10\%=20\% \\ T_{0.5, 0.5} &= x_a+(x_b-x_a)\Big(\frac{1}{2}\Big)=70\%-25\%=45\% \end{align*}\]Hence, using bilinear interpolation, a pixel positioned at the centre of the texture would be 45% white. We can state the entire bilinear interpolation step mathematically – I’ll call it Blerp and it’ll take the four nearest pixel colours and two interpolation factors as parameters.
This extends to higher dimensions. Trilinear interpolation operates in three dimensions and requires the nearest eight data points and three interpolation factors.
Spherical Linear Interpolation
Lerp works great for interpolating between positions. However, interpolating rotations using Lerp – while possible – may cause unintended effects. With Lerp, the distance between two interpolated points is proportional to the difference in their interpolation factors. To illustrate why this might not be desirable for a rotation, let’s chart an interpolation across a straight line superimposed on a quarter-circle.

Let’s analyse the diagram. The bold straight line has points on it at regular intervals – there are 15, including the two endpoints. The change in interpolation factor between any adjacent pair of points is the same. Lerping works great for a linear curve – a straight line. The quarter circle traced around it is, of course, not a straight line! That arc conceptually represents a Lerp carried out on a rotation – each pair of points still has the same difference in interpolation factor, but points get further away from each other as you go from an endpoint towards the middle of the curve.

This diagram illustrates that the difference in interpolation factor – above the line – of given points on the line is proportional to the difference in their distance from the endpoints; the distance increases monotonically with the interpolation factor.
A Slerp – short for ‘spherical linear interpolation’ – interpolates over a line projected onto a spherical surface such that two points on the line with the same difference in interpolation factor are the same distance apart as any other pair of points on the line with the same difference in interpolation factor. Still with me? This function is fantastic for rotations for this reason; while the Quaternion.Lerp function exists as I mentioned, Quaternion.Slerp will give you more accurate results at a slight performance expense. However, over large angles, Quaternion.Slerp should give noticeably smoother rotations.
Vector3.Slerp also exists – if Vector3.Lerp acts on positions, then Vector3.Slerp interpolates directions in the same manner as described. The problem with using Lerp to interpolate directions is that you get the issue illustrated on the diagram above, but Slerp fixes this. Let’s represent Slerp mathematically.
Quaternion.Slerp(Quaternion a, Quaternion b, float t);
For more information on Slerp and the maths behind it, check out its Wikipedia entry.
Coming Up
The next article in this series, which will be published on September 16th, will be about ScriptableObjects! It is already available in PDF format for $5 Patreon backers.