Fisheye lenses gained popularity throughout the 1900s for their ability to capture ultrawide-angle views using a spherical mapping, rather than a straight-line perspective. The name comes from how American physicist Robert W. Wood imagined a fish would view its environment underwater. Images created using a fisheye lens are characterised by objects in the centre appearing ‘closer’ than they otherwise would. Nowadays, we use fisheye lenses for a range of applications, from artistic choices in entertainment media to computer graphics, where we can use two 180-degree virtual lenses to create environment maps. Today, we’ll combine artistic intent with computer graphics and look at a cheap way to convert computer-generated images into fisheye-style images.
Virtual lenses
Conventional virtual cameras capture rectilinear images - features such as walls appear straight. In theory, you could use an alternative projection matrix to achieve a fisheye effect, but we won’t be changing the way the camera renders the original image - instead, we’ll create a postprocessing effect that mimics the distortion effect introduced by fisheye lenses. In order to do this, all we need is a bit of maths to jig around our UVs a little.
For those that haven’t come across UVs before, they are a type of coordinate system that allow us to map 2D textures (images) to 3D objects. In our case, our “3D object” is the screen, which we can consider to be a 2D object for simplicity. The UV coordinates, then, map a 2D texture to a 2D screen. That 2D texture will be the result of rendering the scene, right before our fisheye shader is put into action. Before we look at how such a shader would work, let’s talk about the shader system I’ve developed for this series.
Please download the project repository from GitHub if you’d like to follow along!
Shader system
In the last series, I provided two shader files for each shader: one complete, and one with gaps for you to fill in using these tutorials. There were a handful of scripts to facilitate special features on some of the shaders, such as Gaussian blur. This time, I’ve simplified things - the GitHub repository will only include complete versions of the shaders and the associated scripts will be less confusing.
Each shader has a corresponding script that includes Inspector-accessible variables for each of the special features of the shader. Those scripts use ScriptableObject as a base class, so you can create assets directly inside the Editor - this will allow you to create multiple instances of each effect with different parameters. Think of them as presets! You can create these directly in the Project pane using the Create menu. I’ll detail exactly how these assets and scripts are created throughout these tutorials.
Fisheye Shader
This tutorial assumes you have a little knowledge of shader syntax. For a low-down on how shaders work, check out the first shader series - particularly the shader primer. The shader uses a lot of standard shader code: the appdata and v2f structs and the vertex shader are basic Unity image effect shader parts. We’re going to add barrel distortion in the fragment shader in order to convert the original image into a “fisheye-like” image - it’s named as such because straight lines tend to curve away from the centre, as do the sides of a barrel.

For the shader, we’ll add a _BarrelPower variable to Properties and include it in the shader code. The following shader code is found at Resources/Shaders/Fisheye.shader.
// In Properties.
_BarrelPower("Barrel Power", Float) = 1.0

// In shader.
uniform float _BarrelPower;
Then, we will define a function that maps input positions to distorted output positions. To conceptualise what the function is doing, imagine that it is drawing a line from the centre of the image to the input position, then extending that line by a factor of the length of the line to the power of _BarrelPower. The endpoint of that line is the new position - which is then adjusted into a UV coordinate. We’ll call the function distort().
float2 distort(float2 pos)
{
    float theta = atan2(pos.y, pos.x);
    float radius = length(pos);
    radius = pow(radius, _BarrelPower);
    pos.x = radius * cos(theta);
    pos.y = radius * sin(theta);

    return 0.5 * (pos + 1.0);
}
We have a mapping between input positions and output UVs! Now all we need to do is to create the fragment shader. The fragment shader starts off by calculating the input positions.
fixed4 frag (v2f i) : SV_Target
{
    float2 xy = 2.0 * i.uv - 1.0;
    ...
}
Since UV positions are calculated such that the bottom-left of the image is at (0, 0) and the top-right is at (1, 1), we need to convert them so that the centre is at (0, 0) and the corners are (1, 1), (-1, -1), (1, -1) and (-1, 1) respectively. Next, we’ll want to consider what to do about pixels outside of the “barrel” shape. The distort function will work on any pixels inside an oval that touches the edges of the screen, but for pixels outside that region, the output is messy. Either we can keep the old pixels in these outside regions by sampling the original texture with the original UVs, or we can discard those fragments and exaggerate the effect. I’ve opted for the latter.
float d = length(xy);

if (d >= 1.0)
{
    discard;
}

float2 uv = distort(xy);
return tex2D(_MainTex, uv);
That’s all we need to do for the shader code itself. Let’s now look at the scripting required to drive the effect.
Scripting
As mentioned, we will create a script that inherits another script I’ve called BaseEffect. That script inherits ScriptableObject, so we can create instances of this object in the Project pane. The following code is available in Scripts/Image Effects/FisheyeEffect.cs.
using UnityEngine;

...
public class FisheyeEffect : BaseEffect
{
    ...
}
In order to create instances of this class from within the Editor, we will add the following directive just above the class definition.
[CreateAssetMenu(menuName = "Image Effects Ultra/Fisheye", order = 1)]
This directive adds a Create menu item - we’ll see it in action shortly. Next, we need to add a variable to control the barrel power exponent - I’ve named the variable pow and it will correspond to shader property _BarrelPower.
[SerializeField]
private float pow;
In order to use our shader, we must create a material which uses it. BaseEffect exposes a protected member named baseMaterial for this purpose, alongside a virtual OnCreate method which will be called at scene start. We’ll use both, and we’ll load the shader file using Resources.Load instead of Shader.Find so that these shaders will always be included when the game is built. Also inside OnCreate, we will map the pow variable to the _BarrelPower property.
public override void OnCreate()
{
    baseMaterial = new Material(Resources.Load<Shader>("Shaders/Fisheye"));

    baseMaterial.SetFloat("_BarrelPower", pow);
}
Finally, we need to apply the postprocessing effect each frame. For this, BaseEffect defines an abstract Render method that takes in a source and destination RenderTexture. It’s basically a stand-in for OnRenderImage, but Unity cannot call that function on a ScriptableObject because it is not a Component. We will call this function manually elsewhere.
public override void Render(RenderTexture src, RenderTexture dst)
{
    Graphics.Blit(src, dst, baseMaterial);
}
This is the simplest Render functionality - just call Graphics.Blit using the two RenderTextures and baseMaterial.
Putting it together
We’ll create a new FisheyeEffect asset. Inside the Effects folder, by either right-clicking or using the Assets menu in the toolbar, select Create>Image Effects Ultra>Fisheye. A new asset will be created, and you can modify the pow variable in the Inspector like any other Unity object. Now, let’s add the final piece of the puzzle - a short MonoBehaviour we can attach to our camera to drive the effect.
using UnityEngine;

[RequireComponent(typeof(Camera))]
public class ImageEffect : MonoBehaviour
{
    [SerializeField]
    private BaseEffect effect;

    private void Awake()
    {
        effect.OnCreate();
    }

    private void OnRenderImage(RenderTexture src, RenderTexture dst)
    {
        effect.Render(src, dst);
    }
}
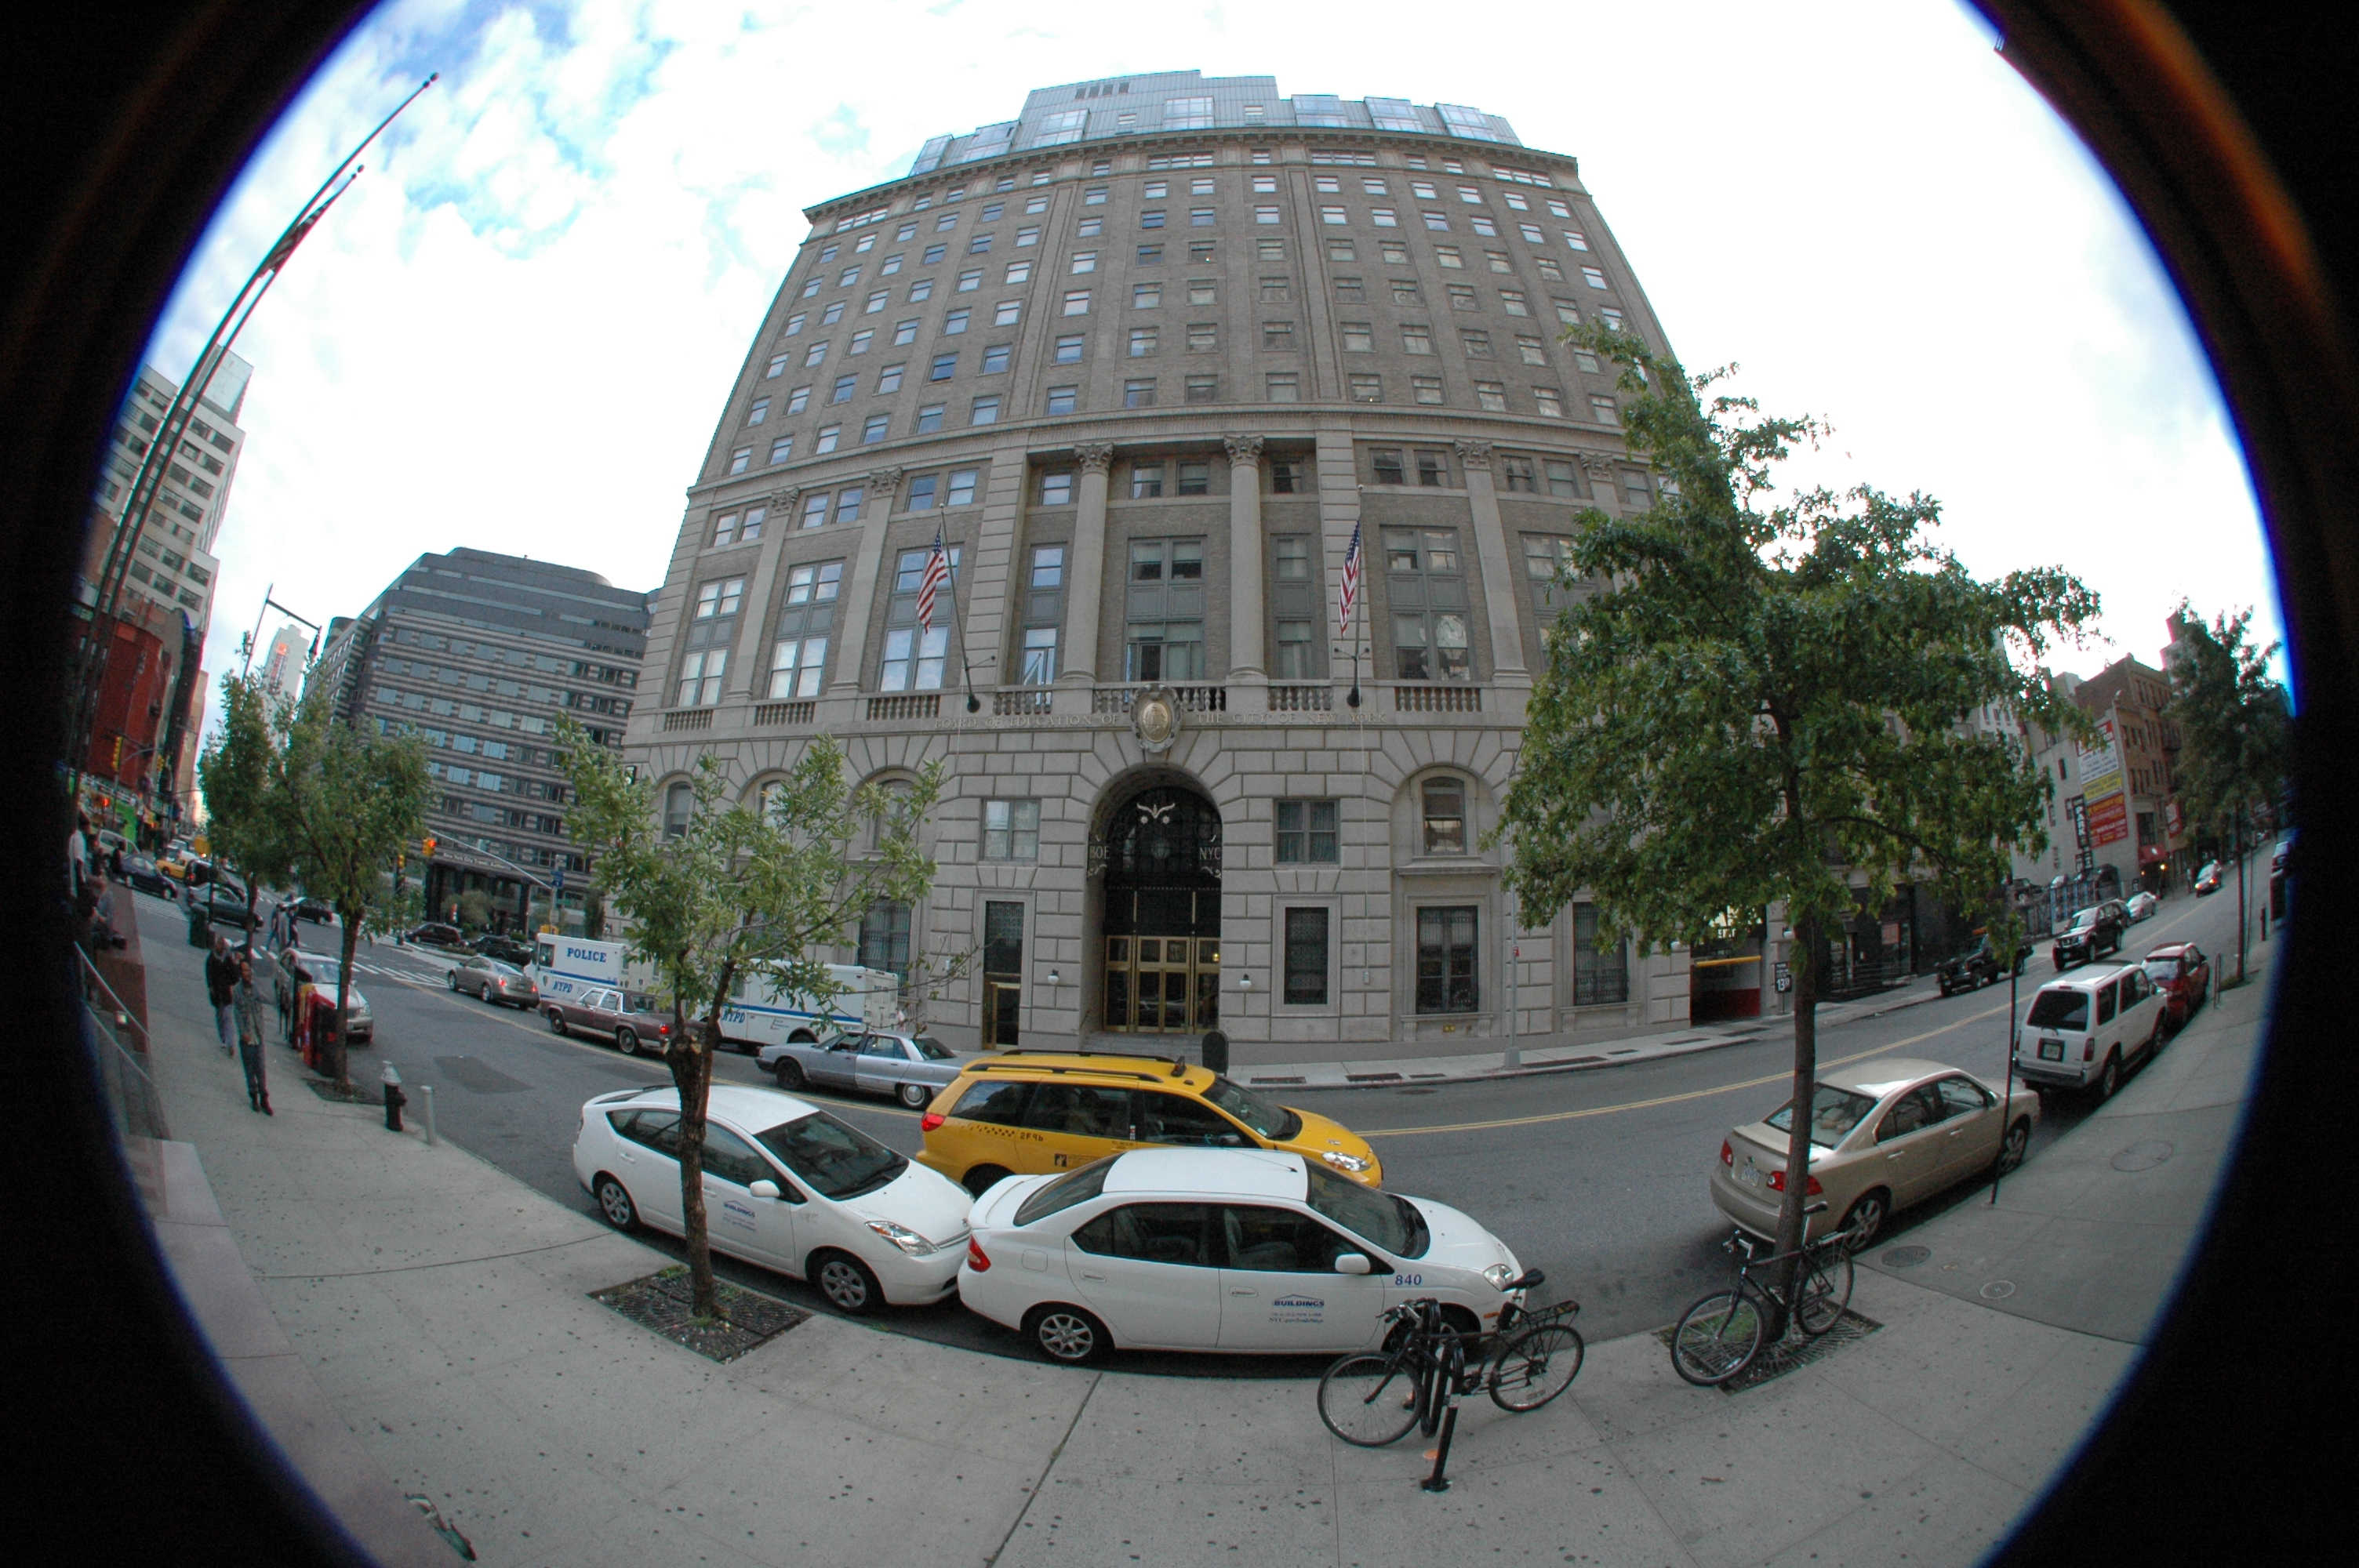
This script is essentially a wrapper around the assets we just created. Drag this script onto the camera and drag an effect onto the effect field in the Inspector and hit that play button. With a pow value of 2, you should see something similar to the screenshot below.

Conclusion
Today we’ve seen how we can mess around with image UVs to achieve our effect in a surprisingly efficient manner. There are several other ways to create a fisheye lens effect, but I chose this one due to its ease of implementation and cheap computational cost.
In the next tutorial, we’ll look at an underwater effect, complete with animated waves. Additionally, we’ll look at ways of combining multiple effects into a single package.
Acknowledgements
This tutorial series uses the following asset packs - available on the Unity Asset Store:
| Forest - Low Poly Toon Battle Arena / Tower Defense Pack | AurynSky |