I recently finished Return of the Obra Dinn by Lucas Pope, a fantastic detective game about an ill-fated ship and its crew. One of the distinguishing features of the game is its 1-bit early Macintosh graphical style, which is realised by an extremely in-depth dithering effect. You can read Lucas’ excellent articles on how to perfect the dithering effect - today, we’ll cover the basics.
Dithering
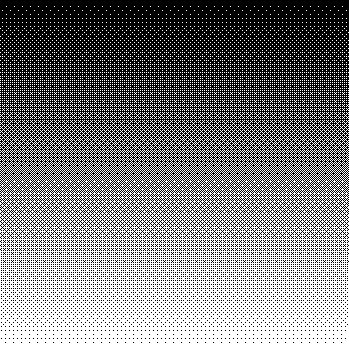
Dithering is the art of faking the existence of intermediate colours using a limited colour palette, often to simulate a smooth shading effect - instead of filling pixels with a smooth falloff of colour values, all pixels are one of two colours arranged in a ‘dither pattern’ to make it look as if the smooth falloff exists. Here’s an example where a Bayer matrix dither pattern is used to create a ‘smooth gradient’ from black to white using only those two colours:
When Obra Dinn is described as having a ‘1-bit’ aesthetic, people are referring to the fact the colour palette is made up of two colours - you could represent the colour used by each pixel using a single bit of information. In Obra Dinn’s case, there are several options for which two colours are used, all of which are based on classic computer colour schemes. Of course, Obra Dinn uses a comprehensive dithering effect instead of smooth gradient shading, with a wireframe outline effect on top to aid visual clarity.
The dithering effect is produced via a postprocessing shader - the scene is rendered with smooth lighting to begin with, then a noise texture which uses that dithering pattern is used to threshold each pixel of the smoothly-shaed image. Pixels with a luminance above the noise texture become light, and those below become dark.
Bayer Patterns and Blue Noise
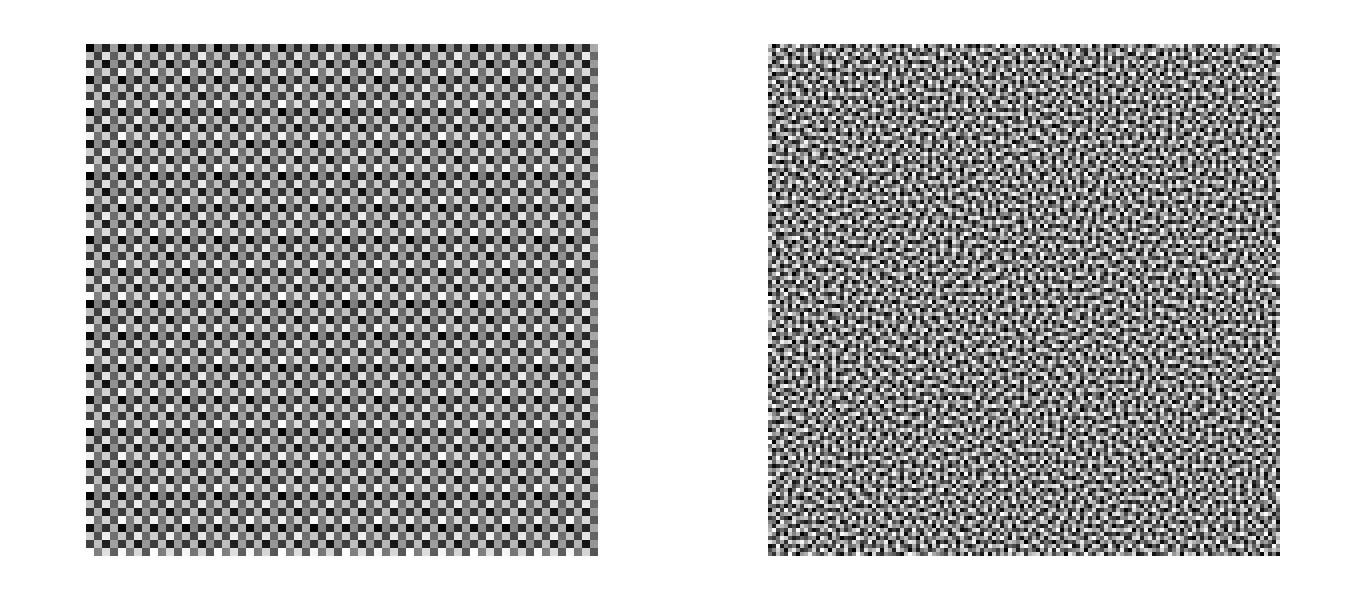
Obra Dinn uses more than one kind of dithering pattern. The Bayer pattern shown above results in very neat dithering, as the noise texture contains neatly ordered pixels. On the contrary, dithering with blue noise is extremely disorderly. In the following image, on the left is a Bayer pattern, and on the right is a blue noise pattern - you can grab the one I used here.
In this screenshot, you can see examples of both types of dithering - the environments tend to use the blue noise variant, whereas important details such as people and the Memento Mortem (your skull-adorned watch) commonly use the Bayer dithering effect.

Now we’ve covered the basic theory behind Obra Dinn’s aesthetic, let’s reproduce it in a shader.
Dithering Shader
The shader we’ll write won’t cover all the details explained in Lucas Pope’s article I linked above, but we’ll cover the core part of the effect. Open Resources/Shaders/Dither.shader. The shader requires three textures: the image texture, _MainTex; the noise texture, _NoiseTex; and a texture we’ll use for the colour ramp which can easily be switched out if we want to choose a different theme, _ColorRampTex. We’re also going to need the resolution of _MainTex and _NoiseTex, so throw in _MainTex_TexelSize and _NoiseTex_TexelSize respectively.
sampler2D _MainTex;
float4 _MainTex_TexelSize;

sampler2D _NoiseTex;
float4 _NoiseTex_TexelSize;

sampler2D _ColorRampTex;
We’re also going to include two variables to represent an offset for the noise, _XOffset and _YOffset. Reading Lucas’ article, there are several ways to map noise onto the scene - we might want to tile the noise statically across the scene, or perhaps we think it should scroll when the player moves the camera. Lucas ends up mapping the noise texture onto a sphere and projecting from the camera to the sphere in order to map noise to the scene, but we’ll stop short of that - we’ll implement an option to scroll the noise based on the camera’s rotation and field-of-view. It’s not perfect, but it’s great for the purposes of this tutorial.
float _XOffset;
float _YOffset;
Now let’s write the fragment shader. We’ll calculate the luminosity of the image texture to start off - we’ve done this calculation a thousand times before when we’ve needed a greyscale texture.
float4 frag (v2f i) : SV_Target
{
    float3 col = tex2D(_MainTex, i.uv).xyz;
    float lum = dot(col, float3(0.299f, 0.587f, 0.114f));
    ...
}
Then, we’ll tile the noise texture across the screen. To do this, we’ll need to divide the UV coordinates of the pixel, i.uv, by the size of the noise texture, then multiply by the size of the image texture. For whatever reason, the x and y components of any texture’s _TexelSize data contains 1 divided by width and 1 divided by height respectively, whereas the z and w components contain the width and height, so the code looks like this:
float2 noiseUV = i.uv * _NoiseTex_TexelSize.xy * _MainTex_TexelSize.zw;
Then, we’ll add the scrolling offset we just mentioned. Both those values will be provided to the shader from a script, so we don’t need to worry about calculating the amount of scrolling just yet. Using the UVs we calculate, we can sample _NoiseTex. We’re going to use the noise pixel value as a threshold - any image pixel above its corresponding noise pixel will be drawn as white, otherwise it’ll be drawn dark. For that, we’ll also need to calculate the luminance of the noise pixel.
noiseUV += float2(_XOffset, _YOffset);
float3 threshold = tex2D(_NoiseTex, noiseUV);
float thresholdLum = dot(threshold, float3(0.299f, 0.587f, 0.114f));
Now we’ll perform the thresholding. We could use a hard cutoff as described, but even Obra Dinn cheats in places and blends colours slightly, resulting in an effect which isn’t strictly 1-bit. Instead, we’ll sample _ColorRampTex based on whether the image pixel overcomes the threshold, but take into account by how much it overcomes the threshold. It’s a very small difference but I like it better this way. After the thresholding step, we’re done with the shader.
float rampVal = lum < thresholdLum ? thresholdLum - lum : 1.0f;
float3 rgb = tex2D(_ColorRampTex, float2(rampVal, 0.5f));

return float4(rgb, 1.0f);
We can now move on to the script to drive the effect.
In Scripts/DitherEffect.cs, we’ll include four member variables: ditherTex and rampTex for the noise texture and colour ramp texture respectively, and a useScrolling flag to control whether the noise texture should move along with the camera rotation. We’ll also include a filterMode variable to control whether the final image should smooth between pixels.
[SerializeField]
private Texture2D ditherTex;

[SerializeField]
private Texture2D rampTex;

[SerializeField]
private bool useScrolling = false;

[SerializeField]
private FilterMode filterMode = FilterMode.Bilinear;
Let’s skip straight to the Render method. The scrolling offset will be based on the camera’s field of view and the eulerAngles representation of its rotation. To make sure the noise texture scrolls such that the noise ‘anchors’ itself to the same part of the image while the camera rotates, we divide the y-component of the camera’s rotation by the camera’s field of view to obtain the xOffset - it needs to be multiplied by four because of the size difference of the RenderTextures we’ll use (which will be covered in a moment). The yOffset uses a different multiplier and is based on the camera’s aspect ratio. These calculations are only performed if we enabled the useScrolling flag.
public override void Render(RenderTexture src, RenderTexture dst)
{
    var xOffset = 0.0f;
    var yOffset = 0.0f;

    if(useScrolling)
    {
        var camEuler = Camera.main.transform.eulerAngles;
        xOffset = 4.0f * camEuler.y / Camera.main.fieldOfView;
        yOffset = -2.0f * Camera.main.aspect * camEuler.x / Camera.main.fieldOfView;
    }

    baseMaterial.SetFloat("_XOffset", xOffset);
    baseMaterial.SetFloat("_YOffset", yOffset);

    ...
}
We’re going to need a secondary RenderTexture at a smaller resolution than the screen to emulate Obra Dinn’s low-resolution look. However, I also found that the effect is a lot less noisy if you increase the resolution first then decrease the size to that smaller texture. We will begin by doubling the resolution in both the x- and y-directions without applying the shader effect, then collapse the image to half its original resolution while applying the effect; the four-fold reduction in resolution on each axis during this step is why we needed the multipliers when calculating the offsets. This is also where the filterMode will come into play - we’ll set both textures to have whatever mode we picked. FilterMode.Point will give the final image a hard pixelated look, and FilterMode.Bilinear will smooth the image. When we’re done, we’ll use RenderTexture.ReleaseTemporary to relinquish the intermediate half and super textures.
RenderTexture super = RenderTexture.GetTemporary(src.width * 2, src.height * 2);
RenderTexture half = RenderTexture.GetTemporary(src.width / 2, src.height / 2);

super.filterMode = filterMode;
half.filterMode = filterMode;

Graphics.Blit(src, super);
Graphics.Blit(super, half, baseMaterial);
Graphics.Blit(half, dst);

RenderTexture.ReleaseTemporary(half);
RenderTexture.ReleaseTemporary(super);
Now we can modify the effect, found at Effects/Dither, to see what it looks like. With a bit of testing, I prefer the Bayer texture with a filterMode of Point, or the blue noise texture with Bilinear filtering. Here’s the effect with Bayer:

And here it is with blue noise:

Conclusion
Return of the Obra Dinn, apart from being a fantastic game, wowed audiences with its striking visuals. The dithering effect uniquely stands out, as does the range of retro colour palettes. The two dithering patterns, used in different contexts, add slight variation and help to broadcast which elements of a scene are the most important.
In the next article, we’re going to go on a Nintendo nostalgia trip and create a shader based on the new art style of Pokémon Mystery Dungeon: Rescue Team DX.
Acknowledgements
Assets
This tutorial series uses the following asset packs:
| Forest - Low Poly Toon Battle Arena / Tower Defense Pack | AurynSky |