A common trope in videogames is the infamous water level. All good games must have one - who can say whether Ocarina of Time would have been the critical and commercial success it was without the Water Temple? Games emulate the feeling of being underwater in several ways - from tinting the screen blue to emulating the way foliage waves around in the undercurrents. In this tutorial, instead of a full simulation of the water’s effect on objects, we’ll build on the work from last tutorial and mess with the UVs we use to sample the image texture, albeit in a different manner. We’ll also look at how to create composite effects.

Photo by Mohamed Ahzam on Unsplash
Waves and Fog
Analysing the photo, we see that the water is tinted a deep blue that gets stronger the further away from the camera you get. The surface of the water is covered in ripples. These two properties will feature heavily in our effect, with a little creative license. Since our effect is intended to give arbitrary scenes the feeling of being underwater, we won’t include ripples on the water’s surface and will instead animate ripples and waves across the entire screen. We will, however, take cues from the real world when considering colouration of the scene. The density of the water makes it a lot harder to see further away.
In order to recreate an underwater feeling as part of a postprocessing effect, we’ll need some device for emulating a wave pattern, one that tiles well and is animated. For the fog pattern, we will need to determine how far pixels are from the camera and blend the original pixel colours with the water tint. Let’s look at the waves first.
Please download the project repository from GitHub if you’d like to follow along!
Making Waves
In scientific fluid simulations, it’s common to describe a flow pattern as a series of flow vectors at discrete points so that an approximation algorithm can be run. We will be doing a similar thing; our simulation takes place on a 2D grid of pixels, so it makes sense for our “flow pattern” to be encoded as part of a 2D texture. We even have a well-understood and widely-used method for capturing vectors inside a 2D texture: a normal map! Normal maps are usually used to add lighting detail to models without the need for fine model geometry, and we can exploit Unity’s built-in functions to encode and decode a flow pattern within a shader using the same functionality. Here is an example normal map - the one we will use for this effect, based on a tiled Perlin noise generator:

Note that it’s important that your normal texture is tileable so that the effect doesn’t encounter jarring inaccuracies partway through. For the shader found at Resources/Shaders/Underwater.shader, the vertex shader and structs are standard, and we’ll modify the fragment shader. We’re going to accept a texture to act as our normal map (also known as a bump map).
// In Properties.
_BumpMap("Normal Map", 2D) = "bump" {}

// In shader code.
uniform sampler2D _BumpMap;
To grab the normal vector we need, we’ll use tex2D to sample the texture, but there’s more work on top of that. We have discussed normals on this blog before, but as a reminder, we’re pulling a 3-dimensional vector out of each pixel of the texture based on its colour, and Unity provides a function called UnpackNormal for that. We could write our function call like this:
half3 normal = UnpackNormal(tex2D(_BumpMap, i.uv));
This would be sufficient, but we also want to animate the waves. Instead, we will use the _Time variable that is passed into Unity shaders by default - it’s a 4-element vector that contains the time since level load, t, with various multipliers: _Time = (t/20, t, 2t, 3t). To animate the waves, we’ll add the time to our UVs in the x- and y-directions before sampling the normal texture.
half3 normal = UnpackNormal(tex2D(_BumpMap, (i.uv + _Time.x) % 1.0));
Note here that adding a scalar value, _Time.x, to a float2, i.uv, adds the scalar to both components of the vector. We want a designer to have the ability to change the strength of the waves, so we’ll add a _Strength property.
// In Properties.
_Strength("Strength", Float) = 0.01

// In shader code.
uniform float _Strength;
We can then define the UVs we’d like to use to read the texture. Like how we modified the UVs in our Fisheye shader last time, we’ll add the normals we just extracted to the initial UVs to obtain distorted UVs. Those will be used to read from the texture.
float2 uv = i.uv + normal * _Strength;
fixed4 col = tex2D(_MainTex, uv);
...
return col;
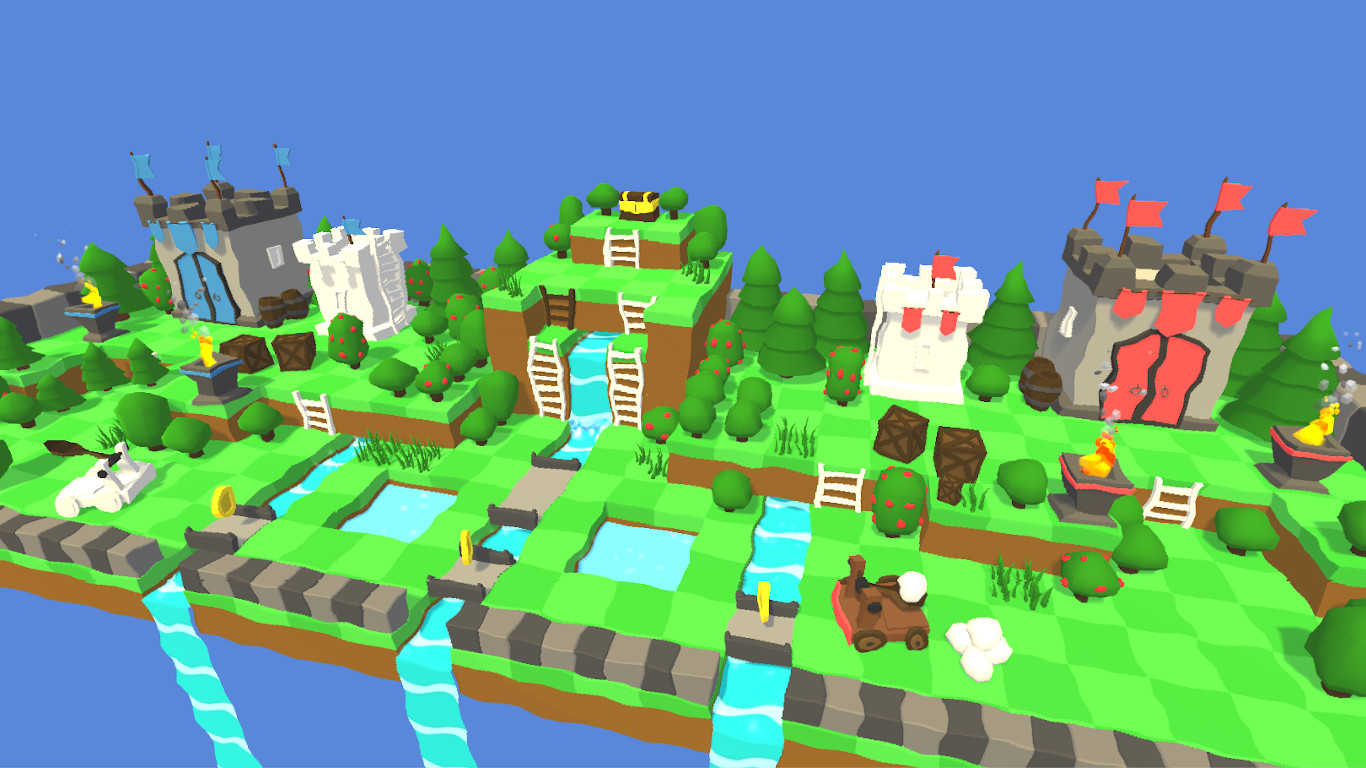
At this stage, we obtain an image like the one below.
Blue Shift
Now we’ll add the water tint. As I mentioned, we want the amount of blending between the original pixel colour and the water tint to be controlled by the distance of the pixel from the camera. We’ve discussed the depth buffer extensively in the past, and that’s the device we’ll be using today to achieve this blending effect.
We’ll need a couple more properties to control the tint colour and the strength of the fog.
// In Properties.
_WaterColour("Water Colour", Color) = (1.0, 1.0, 1.0, 1.0)
_FogStrength("Fog Strength", Float) = 0.1

// In shader code.
uniform float4 _WaterColour;
uniform float _FogStrength;
In the same way we use Unity’s UnpackNormal built-in function to extract normals from a texture, we’re going to use the UNITY_SAMPLE_DEPTH and Linear01Depth functions to extract a depth value, and convert its value to be between 0 and 1, respectively. We’ll need to use the camera’s depth texture, which is possible in Unity by including the _CameraDepthTexture variable.
uniform sampler2D _CameraDepthTexture;
Before the return statement, we can use the two functions to read from the texture.
float depth = UNITY_SAMPLE_DEPTH(tex2D(_CameraDepthTexture, uv));
depth = Linear01Depth(depth);
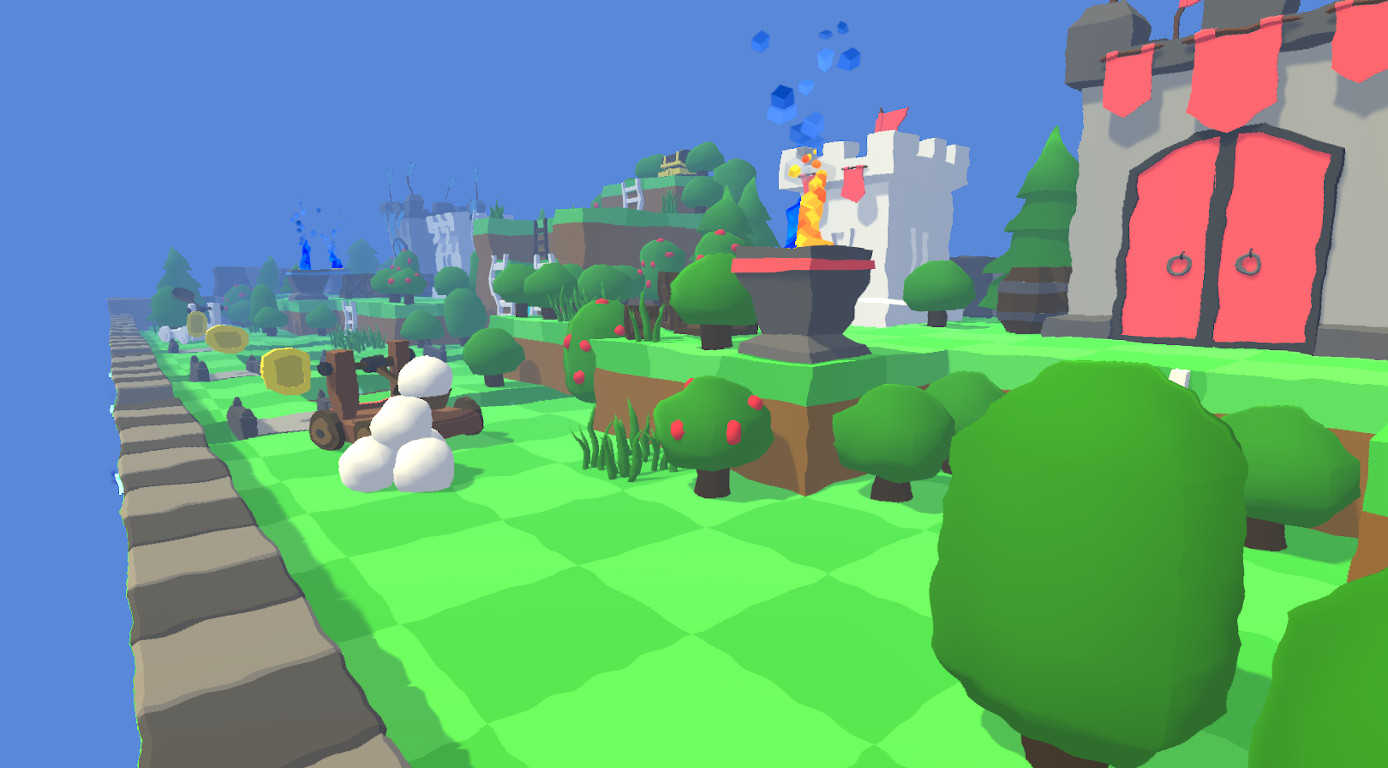
Then, we will blend the colour between the original pixel and the water tint, using this depth value multiplied by _FogStrength as a parameter, using the lerp function. If _FogStrength is set to zero, fog will be turned off.
col = lerp(col, _WaterColour, depth * _FogStrength);
Now, the output of the fragment shader looks a lot more like this:
Scripting
Before we reach that stage, we’ll need to write a short script to drive the effect. It’s in a similar format to the Fisheye effect, including an identical Render function, so we’ll just look at the variables we’ll use to feed the shader.
[SerializeField]
private Texture2D normalMap;

[SerializeField]
private float strength = 0.01f;

[SerializeField]
private Color waterColour = Color.white;

[SerializeField]
private float fogStrength = 0.1f;

public override void OnCreate()
{
    baseMaterial = new Material(Resources.Load<Shader>("Shaders/Underwater"));

    baseMaterial.SetTexture("_BumpMap", normalMap);
    baseMaterial.SetFloat("_Strength", strength);
    baseMaterial.SetColor("_WaterColour", waterColour);
    baseMaterial.SetFloat("_FogStrength", fogStrength);
}
With this script in action - you can see the full script at Scripts/Image Effects/UnderwaterEffect.cs - we can create instances of UnderwaterEffect using Create>Image Effects Ultra>Underwater.
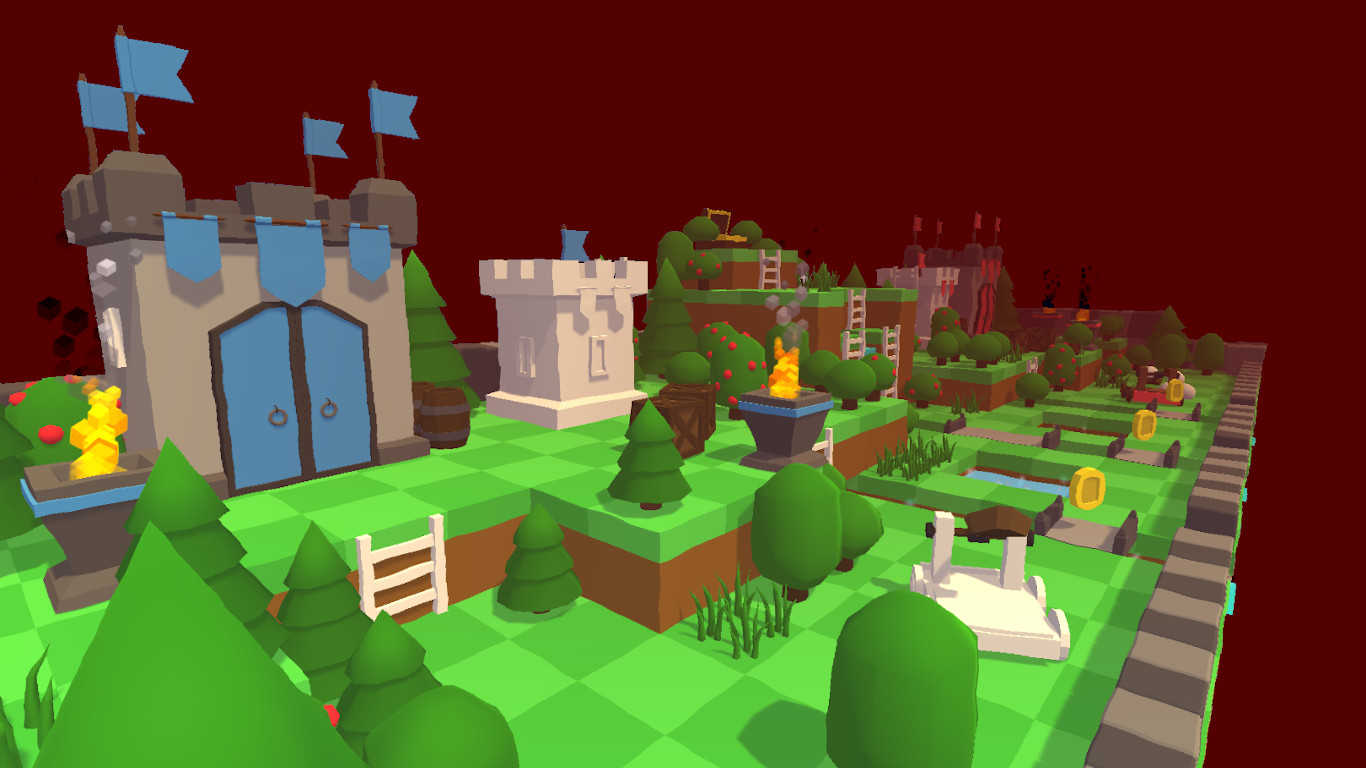
With a little creativity, we can create an effect that’s not strictly to do with being underwater. If you’d like to create a hellish effect, you could turn the ‘water colour’ red and turn down the wave overlay strength a little to simulate a heat haze. This effect is included under Effects/Hell.asset.
Composite Effects
Now that we’ve seen two effects, we can look at composition of effects. I’ve written a super-simple extra script that allows you to add as many effects as you’d like to a list, which are then executed in order each frame. If you’ve used Unity’s Post-Processing Stack, then this is my (simplified) answer to that.
using System.Collections.Generic;
using UnityEngine;

[CreateAssetMenu(menuName = "Image Effects Ultra/Composite", order = 1)]
public class CompositeEffect : BaseEffect
{
    [SerializeField]
    private List<BaseEffect> effects;

    // Call OnCreate() on all effects in the list.
    public override void OnCreate()
    {
        for(int i = 0; i < effects.Count; ++i)
        {
            effects[i].OnCreate();
        }
    }

    public override void Render(RenderTexture src, RenderTexture dst)
    {
        RenderTexture tmpSrc = RenderTexture.GetTemporary(src.width, src.height);
        RenderTexture tmpDst = RenderTexture.GetTemporary(src.width, src.height);
        Graphics.Blit(src, tmpSrc);

        for (int i = 0; i < effects.Count; ++i)
        {
            effects[i].Render(tmpSrc, tmpDst);

            // Swap the two render textures.
            var tmp = tmpSrc;
            tmpSrc = tmpDst;
            tmpDst = tmp;
        }

        Graphics.Blit(tmpSrc, dst);

        RenderTexture.ReleaseTemporary(tmpSrc);
        RenderTexture.ReleaseTemporary(tmpDst);
    }
}
Here’s the entire class definition. Its OnCreate method initialises each of the sub-effects, and the Render method evaluates each effect in turn by creating two temporary textures and constantly swapping between the two. This means we can create arbitrary composite effects in the Editor and add as many effects - even multiple of the same type of effect - to the effects list. This is what a hybrid underwater-fisheye effect looks like - note that the order of operations does matter so the underwater effect is applied first in this case.

Conclusion
Building on the work from last tutorial, we’ve implemented a pleasing underwater effect with customisable strength and colour. We’ve also seen how easy it is to create assets that combine multiple effects together.
In the next tutorial, we will move on to a Mosaic shader which turns your image into a series of small tiles.
Acknowledgements
This tutorial series uses the following asset packs - available on the Unity Asset Store:
| Forest - Low Poly Toon Battle Arena / Tower Defense Pack | AurynSky |