Many games feature impossible geometry such as Antichamber, which has a room full of cubes which each contain different objects when viewed from different sides. All the objects apparently inhabit the same physical space, but there’s a rendering trick we can use to make sure we only see certain objects. In this article, we will learn about stencils and how to use URP’s Renderer Features to make it easy to work with them.
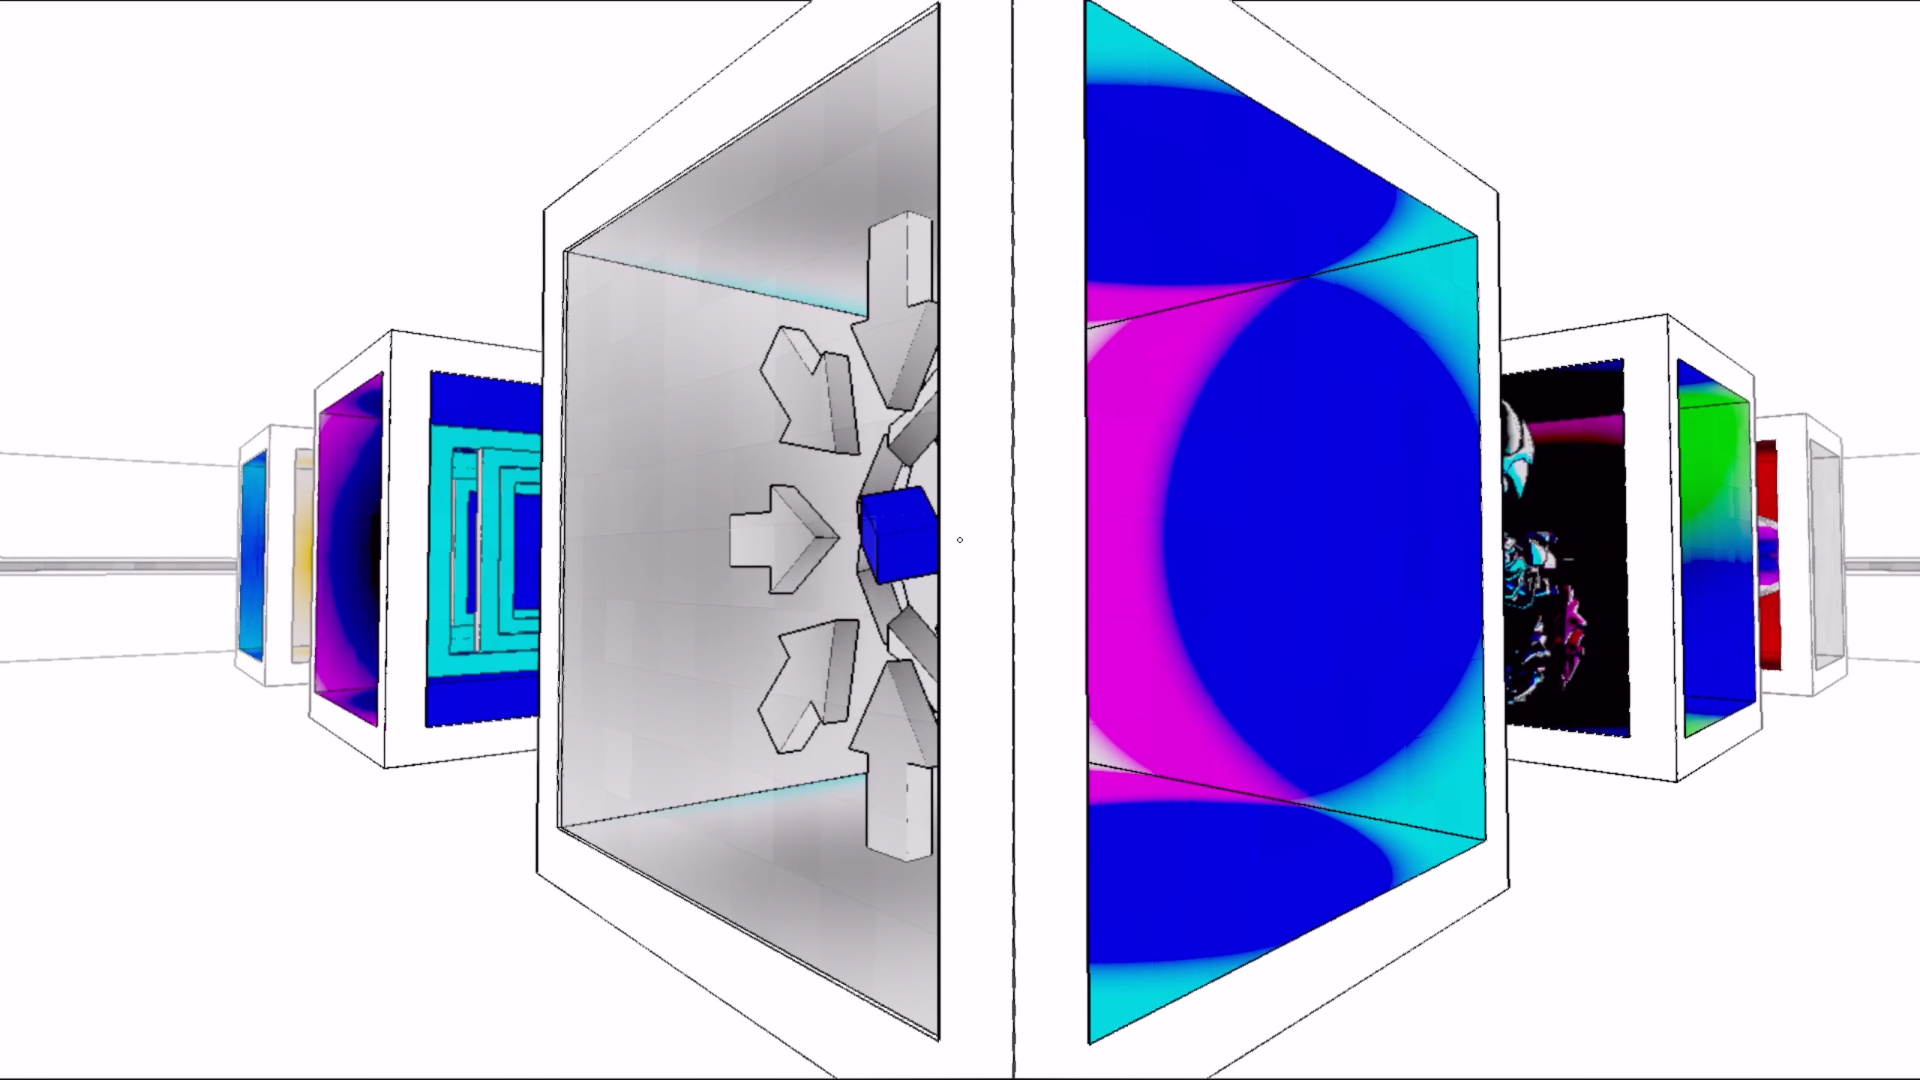 Impossible stencils in Antichamber.
This tutorial is aimed at people who have a bit of experience with shaders. We are using Unity 2020.3.21f1 and URP 10.6.0.
Check out this tutorial over on YouTube too!
Stencils
Stencils are a shader feature which let us set up rules to control whether to render certain objects or parts of objects. When rendering an object, we can tell Unity to remember which parts of the screen contained the object, even if we make the object completely invisible. Later, while rendering a different object, we can ask Unity: “Hey, was this bit rendered before by that other object? Yeah? Well, I guess I’ll discard the current pixel”. Or we can say, “I only want to render the current object if I rendered a stencil here previously”. Maybe you can see how this will be helpful for making impossible geometry rooms like the ones in Antichamber.
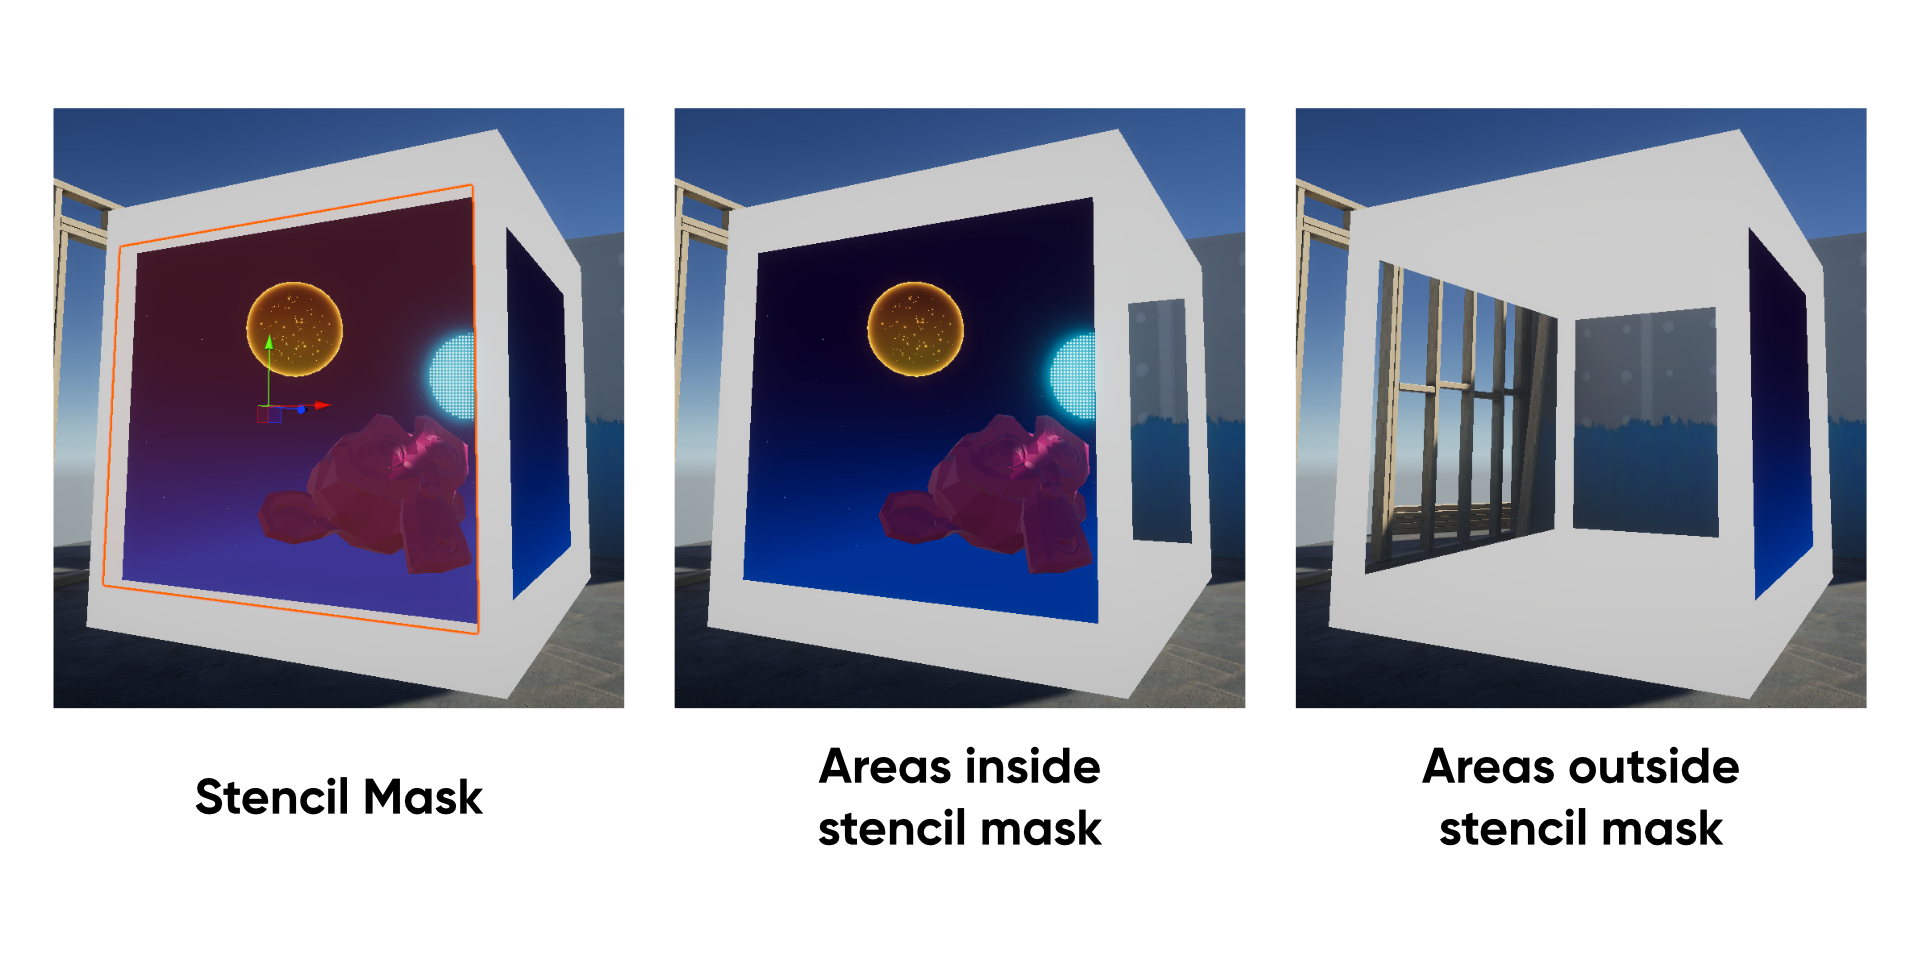 Different effects can be made with the same mask.
First, we’ll write a mask shader to define the region where Unity can draw one set of ‘impossible’ objects. In the example above, the mask will be applied to the first object that gets rendered. Stencils work by reading, writing, and comparing integer values attached to each pixel on-screen - by default, all pixels have a stencil reference of zero, so we’ll overwrite the value with this shader. Here is the shader’s skeleton.
Shader "Examples/Stencil"
{
     Properties
     {

     }
     SubShader
     {
          Tags
		{

		}

          Pass
          {

          }
     }
}
Stencil IDs can run from 0 to 255, so I’ll start by setting up a property called _StencilID so we can set up lots of materials with different stencil IDs. This is the only property we need.
Properties
{
     [IntRange] _StencilID ("Stencil ID", Range(0, 255)) = 0
}
We need the mask shader to write the new stencil value before any other shader needs to read it, which we usually do by forcing the mask to render before the opaque geometry queue. However, we can use URP Renderer Features in a later step to force objects inside the ‘impossible’ space to render after the mask, so we can just use the standard Geometry queue for the mask shader. This is the full Tags block.
Tags
{
     "RenderType" = "Opaque"
     "Queue" = "Geometry"
     "RenderPipeline" = "UniversalPipeline"
}
Inside the Pass block, we need to make the object render invisibly because we don’t want to see the mask, just the objects behind it. We do that by saying Blend Zero One, which means that the output color of this pixel equals 0% of the color output by this shader, and 100% of the color already in the framebuffer for this pixel. Then, we need to add ZWrite Off to prevent this shader writing to the depth buffer, which would screw up the rendering of other objects.
Pass
{
     Blend Zero One
     ZWrite Off

     // Stencil block here.
}
Now we can write the stencil itself. We add a Stencil block, complete with curly braces, and add all stencil logic inside the block. First is the reference value. We can write Ref 1 to use a stencil reference of 1, Ref 2 to use a reference of 2, and so on, or we can say Ref [_StencilID] because we already set up a property for this. It always pays to plan ahead. Next, we will add a stencil test which compared the Ref value we just defined with whatever stencil value is already set on this pixel - depending on whether the comparison passes of fails, we can change the stencil value for this pixel in different ways. We’re not actually interested in comparison for the mask shader and we always want to overwrite the stencil value for this pixel, so we can say Comp Always, which means the stencil test always passes. The opposite would be Comp Never, which always fails.
Finally, we tell Unity what to do when the test passes of fails. An important detail here is that we’ll have to pass a depth test too. If both tests pass, we want to replace the current stencil buffer value with the reference we defined in this shader, which we do by saying Pass Replace. There are other kinds of behaviour you can use which we will see later. If either of the tests fail, then we can say Fail Keep which means Unity will keep whatever value is already in the stencil buffer (this is the default behaviour even if we don’t write Fail Keep).
Stencil
{
     Ref [_StencilID]
     Comp Always
     Pass Replace
     Fail Keep
}
That’s all we need to write for the mask shader, so we’ll pop back over to the Unity Editor. It’s time for our scene setup. I’ll put two sets of objects in the same physical space in a box like the one in Antichamber. You can see a bit of z-fighting on the objects here.
 You wait for some impossible geometry, then two come along at once.
We’re going to use stencils to pick between which one we’ll see with the help of URP Renderer Features. For this, we will need to add two layers which I’ll name StencilLayer1 and StencilLayer2 and assign each set of objects to a different layer.
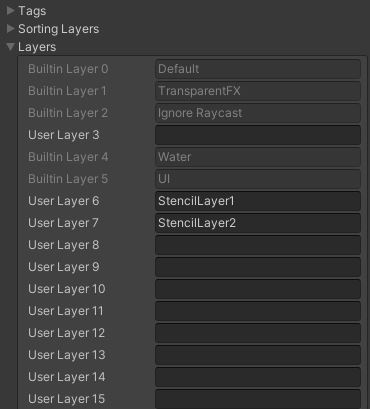 Layering on some impossible geometry.
I’ll create two materials using the stencil mask shader we wrote, with stencil values of 1 and 2 respectively, then create two quads on the faces of my impossible cube in front of each set of objects. I’ll assign one of the stencil mask materials to each quad. For now, you shouldn’t see any changes to the two sets of objects, but the quads will turn invisible.
 I’m just using Unity quads, but you can actually use any mesh you want.
Now it’s time for Renderer Features. These are URP’s tool for overriding certain aspects of rendering which we can use here to play with the stencil values being set by the two quads. I’m doing it this way because the traditional method for dealing with stencils is to write a custom version of each shader for all the objects inside the impossible space, but I want to avoid the extra work and let myself just add any old shader to the objects without needing to add stencil functionality. URP can deal with the stencil comparisons for me.
First, find the Forward Renderer asset. In a default URP project, it’s in the Settings folder. It’ll look something like this.
 We can change lots of rendering settings here.
The first step is to head for the Filtering section and untick StencilLayer1 and StencilLayer2 on the Opaque and Transparent layer masks. Your objects should disappear from the Scene View when you do that, because they are no longer being rendered by default. Then, head to the bottom and click Add Renderer Feature, then choose the Render Objects option. I’ll name this one “Stencil 1 Opaque”. We’ll leave the Event as AfterRenderingOpaques, which forces Unity to render them just after the standard Geometry queue - that’s why we could use the Geometry queue for our mask shader.
Under the Filters section, we want the Layer Mask to use just StencilLayer1 - the opaque objects in that layer should pop back into existence. In Overrides, tick Stencil, and this is where we’ll be using the stencil values set by the mask. We’ll use Value 1, and now we’ll decide what to do with objects in StencilLayer1 with a stencil value of 1, which should be any object in that layer behind the mask quad. If we change the comparison function to Equal, then we’re asking Unity: “Does this pixel have a stencil value equal to 1?” and only is this is true do the objects in StencilLayer1 get drawn. We don’t need to change the stencil buffer value after rendering these objects, so both Pass and Fail can use the Keep setting.
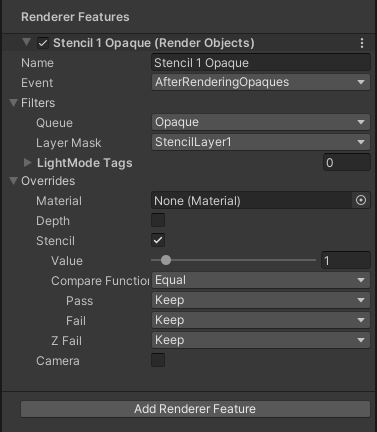 The opaque objects in layer 1 should now only appear from the correct side.
That’s dealt with the opaques for one of the layers. We’ll need to add a second Renderer Objects feature called “Stencil 2 Opaque”. This is the same as the first, except it uses StencilLayer2 (and only StencilLayer2) for its layer mask instead, and the stencil value is now 2. Everything else is the same.
 Opaques will now appear as we want them to.
If you will be using transparent objects inside the impossible geometry, you will need two extra features with the same settings as the first two (one for StencilLayer1 and one for StencilLayer2, as before), except the Event needs to be AfterRenderingTransparents and the Queue now needs to be Transparent. If you want additional sets of impossible geometry objects, then add more layers, more stencil masks using other stencil IDs (such as 3 and 4), and more pairs of Render Objects features in the same way.
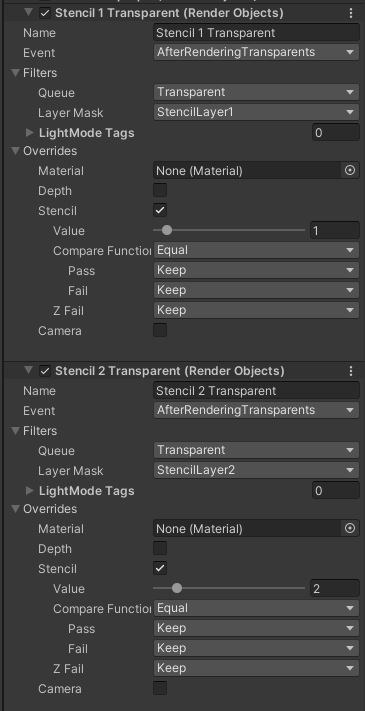 And after this, transparents will only appear from the correct side.
If we pan the camera across the Scene View, you will see that the geometry within the cage will be different on each side.
 If you pan the camera from side to side, the left objects only appear when viewed from the left.
Conclusion
Impossible geometry can be employed for purely visual effects, like this, and for gameplay-related visuals with a bit more work. You would potentially need to enable and disable collisions or entire objects if you were to do that, but it can certainly be done! If you’re interested in learning more about stencils, I briefly used them while making portals from the game Portal to mask out the parts of a portal frame and use the capture from a separate camera to render the camera view. Check it out here for the built-in renderer or on YouTube for a URP-compatible version!
Acknowledgements
Supporters
Support me on Patreon or buy me a coffee on Ko-fi for PDF versions of each article and to access certain articles early! Some tiers also get early access to my YouTube videos or even copies of my asset packs!
Special thanks to my Patreon backers for January 2022!
Gemma Louise Ilett
Jack Dixon Morrie Pisit Praiwattana Underwater SUN
FonzoUA Josh Swanson Moishi Rand
Agnese Anna Voronova Brocktoon ccxvee James Poole JP Ming Lei Paul Froggatt Ying Mo Zachary Alstadt