The PlayStation 1 was many people’s first ever 3D games console. That’s true for me - I grew up playing games like Spyro and Crash Bandicoot and, uhh, Metal Gear Solid? Probably not the most suitable game for a kid, but I turned out okay anyway - I think. PS1 games have a very nostalgic feel, although a lot of its quirks are down to technical limitations that developers had to work around. In this tutorial, we’ll look at one of those flaws and recreate it in shader code.
This tutorial is aimed at people who have a bit of experience with Shader Graph. We are using Unity 2020.3.2f1 and URP/Shader Graph 10.4.0.
Check out this tutorial over on YouTube too!
How the PS1 Handles Textures
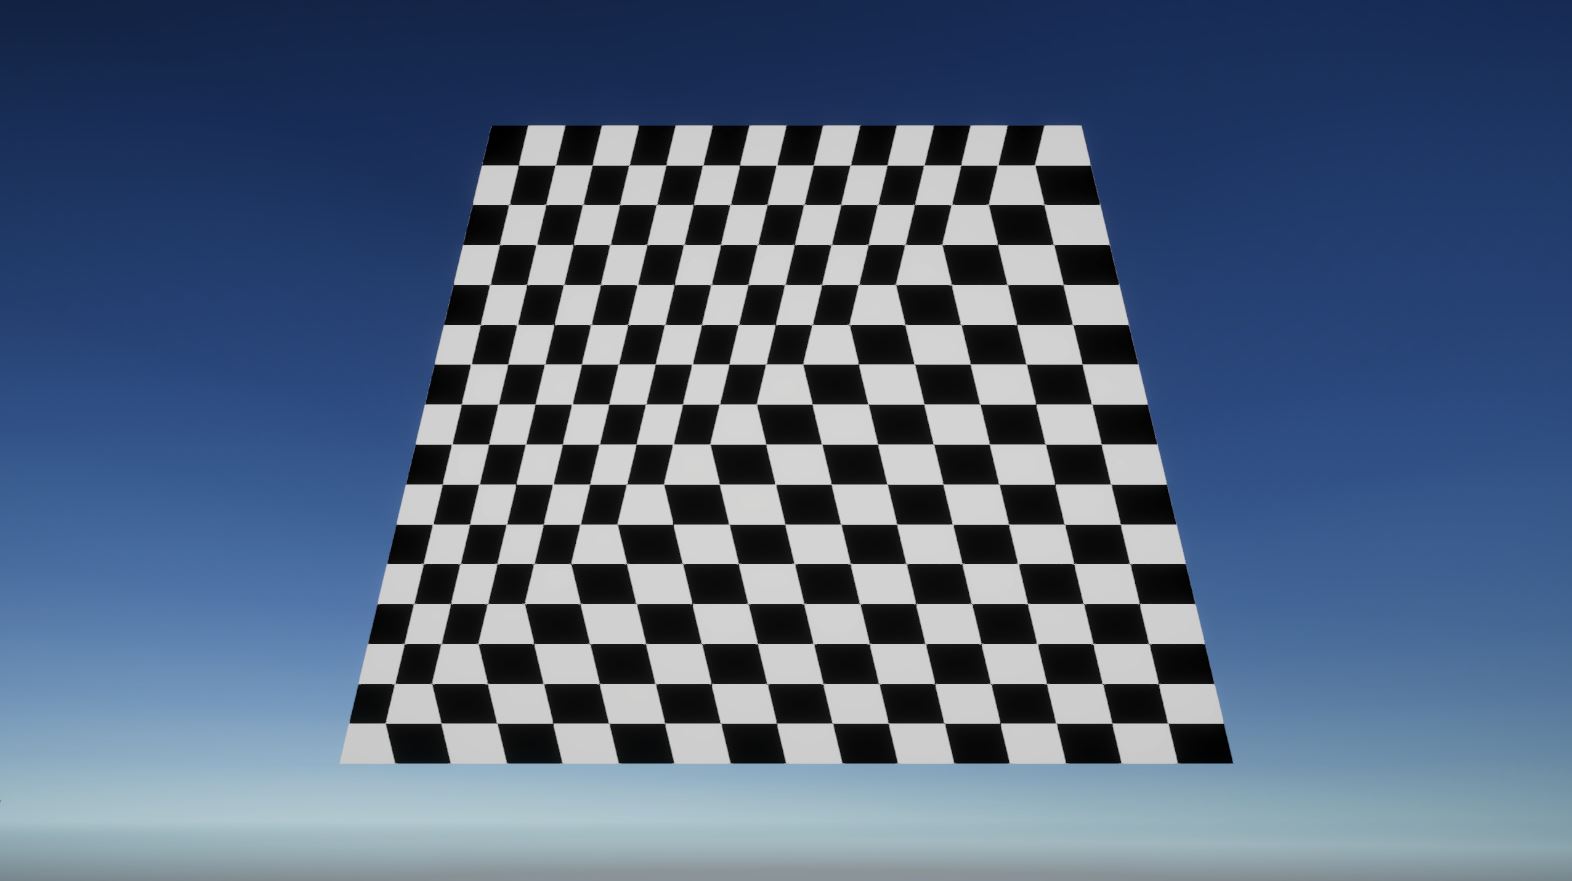
The PS1 does not properly account for the camera’s perspective during the texturing process. Instead, the PS1 uses affine texture mapping, where UV coordinates are interpolated between vertices using only their (x, y) positions and ignoring the z-axis depth of each vertex. This process occurs between the vertex and fragment shader stages. You can tell when we’re using affine texture mapping, because for each triangle of a mesh, the textures will always be parallel to two of the triangle’s edges. It’s easiest to see on a checkerboard texture - when mapped onto a quad, you will see the line shared by the two triangles very clearly.
 Lookin’ pretty (af)fine.
Modern hardware, and even other consoles at the time like the Nintendo 64, can correctly account for the z-axis during this step, so the squares on the checkerboard texture get smaller as they get further away from the camera. Unfortunately for us, this step is automatic on modern hardware, but luckily, it’s pretty easy to reverse. We’ll look at two methods - one is very quick to implement, and the other is even easier.
 Sometimes you just need the right perspective.
Hacking the automatic interpolation step
A standard vertex shader will transform vertex positions from object space to clip space using the UnityObjectToClipPos or TransformObjectToHClip function, depending on which render pipeline you’re using. For texture coordinates, we can set the output equal to the input, or use the TRANSFORM_TEX macro to account for offset and tiling options on a specific texture.
VertexOutput vert(VertexInput i)
{
     VertexOutput o;

     o.positionCS = TransformObjectToHClip(i.positionOS);
     o.uv = TRANSFORM_TEX(i.uv, _MainTex);

     return o;
}
What we’re going to do differently here is undo the perspective effect manually by using the w component of the position (although positions are in 3D space, we use an extra ‘homogeneous’ coordinate to make some matrix operations possible). In the vertex shader, I’ll take the UVs and multiply by that w component.
VertexOutput vert(VertexInput i)
{
     VertexOutput o;

     o.positionCS = TransformObjectToHClip(i.positionOS);
     o.uv = TRANSFORM_TEX(i.uv, _MainTex) * o.positionCS.w;

     return o;
}
Then, in the fragment shader, we will divide the UV by the position w component while sampling the texture.
float4 frag(VertexOutput i) : SV_Target
{
     float4 col = SAMPLE_TEXTURE2D(_MainTex, sampler_MainTex, i.uv / i.positionCS.w);
     return col;
}
It appears that we’ve just multiplied and divided by the same thing, but no - the trick here is that the position is getting interpolated alongside the UVs between both shader stages. The result of doing these extra operations in this order is that we’re undoing the perspective correction for the UVs, just like we wanted to.
Turning off perspective with a keyword
That’s one way to do it, but there’s an even easier way. We’ll start with a fresh shader file, and instead of making changes in the vertex or fragment functions, we will go to the VertexOutput struct - which contains data passed from the vertex shader to the fragment shader - and put the noperspective keyword in front of the UV declaration. This keyword instructs the underlying graphics API to skip the perspective correction step.
struct VertexOutput
{
     float4 positionCS	: SV_POSITION;
     noperspective float2 uv : TEXCOORD0;
};
Conclusion
Later PS1 games tried to mitigate the warping effect of affine texture sampling by simply using subdivided geometry, which meant that these texture glitches happened on smaller triangles, and were therefore less noticeable. Of course, this wasn’t always possible, because the PS1 had limited memory as an extra limitation. Regardless, I hope you’re able to put this to great effect with your own PS1-style games!
Acknowledgements
Supporters
Support me on Patreon or buy me a coffee on Ko-fi for PDF versions of each article and to access certain articles early! Some tiers also get early access to my YouTube videos or even copies of my asset packs!
Special thanks to my Patreon backers for October 2021!
Gemma Louise Ilett
Jack Dixon Morrie Pisit Praiwattana Sébastien Perouffe
FonzoUA Josh Swanson Moishi Rand
Agnese Anna Voronova Brocktoon Christopher Pereira Hann Harshad James Poole JP Ming Lei Paul Froggatt Timothy Hanna Yasiel A. Ying Mo Zachary Alstadt