We’ve now dealt with almost all the moving parts of portals. We can fire portals at walls and floors, with automatic position and rotation correction. We can place a virtual camera at the correct place and paste a screenshot of the world on the portal’s surface, with correct oblique near-plane camera clipping. And we can even throw objects including the player through the portals and preserve their velocity relative to their new location. Alas, we’re unable to look through a chain of portal surfaces and seamlessly see a sequence of portal views through each - until now.
It’s a good idea to make sure you have the latest version of the code, available on GitHub.
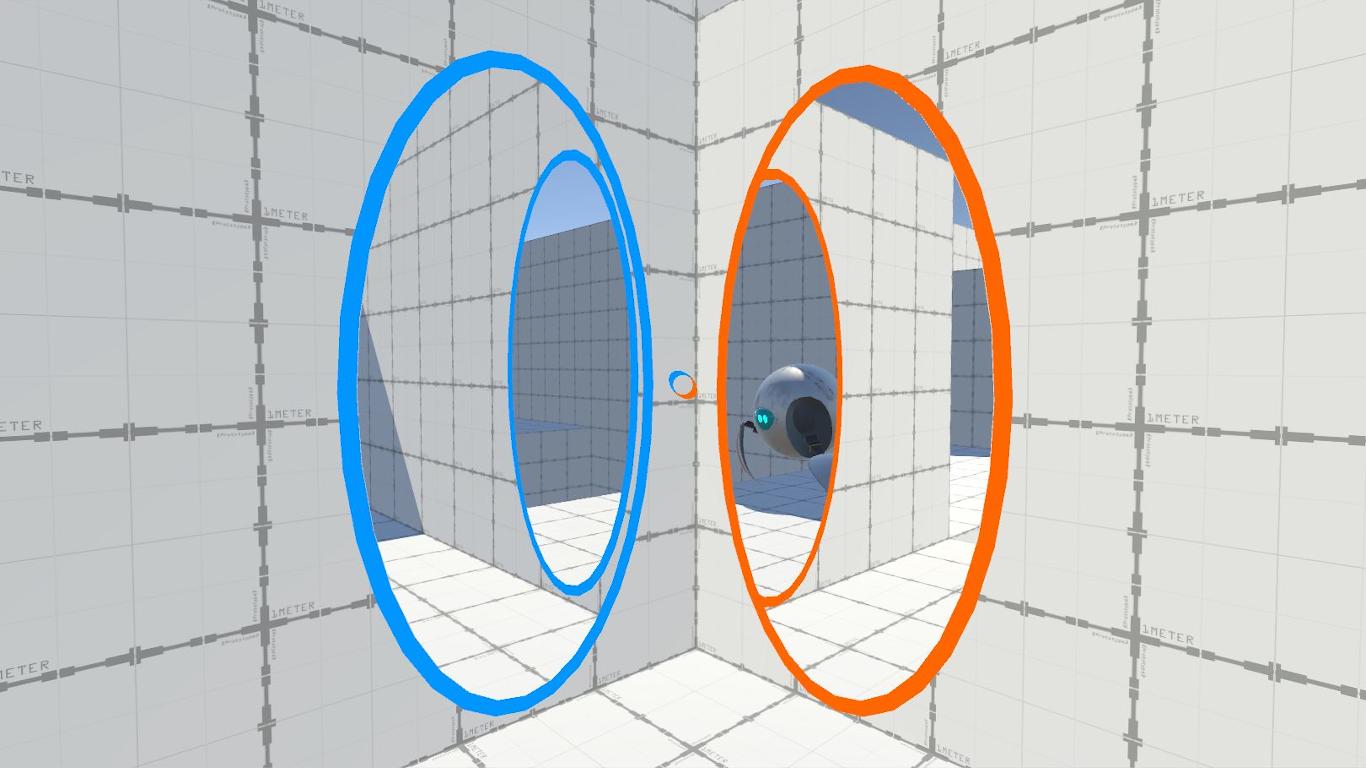
Portal recursion
So far, we’ve been using the stencil buffer to cut portal holes in the image texture captured by the main camera, then applying the virtual camera’s texture over the holes as a post-processing effect. That’s not the only way to map the virtual camera’s texture to the portal surface, however; it’s just an interesting way to show off the capabilities of the stencil buffer. While it’s possible to achieve recursion using this technique, it’s cumbersome having to deal with multiple stencil ID values. There’s an alternative which I’ve found to be far easier both to implement and to explain.
Instead of stencils, we can use screen-space sampling. When we were using stencils, the portal surface used a material which rendered nothing to the screen but set a stencil ID which defined a region that would be drawn over by the virtual camera during the postprocessing step. It required a second shader which read the stencil buffer to find pixels with those IDs.
The alternative method is a pre-processing step, not a postprocessing step - we’ll map a texture onto the portal surface before the main camera renders the screen. The basic idea is that we’ll do the inverse positioning method for the virtual camera, take a screenshot, then paste that image over the portal surface using screen-space sampling. We use the screen-space position of each pixel on the portal surface as a UV coordinate on the screen-sized image captured by the virtual camera - it’s less complicated than using the stencil buffer if we want a non-recursive effect.
But here’s the trick: if we want to perform recursive iterations, then we can do the inverse positioning step several times and take a capture after each repositioning. The caveat to this approach is that we must capture the iterations in reverse - the deepest iteration is done first and the texture applied to the portal, then the second-deepest iteration is performed with the texture from the deepest iteration applied to the portal surface and visible to the camera, and so on until the ‘first’ iteration. The key part here is that each iteration sees the result of the previous one when the virtual camera takes its screenshot.
Note that we will still include a stencil on the screen-space sampling shader. We aren’t using the stencil for portal rendering - we’re using it to correctly cull parts of the portal outline.
Recursive portal shader
We’ll look at the screen-space shader first. Open Shaders/RecursivePortal/RecursivePortalMask.shader. For that matter, also open Scenes/RecursivePortals.unity to see everything set up already.
RecursivePortalMask doesn’t need to take a MaskID in Properties - only a _MainTex.
Properties
{
    _MainTex("Main Texture", 2D) = "white" {}
}

// Above fragment shader.
uniform sampler2D _MainTex;
We will be including a stencil in order to cull the portal’s outline - but we’ll set a reference value of 1 so that it works well for both portals. We’re not using this stencil for rendering the portal view.
Stencil
{
    Ref 1
    Pass replace
}
Now that we are using screen-space textures, we’ll need a modified vertex-to-fragment struct to ensure the screen-space position of the pixel is sent to the fragment shader instead of conventional UV coordinates. The appdata struct can be modified to remove the uv property as it is no longer needed.
struct appdata
{
    float4 vertex : POSITION;
};

struct v2f
{
    float4 vertex : SV_POSITION;
    float4 screenPos : TEXCOORD0;
};
In order to pass the screenPos to the fragment shader, we must calculate it in the vertex shader. Unity includes a built-in ComputeScreenPos function which takes in the vertex position and spits out a modified screen-space version.
v2f vert(appdata v)
{
    v2f o;
    o.vertex = UnityObjectToClipPos(v.vertex);
    o.screenPos = ComputeScreenPos(o.vertex);
    return o;
}
All that’s left is the fragment shader. To use screenPos as a UV coordinate, we need to divide the xy components by the w component to ensure the coordinates are scaled properly, then we can use the tex2D function using those new screen-space UVs to extract the corresponding pixels from _MainTex.
fixed4 frag(v2f i) : SV_Target
{
    float2 uv = i.screenPos.xy / i.screenPos.w;
    fixed4 col = tex2D(_MainTex, uv);
    return col;
}
The shader is now finished - so let’s move on to the script that controls image capture.
Recursive portal scripting
Open Scripts/RecursivePortal/RecursivePortalCamera.cs. The RecursivePortalCamera script controls the capture of each portal iteration. It looks strikingly like the BasicPortalCamera script, but with a handful of differences. First, there’s no portalMaterial because we’re not doing a postprocessing effect, and there are no maskIDs defined either. There is an additional iterations parameter for controlling the number of recursions and two tempTexture parameters for storing the screen captures of each virtual camera.
private RenderTexture tempTexture1;
private RenderTexture tempTexture2;

private const int iterations = 7;
We’ll have to create those in Awake and assign the textures to each portal in Start.
private void Awake()
{
    mainCamera = GetComponent<Camera>();

    tempTexture1 = new RenderTexture(Screen.width, Screen.height, 24, RenderTextureFormat.ARGB32);
    tempTexture2 = new RenderTexture(Screen.width, Screen.height, 24, RenderTextureFormat.ARGB32);
}

private void Start()
{
    portals[0].SetTexture(tempTexture1);
    portals[1].SetTexture(tempTexture2);
}
Now let’s jump to the RenderCamera function. As mentioned, it’s like the same function on BasicPortalCamera, but with an added iterationID parameter. All code pertaining to oblique matrices onwards is the same - so let’s focus on the virtual camera transformation code.
We’ll start off by caching a few things like last time. We’ll keep a handle on the cameraTransform and use that as the initial reference point of each transformation step.
Transform inTransform = inPortal.transform;
Transform outTransform = outPortal.transform;

Transform cameraTransform = portalCamera.transform;
cameraTransform.position = transform.position;
cameraTransform.rotation = transform.rotation;
Now, we’ll use a loop to control the position. This function is only going to capture one portal recursion iteration, so we’re going to need to perform the repositioning step several times in order to put the camera in the correct place for the current recursion. The code inside the function is almost the same, but we’re using cameraTransform where we used just transform last time (in this context, transform is the parent of cameraTransform - the RecursivePortalCamera script is attached to the virtual camera’s parent).
for(int i = 0; i <= iterationID; ++i)
{
    // Position the camera behind the other portal.
    Vector3 relativePos = inTransform.InverseTransformPoint(cameraTransform.position);
    relativePos = Quaternion.Euler(0.0f, 180.0f, 0.0f) * relativePos;
    cameraTransform.position = outTransform.TransformPoint(relativePos);

    // Rotate the camera to look through the other portal.
    Quaternion relativeRot = Quaternion.Inverse(inTransform.rotation) * cameraTransform.rotation;
    relativeRot = Quaternion.Euler(0.0f, 180.0f, 0.0f) * relativeRot;
    cameraTransform.rotation = outTransform.rotation * relativeRot;
}
Now let’s look at where RenderCamera is used. Instead of using OnRenderImage, as does BasicPortalCamera, we’ll use OnPreRender. The latter method does not take any parameters and is called before the main camera is rendered. Like last time, if either portal isn’t placed for whatever reason, we’ll immediately exit the function.
private void OnPreRender()
{
    if (!portals[0].IsPlaced() || !portals[1].IsPlaced())
    {
        return;
    }

    ...
}
Now we’ll consider each portal separately. We mentioned earlier that we need to render the iterations in reverse order - this is where we’ll set up the loop to do just that. We’ll check if the portal surface is visible at all, and if it is, we’ll go ahead with the rendering loop. The portalCamera’s target is set to whichever tempTexture was allocated for the portal, then RenderCamera is called.
if (portals[0].IsRendererVisible())
{
    portalCamera.targetTexture = tempTexture1;
    for (int i = iterations - 1; i >= 0; --i)
    {
        RenderCamera(portals[0], portals[1], i);
    }
}
We repeat this for the other portal.
if(portals[1].IsRendererVisible())
{
    portalCamera.targetTexture = tempTexture2;
    for (int i = iterations - 1; i >= 0; --i)
    {
        RenderCamera(portals[1], portals[0], i);
    }
}
And that’s all there is to it. Running the game will result in portals that perfectly render the views through other portals recursively!
Conclusion
We’ve reached the end of our journey with portal rendering, capping things off with fully recursive portals! We’ve come a long way - with a bit of extra polish and a few more edge cases crossed off the list, you could feasibly use these as a mechanic in your game. I hope you’ve learned something during our journey - we’ve explored many concepts while creating this effect. I had originally planned to include an article on particles and other effects to make our portals look a little nicer, but in the end I decided that it was more important to get this article out sooner - and I may return to do an article on particle effects in the future.
I’m planning to take a break until early February in order to work on the next set of tutorial articles. Until that time, I hope you have fun building on the foundations this series provided!
Acknowledgements
Assets
This tutorial series uses the following asset packs from various sources:
| “Skybox Volume 2 (Nebula)” | Hedgehog Team |
| “Robot Sphere” | Razgrizzz Demon |
| “Low Poly Hand Painted Dungeon Arch” | BitGem |