Placing portals and ensuring they’re positioned correctly is more involved than you may expect. The basic idea is to point in a direction and press shoot to move a portal to that point on the wall. But there are many questions to ask: what types of object can block the portal shot? What if that position would hang over the edge of a surface or intersect another wall? And how do we make sure the portal has the correct rotation?
Proper placement
To start off with, let’s handle the initial positioning. We’ll raycast in the direction the player is facing until we hit a wall (and do nothing if we’re looking into thin air). At the point the wall is hit, we’ll place the portal and make sure it is rotated correctly. Already, there’s a lot of fiddly maths to deal with, so let’s jump right in.
It’s a good idea to make sure you have the latest version of the code, available on GitHub.
Open the PortalPlacement class, found at Scripts/PortalPlacement.cs. This will get attached to the player object and is responsible for shooting portals. The Portal class - found at Scripts/Portal.cs - will deal with corrective repositioning. Let’s jump into PortalPlacement.
[RequireComponent(typeof(CameraMove))]
public class PortalPlacement : MonoBehaviour
{
    [SerializeField]
    private PortalPair portals;

    [SerializeField]
    private LayerMask layerMask;

    [SerializeField]
    private Crosshair crosshair;

    private CameraMove cameraMove;

    private void Awake()
    {
        cameraMove = GetComponent<CameraMove>();
    }

    ...

}
This class needs access to each of the two portal objects so it can communicate when the player presses the left or right mouse button to place a portal. We’re requesting the PortalPair object (storing it in the portals variable), which contains references to the two individual portals. We’ll need a LayerMask (aptly named layerMask) to tell the physics engine which layers we want to be considered or ignored during the raycast. We’ll also reference a new Crosshair object, which is a UI element placed in the scene so a) we can see where the centre of the screen is, and b) we can see which of the two portals are active. Finally, we’ll reference the CameraMove object attached to the player so that we use the player’s targetRotation instead of its current rotation when shooting portals - that will cover the edge case in which a player exits a portal and shoots another one while their rotation is being reoriented. We don’t want portals to be placed strangely because of that.
private void Update()
{
    if(Input.GetButtonDown("Fire1"))
    {
        FirePortal(0, transform.position, transform.forward, 250.0f);
    }
    else if (Input.GetButtonDown("Fire2"))
    {
        FirePortal(1, transform.position, transform.forward, 250.0f);
    }
}
Firing the initial portal is easy. We’ll poll the Fire1 and Fire2 buttons for the first and second portals respectively, and call FirePortal if either is pressed. The ID of the portal is passed to the function along with the firing position and direction. Let’s write FirePortal piece by piece.
private void FirePortal(int portalID, Vector3 pos, Vector3 dir, float distance)
{
    RaycastHit hit;
    Physics.Raycast(pos, dir, out hit, 250.0f, layerMask);

    if(hit.collider != null)
    {
        ...
    }
}
Raycasting is the process of shooting a virtual “ray” and detecting if a Collider was hit by the ray. There are several kinds of casts we may use, but Physics.Raycast and Physics.Linecast are the most basic types and raycasting is the one that makes most sense here. We’re casting from the player camera’s position in the direction they’re facing. We need to retrieve data about any colliders detected by the cast, so we also pass in a RaycastHit struct using the out keyword, which means the function will output (not return) a RaycastHit and store it in the hit variable. We’ll specify a maximum raycast length of 250 and use layerMask to restrict the types of objects detected by the raycast.
Stepping outside of the code for a second and looking at the PortalPlacement component on the player camera, we’ll see that the layer mask selects only the LevelGeom and Portal layers; the level’s static geometry - anything we want a portal to attach to - is set to the LevelGeom layer, and the two portals (only their surface and not the graphical outline or border colliders from last tutorial) are labelled Portal. This means that we can stick most other objects in the Default layer and the portal will pass straight through them. If you wish to implement objects that can block portal shots, you can enable a separate layer on this mask and add some code to immediately return from the FirePortal method when an object in that layer is hit.
Let’s return to the code. We’ll skip the if-statement which checks for objects tagged “Portal” until later as this code relates to shooting portals through portals. After that, the next bunch of code handles the positioning and rotation of the new portal.
We’ll handle portal rotation a little differently than you might expect. Because we can place portals on a wall, floor or ceiling, we need to be careful with how we calculate the portal’s rotation. If we were only able to place portals on vertical walls, we could just make the up-direction the same as the world up-direction - but that wouldn’t work on floors and ceilings. We also want to orient the portal along the cardinal grid directions if it’s on the floor or ceiling. That means we’ll need to ‘round’ the rotation along certain axes to the nearest 90 degrees.
Let’s deal with the rounding first. In the end, we’re going to construct the new rotation using Quaternion.LookRotation, which will require us to pass in the up-direction and forward-direction - but it’s not easy to calculate the up-direction yet. Thankfully, we can calculate the right-direction, which is also the easiest to round to the nearest 90 degrees, then use the vector cross product using that right-direction and a known forward-direction to calculate the up-direction.
var cameraRotation = cameraMove.TargetRotation;

var portalRight = cameraRotation * Vector3.right;

if(Mathf.Abs(portalRight.x) >= Mathf.Abs(portalRight.z))
{
    portalRight = (portalRight.x >= 0) ? Vector3.right : -Vector3.right;
}
else
{
    portalRight = (portalRight.z >= 0) ? Vector3.forward : -Vector3.forward;
}

var portalForward = -hit.normal;
var portalUp = -Vector3.Cross(portalRight, portalForward);

var portalRotation = Quaternion.LookRotation(portalForward, portalUp);
We’ll retrieve the camera’s TargetRotation as mentioned so that we’re calculating the proper desired rotation. We can get the player’s right-direction by multiplying Vector3.right by the camera’s rotation. It’s easy to round that vector to the nearest 90 degrees by comparing its x- and z-components with each other to determine which of four possible quadrants the vector is pointing in, then setting the vector to be equal to one of the four cardinal directions. Now portalRight gives us a vector pointing along the desired x-axis of the portal.
The forward vector, portalForward, of the portal is the easiest of them all to calculate - it’s the negative of the raycast’s intersection point - we can use -hit.normal to retrieve this. Then, to get the up-direction - portalUp - we can use the vector cross product on portalRight and portalForward by calling Vector3.Cross with those as arguments. Remember that the cross product of two vectors returns a new vector perpendicular to those two.
It gets a bit fiddly and complicated explaining some of this, but rounding the right-direction to the nearest 90 degrees doesn’t necessarily mean the final rotation will be aligned with cardinal directions - this only applies to surfaces that align with the axes. But since most levels will probably be designed like this, it’s almost always the case.
Now that we’ve created a rotation, we can tell whichever portal we’ve fired where it should place itself.
portals.Portals[portalID].PlacePortal(hit.collider, hit.point, portalRotation);

crosshair.SetPortalPlaced(portalID, true);
The portal needs to know which wall collider we raycasted into in order to handle objects travelling through the portal (which we dealt with in the previous tutorial). The hit.point, which is the intersection point of the raycast and the collider, is the position the portal will attempt to place itself at.
Let’s switch to the Portal script now and go straight to the PlacePortal method.
public void PlacePortal(Collider wallCollider, Vector3 pos, Quaternion rot)
{
    this.wallCollider = wallCollider;
    transform.position = pos;
    transform.rotation = rot;
    transform.position -= transform.forward * 0.001f;

    FixOverhangs();
    FixIntersects();
}
This method places the portal in the position and orientation we passed to the function. However, it needs to detach itself from the wall slightly to avoid z-fighting issues with the wall texture, so we move the portal outwards along its forward-directon very slightly - not enough to be visible. Then two more methods - FixOverhangs and FixIntersects - are called. Why? Let’s demonstrate what happens so far.
This is what happens when you shoot at the centre of a wall. So far, so good!
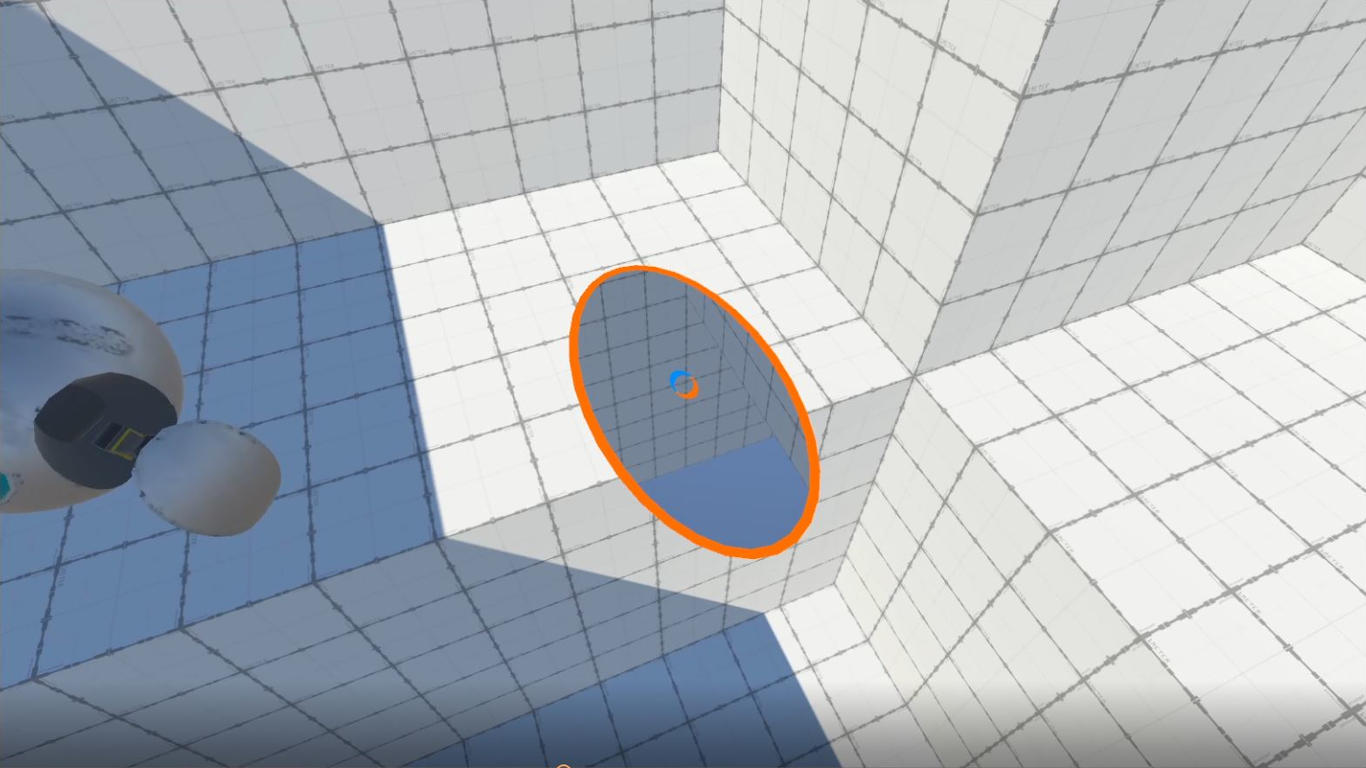
This is the result when you shoot near the edge of a surface. Not so great. The portal hangs over the edge.
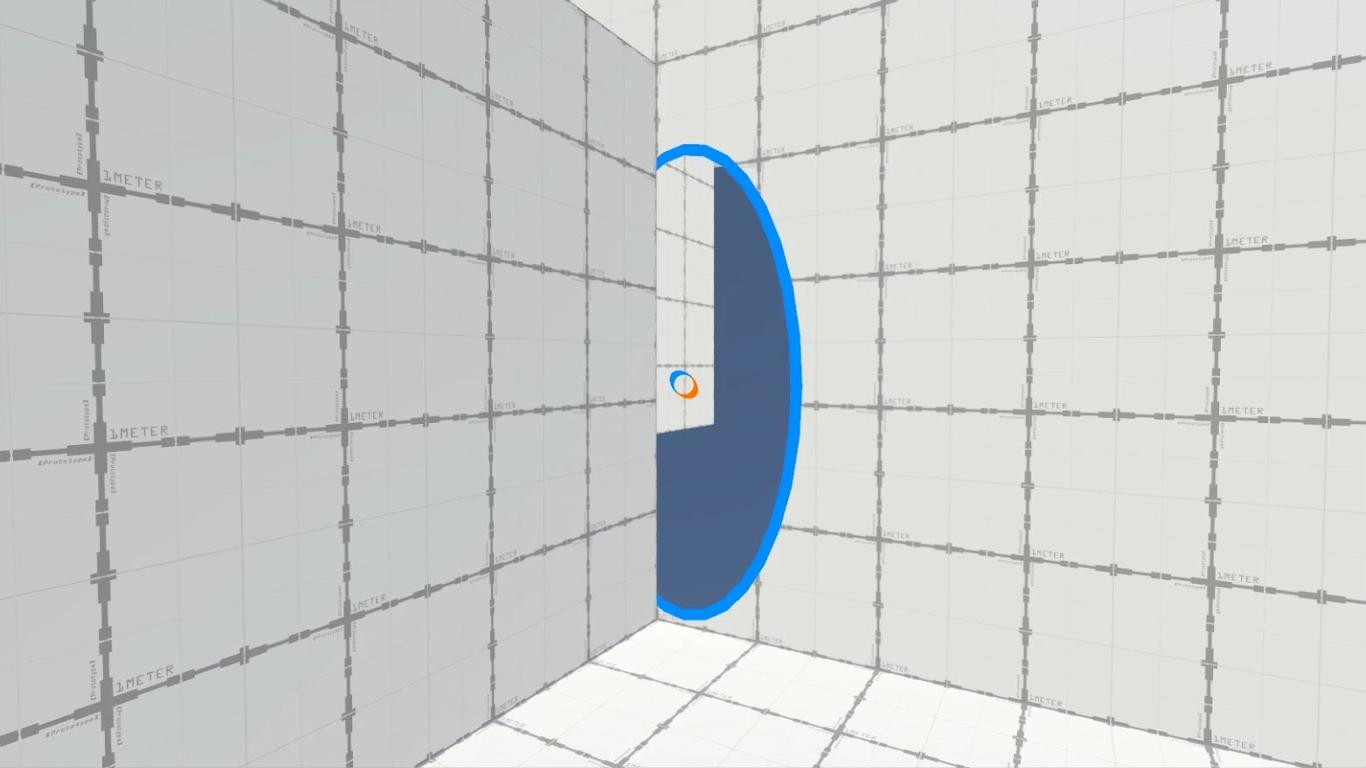
And this is what happens when you shoot at a surface near a protruding section of wall. The portal intersects the wall.
Fixing overhangs
Let’s deal with overhangs first. There’s no convenient method for detecting where an overhang exists and automatically moving the portal by the correct amount, so we’re going to have to check manually. Our strategy for doing so will be to raycast from just behind the portal at each of its four edges, pointing inwards towards the portal’s centre. If the start point already intersects a wall, then great - this edge doesn’t overhang. If it does not, then we’ll need to perform the raycast to check how far away the edge of the wall is. Then we’ll nudge the portal in that direction by the distance from the raycast to the hit point. After repeating that for all four edges, the portal shouldn’t overhang any more. However, this isn’t a complete solution - check the Limitations section at the end for some improvements that need to be made to this code.
First off, for these raycasts, we’re going to need a different LayerMask attached to each Portal component. We’ll call it placementMask, make it a serialized variable and assign only the LevelGeom layer to it, since we’re only concerned with correcting the portal’s position in relation to other sections of wall.
Let’s look at the code in the FixOverhangs method in Portal. We’re going to consider four raycast start points and four directions, so we’ll define those first.
var testPoints = new List<Vector3>
{
    new Vector3(-1.1f,  0.0f, 0.1f),
    new Vector3( 1.1f,  0.0f, 0.1f),
    new Vector3( 0.0f, -2.1f, 0.1f),
    new Vector3( 0.0f,  2.1f, 0.1f)
};

var testDirs = new List<Vector3>
{
     Vector3.right,
    -Vector3.right,
     Vector3.up,
    -Vector3.up
};
It would be far neater to bundle up pairwise positions and directions inside a struct, but this works in a pinch. Each position and direction is defined relative to the local space of the portal, so when we process them inside the following loop, the first thing we must do is convert them to world space in order to work with the physics engine.
for(int i = 0; i < 4; ++i)
{
    RaycastHit hit;
    Vector3 raycastPos = transform.TransformPoint(testPoints[i]);
    Vector3 raycastDir = transform.TransformDirection(testDirs[i]);

    ...
}
We’re going to create a RaycastHit ready to perform a raycast, as we did last time. But first, we’ll use the now-familiar TransformPoint and TransformDirection methods to convert the raycast start point and raycast directions respectively from local space to world space.
if(Physics.CheckSphere(raycastPos, 0.05f, placementMask))
{
    break;
}
else if(Physics.Raycast(raycastPos, raycastDir, out hit, 2.1f, placementMask))
{
    var offset = hit.point - raycastPos;
    transform.Translate(offset, Space.World);
}
We’ll use Physics.CheckSphere to check whether the start point is already inside a wall collider. There’s no CheckPoint function in the Physics class that allows us to pass in a single point, so we’ll just use a tiny sphere instead. It uses the placementMask we defined earlier so only wall colliders get checked. If it’s not inside a wall, we’ll need to Physics.Raycast towards the portal centre. 2.1 Unity units should be enough to reach any overhang. The portal is translated along the raycast direction by the distance between the raycast origin and the raycasts’s hit.point - we need to specify Space.World to ensure it’s translated in world space. Let’s see it in action now:
We’re able to place portals near edges properly now! Let’s fix intersections next.
Fixing intersections
The idea behind intersections is similar, but now we’re raycasting from slightly in front of the portal’s centre outwards in four directions. We’ll need to raycast by different amount in each direction, so rather than declaring positions and directions as in FixOverhangs, this time we’ll state directions and distances.
private void FixIntersects()
{
    var testDirs = new List<Vector3>
    {
         Vector3.right,
        -Vector3.right,
         Vector3.up,
        -Vector3.up
    };

    var testDists = new List<float> { 1.1f, 1.1f, 2.1f, 2.1f };

    for (int i = 0; i < 4; ++i)
    {
        ...
    }
}
Then we’ll perform the four raycasts. This time, there will be no CheckSphere because we’re raycasting in the same position each time.
RaycastHit hit;
Vector3 raycastPos = transform.TransformPoint(0.0f, 0.0f, -0.1f);
Vector3 raycastDir = transform.TransformDirection(testDirs[i]);

if (Physics.Raycast(raycastPos, raycastDir, out hit, testDists[i], placementMask))
{
    var offset = (hit.point - raycastPos);
    var newOffset = -raycastDir * (testDists[i] - offset.magnitude);
    transform.Translate(newOffset, Space.World);
}
If we raycast and end up hitting a wall collider, then we’re intersecting in that direction and we must move the portal in the opposite direction to the raycast direction. The distance will be equal to the total raycast length minus the distance between the raycast start and the hit point. Let’s check out the placement code in action now:
It works as intended - we don’t intersect the wall! Now, let’s consider something that Portal doesn’t allow, but curiously its prototype student project Narbacular Drop does: shooting portals through other portals.
Shooting through portals
In Narbacular Drop, you could shoot portals through other portals. There’s a reason we allow our portal shooting raycast to detect objects in the Portal layer: if we detect a portal surface, we’ll shoot through the portal. Let’s revisit the PortalPlacement class - recall there was a segment of code that we glossed over earlier in the FirePortal method.
if (hit.collider.tag == "Portal")
{
    ...
}
First, the portal surfaces are also tagged “Portal” because it’s easier to compare tags than layers inside the code. We’ll start off by grabbing a reference to the Portal we’ve just fired at and ensure it exists, then get a reference to the exit portal.
var inPortal = hit.collider.GetComponent<Portal>();

if(inPortal == null)
{
    return;
}

var outPortal = inPortal.GetOtherPortal();
In order to continue the raycast through the portal, we need to create and fire an entirely new ray - we can’t magically cut this one in half and move part of it. The easiest way to do this is to call the FirePortal method again with new arguments. To do that, we’ll calculate a new raycast start point - and offset it slightly so we don’t self-intersect the exit portal - and a new raycast direction, as well as a reduced distance. We’ll use some very familiar-looking code.
// Update position of raycast origin with small offset.
Vector3 relativePos = inPortal.transform.InverseTransformPoint(hit.point + dir);
relativePos = Quaternion.Euler(0.0f, 180.0f, 0.0f) * relativePos;
pos = outPortal.transform.TransformPoint(relativePos);

// Update direction of raycast.
Vector3 relativeDir = inPortal.transform.InverseTransformDirection(dir);
relativeDir = Quaternion.Euler(0.0f, 180.0f, 0.0f) * relativeDir;
dir = outPortal.transform.TransformDirection(relativeDir);

distance -= Vector3.Distance(pos, hit.point);

FirePortal(portalID, pos, dir, distance);

return;
We’ve seen this pattern before in the rendering and portal physics articles. We’ll transform the hit point (plus a small offset along the raycast direction) into entrance-portal local space, rotate 180 degrees around the portal, then convert from exit-portal local space to world space. We’ll do the same thing to the raycast direction (without any offset), then recall the FirePortal method with those as arguments, alongside the portalID. We’ll also subtract the distance between the raycast origin and the hit point and pass that into FirePortal so that we can’t line up portals, raycast through them recursively forever and cause the game to crash. Let’s see what it’s like to shoot portals through portals:
We can now fire through portals! If you want the option to turn this off, you can create a Boolean flag to wrap around this portion of code.
Limitations
Since we only used raycasts to check for intersections and overhangs, we’re hampered by mankind’s greatest enemy: corners. There are a few layers of checks we could implement on top of the ones I’ve showed so far, but in the interest of reducing the length of this article - and because setting up raycasts isn’t exactly the most interesting of topics - I’ve left them out. If you’re interested in polishing up this effect a bit more, try answering the following questions: what if we used Boxcast instead of Raycast to detect intersections and overhangs? What if we wanted to ensure that portals, once placed, cannot intersect other portals?
Conclusions
We’re now able to shoot portals wherever we want. There are several edge cases related to correct portal placement, such as making sure the desired position doesn’t intersect a wall and getting the correct rotation of the portal. In the next tutorial, we’ll deal with a few extra visual effects we can add to our portals to make them look a little more impressive. The tutorial after that - the final one in the series - will deal with the question you’ve all been asking: how do we make our portals render recursively?
Acknowledgements
Assets
This tutorial series uses the following asset packs from various sources:
| “Skybox Volume 2 (Nebula)” | Hedgehog Team |
| “Robot Sphere” | Razgrizzz Demon |
| “Low Poly Hand Painted Dungeon Arch” | BitGem |