We have created many shaders now, supporting features like alpha-blended transparency, alpha clipping, depth testing and writing, shadow casting and receiving, and both the metallic and specular workflows for PBR. In this tutorial, let’s combine all of these features into one mega-shader. For that, we will leverage the power of custom shader editors, which let us display the shader GUI in exactly the way we want and run code when a property gets changed. You’ll also gain an understanding of what Unity does under the hood to display shaders such as the URP Lit shader.
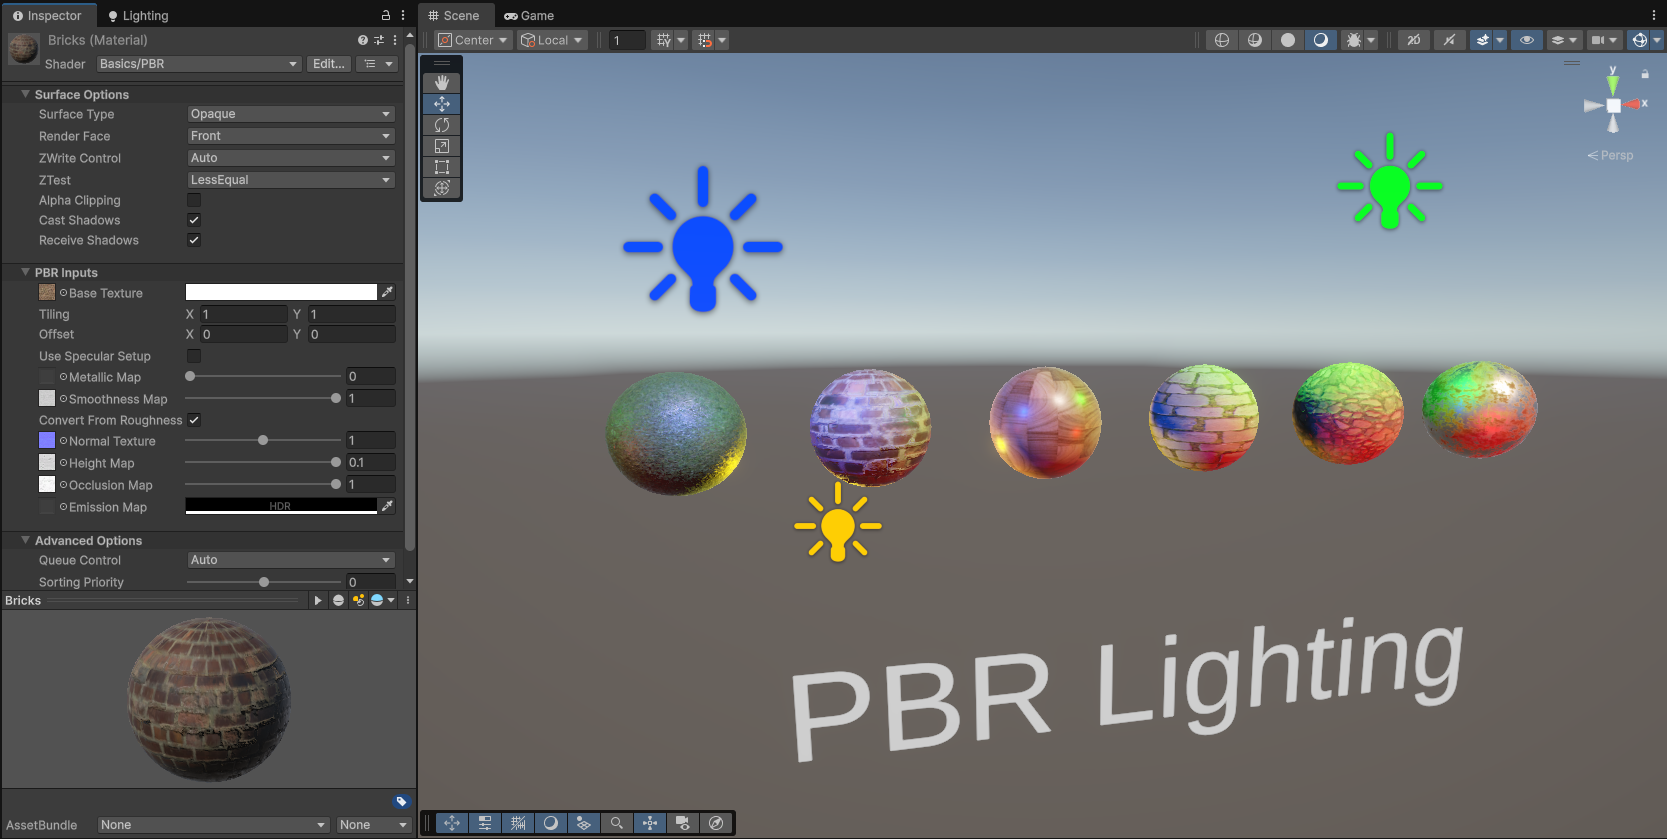
Setting up the PBR shader
First, let’s make edits to the PBR shader. We’ll blitz through the stuff we learned in previous tutorials in this series, but there’s some new stuff here, too. Let’s start with lots of new Properties below the existing ones. Most link directly to a ShaderLab command, such as _ZWrite linking to the ZWrite command, except the _Surface and _Cutoff properties which are used in the HLSLPROGRAM block, in the fragment shader.
[NoScaleOffset] _EmissionMap("Emission Map", 2D) = "white" {}
[HDR] _EmissionColor("Emission Color", Color) = (0.0, 0.0, 0.0, 1.0)

[HideInInspector] _Surface("_Surface", Float) = 0
[HideInInspector] _Cutoff("Alpha Cutoff", Range(0.0, 1.0)) = 0.5
[HideInInspector] _SrcBlend("_SrcBlend", Float) = 1
[HideInInspector] _DstBlend("_DstBlend", Float) = 0
[HideInInspector] _SrcBlendAlpha("_SrcBlendAlpha", Float) = 1
[HideInInspector] _DstBlendAlpha("_DstBlendAlpha", Float) = 0
[HideInInspector] _ZWrite("_ZWrite", Float) = 1
[HideInInspector] _ZTest("_ZTest", Float) = 4
[HideInInspector] _Cull("_Cull", Float) = 2
[HideInInspector] _AlphaToMask("_AlphaToMask", Float) = 0
From top to bottom, we have _Surface for opaque vs transparent objects; _Cutoff, which is the alpha testing threshold value with a range between 0 and 1; four blend factors which are used for source and destination targets, for both the RGB and alpha parts of the screen image; depth writing and depth testing with _ZWrite and _ZTest; _Cull for showing only the front, only the back, or both sides of each mesh face; and _AlphaToMask, which we haven’t seen yet - we’ll talk about that one later.
We will explore these in more detail when we write the editor GUI script, but we will mostly be using enums so that we can use distinct integers to represent kinds of behavior. The default values of these properties correspond to entries in these enums. _ZTest is 4 by default, which corresponds to the less-or-equal (LEqual) entry in a depth-testing enum, which we will see later.
Technically, these properties are just data which gets saved to the material when it gets serialized. Although most properties directly influence either a ShaderLab command or code in the HLSLPROGRAM block, they don’t have to. Properties can be used to hold config data, styling settings for the custom editor, anything you want! And they are particularly useful if we want to keep track of something like a toggle, and then later detect changes to the property in the custom editor script and do stuff like disabling passes or enabling keywords based on the property value.
With that in mind, let’s add a few more properties for keeping track of the shader’s state.
[HideInInspector] _Cull("_Cull", Float) = 2
[HideInInspector] _AlphaToMask("_AlphaToMask", Float) = 0

[HideInInspector] _CastShadows("_CastShadows", Float) = 1
[HideInInspector] _ReceiveShadows("Receive Shadows", Float) = 1.0
[HideInInspector] _Blend("_Blend", Float) = 0
[HideInInspector] _AlphaClip("_AlphaClip", Float) = 0
[HideInInspector] _ZWriteControl("_ZWriteControl", Float) = 0
[HideInInspector] _QueueOffset("_QueueOffset", Float) = 0
[HideInInspector] _QueueControl("_QueueControl", Float) = 0
We keep track of whether the shader should _CastShadows or _ReceiveShadows, which _Blend function we should use, whether to use _AlphaClip, whether to override the default depth-writing behaviour with _ZWriteControl, and a couple of properties to control whether (_QueueControl) and how much (_QueueOffset) to offset the default render queue value by.
Now we need to do a quick tour of each shader pass and make a few changes to use the new ShaderLab command properties we just added. In the UniversalForward pass, instead of just using _ZWrite On and ZTest LEqual, let’s use our new shader properties to control these ShaderLab commands, plus the Cull, Blend, and AlphaToMask commands. To use one of these properties as a parameter, we can put square brackets around it.
Tags
{
    "LightMode" = "UniversalForward"
}

Cull [_Cull]
ZWrite [_ZWrite]
ZTest [_ZTest]
Blend [_SrcBlend] [_DstBlend], [_SrcBlendAlpha] [_DstBlendAlpha]
AlphaToMask [_AlphaToMask]
Here, the Blend command accepts four properties instead of just two like we saw before. When you do this, the first two parameters control the source and destination factors for just the RGB data, and the latter two are for blending the alpha data of the texture. Just remember the comma in between both pairs.
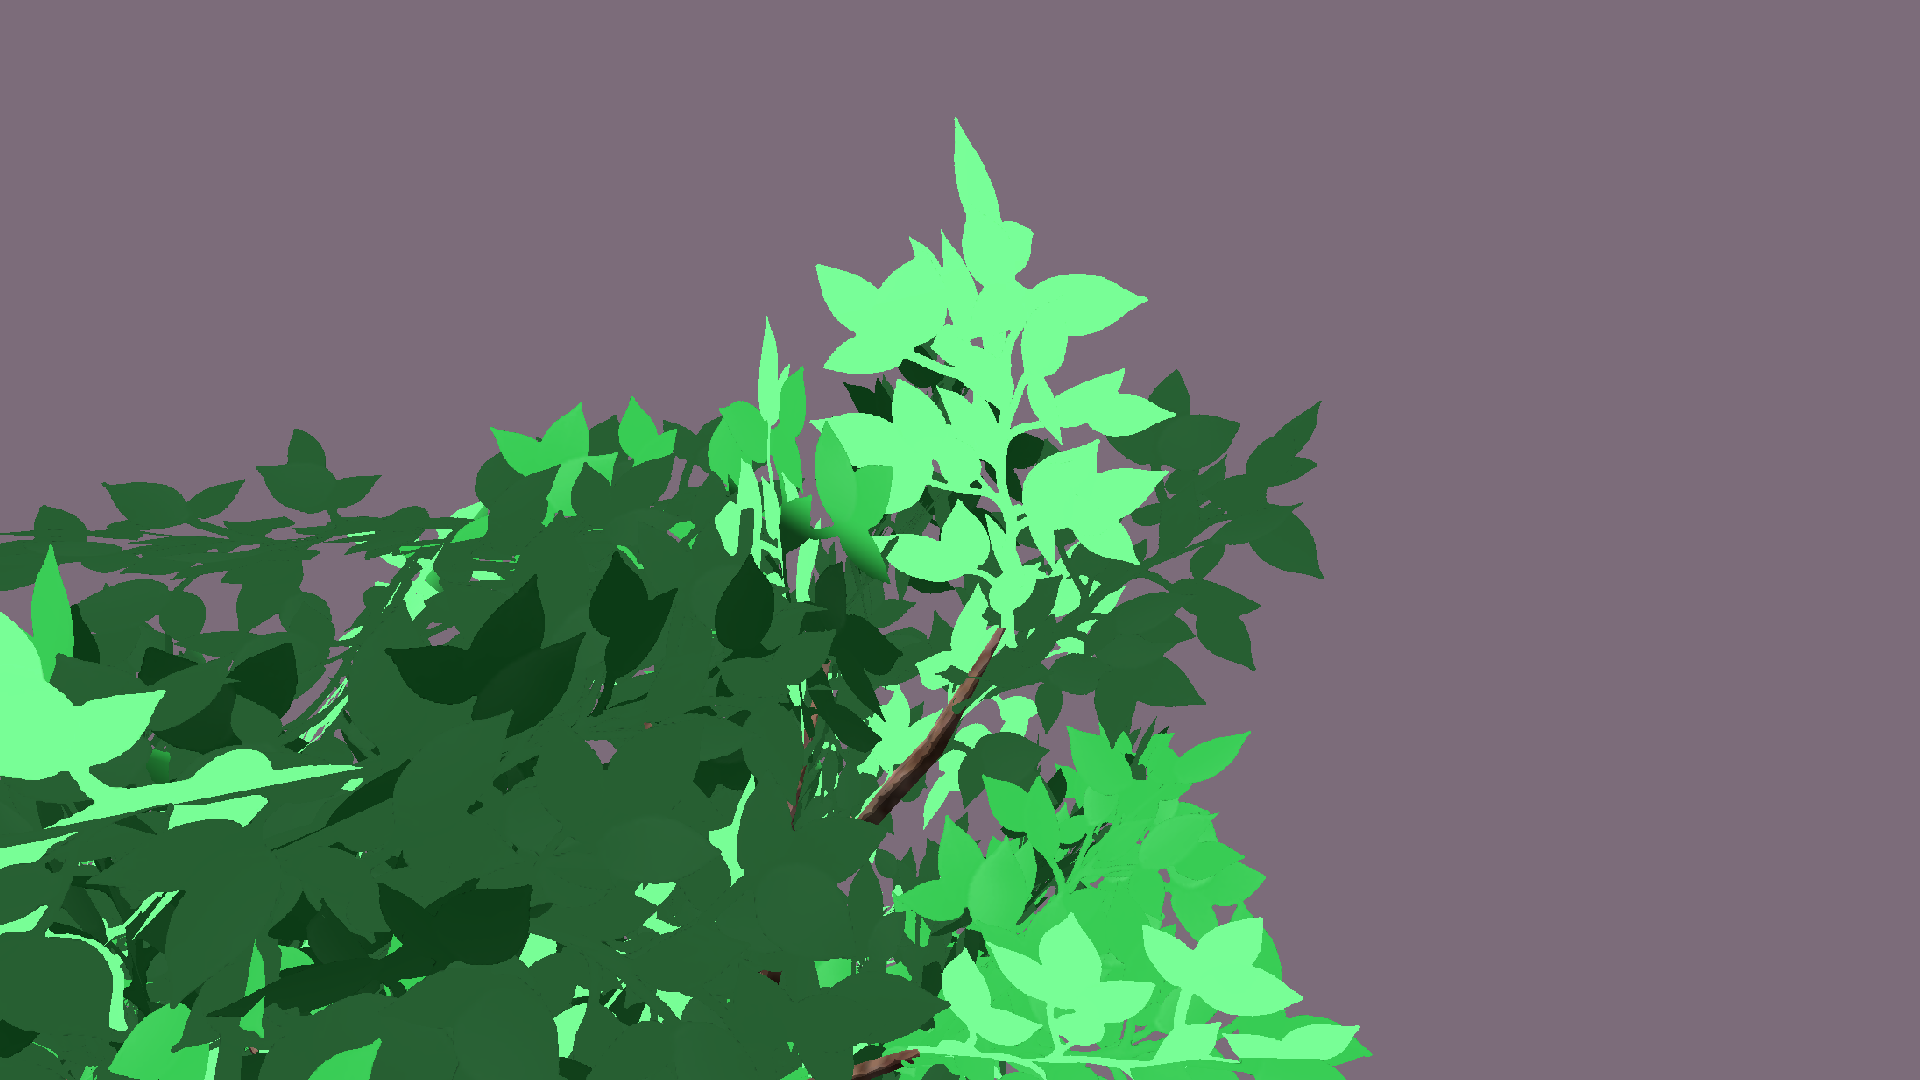
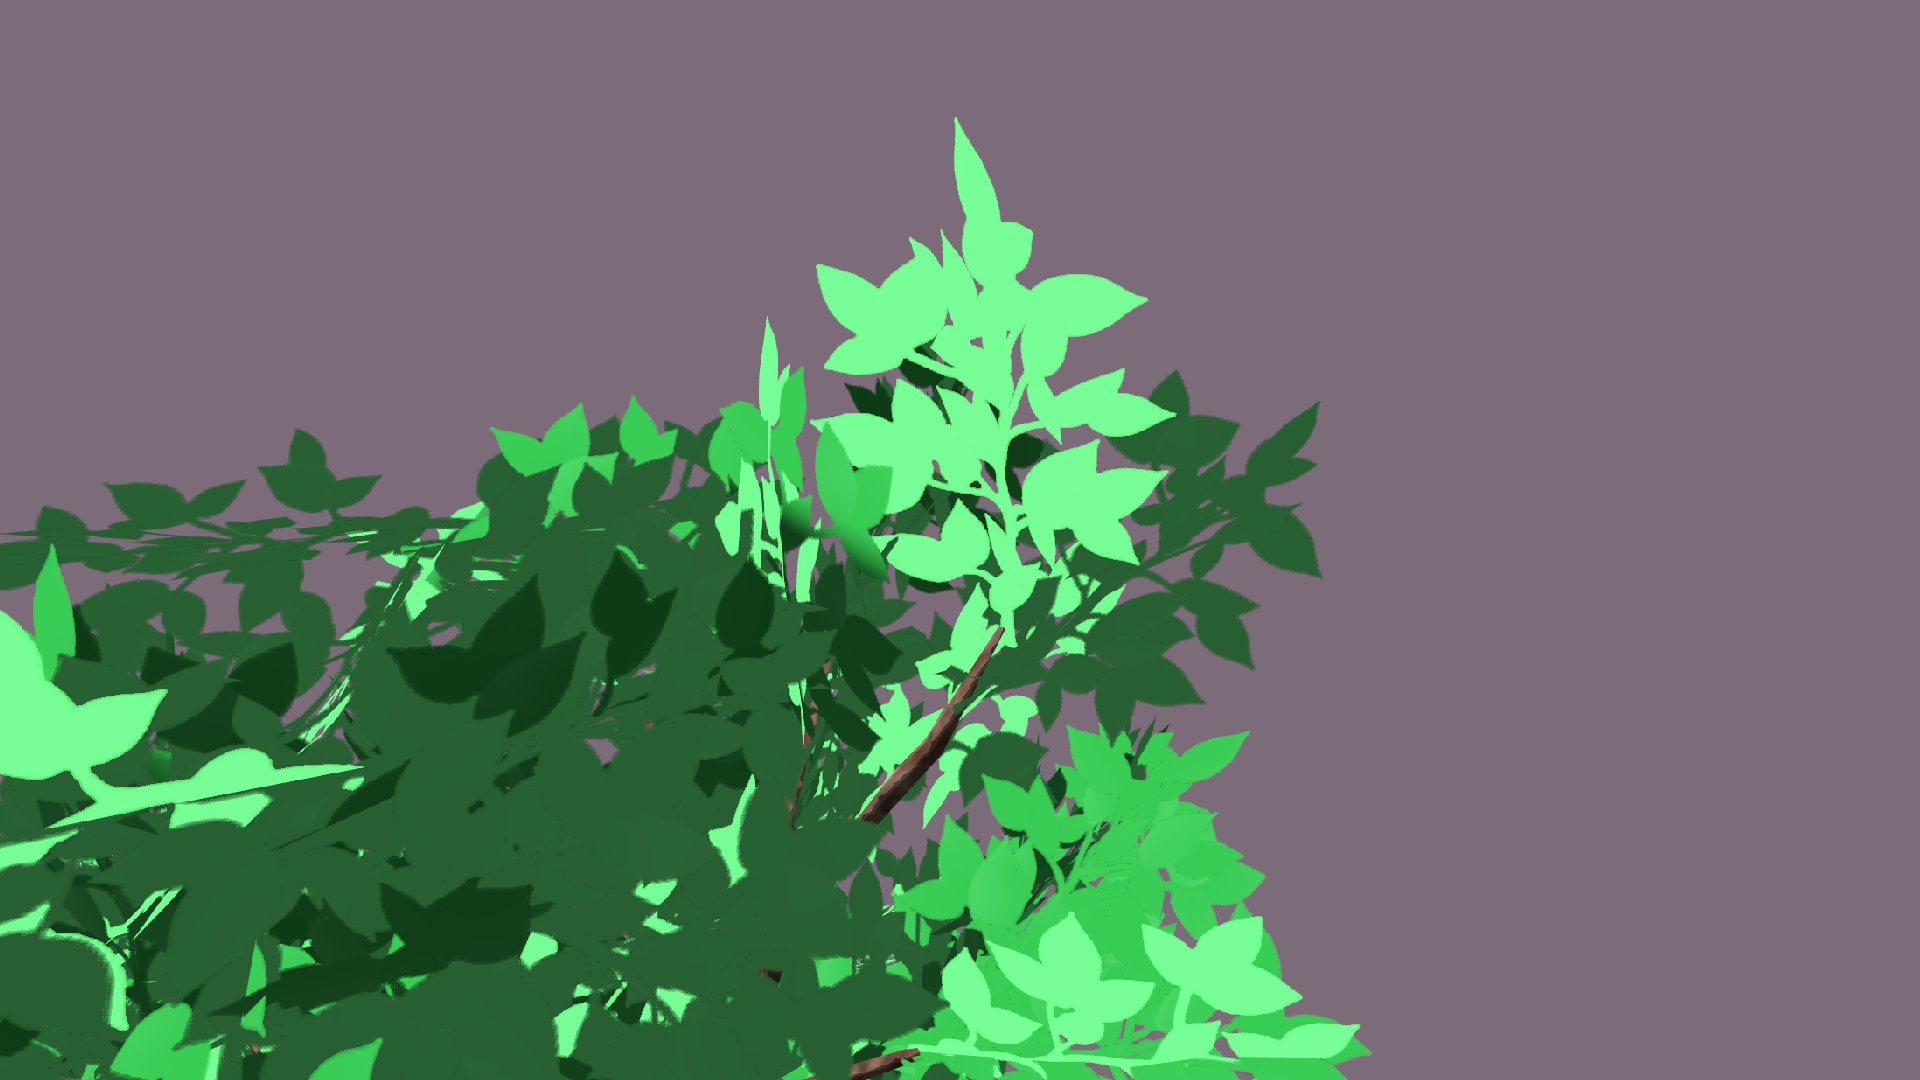
Alpha-to-mask, probably better known as alpha-to-coverage, is a cool technique used when MSAA (Multi-Sample Anti-Aliasing) is active. Essentially, with MSAA, the screen colors are rendered at the normal resolution, but we use 2x, 4x, or 8x the resolution for the depth target, since depth writes and tests are comparatively cheap. When writing to the color target, we can blend colors based on how many depth samples inside the footprint of the color sample pass the depth test. So, say we are using 2x MSAA, each color sample corresponds to 2 depth samples, and we’ll blend colors slightly if e.g. only one of those depth samples passes. That’s why MSAA smooths out the edges of objects, but not the bits within the object. Alpha-to-mask is a method for smoothing any edges that arise due to alpha clipping in your shader. Here’s an article by Ben Golus that goes into much more detail (he also fixes some extra problems that arise from using alpha-to-coverage, which maybe I’ll explore in a future tutorial).
Here’s a comparison with alpha-to-coverage off, then on (zoom in for the changes in details around the edges):
Next, let’s add the _Surface and _Cutoff variables to the CBUFFER.
CBUFFER_START(UnityPerMaterial)
    float _Surface;
    float _Cutoff;
    float4 _BaseColor;
    float4 _BaseTexture_ST;
    float _NormalStrength;
    float _Metallic;
    float3 _SpecularColor;
    float _Smoothness;
    float _HeightMapStrength;
    float _OcclusionStrength;
    float3 _EmissionColor;
CBUFFER_END
Then we can add a new keyword called _ALPHATEST_ON to each pass, and another one called _RECEIVE_SHADOWS_OFF to just the UniversalForward pass.
#pragma shader_feature_local _ _CONVERT_FROM_ROUGHNESS
#pragma shader_feature_local _ _SPECULAR_SETUP
#pragma shader_feature_local _RECEIVE_SHADOWS_OFF
#pragma shader_feature_local_fragment _ _ALPHATEST_ON
We can use the _RECEIVE_SHADOWS_OFF keyword to disable shadows in Unity’s own lighting code.
Then, in the fragment shader after sampling the base texture, we can branch off our new _ALPHATEST_ON keyword and if it has been defined, we can discard the fragment if the base color alpha falls below the _Cutoff threshold value.
    float4 baseColor = SAMPLE_TEXTURE2D(_BaseTexture, sampler_BaseTexture, i.uv) * _BaseColor;
    surfaceData.albedo = baseColor.rgb;
    surfaceData.alpha = baseColor.a;
#ifdef _ALPHATEST_ON
    if(surfaceData.alpha < _Cutoff)
    {
        discard;
    }
#endif
Actually, the URP shader library contains a handy function called AlphaDiscard which does this for us (including the keyword check), so let’s just use that instead.
float4 baseColor = SAMPLE_TEXTURE2D(_BaseTexture, sampler_BaseTexture, i.uv) * _BaseColor;
surfaceData.albedo = baseColor.rgb;
surfaceData.alpha = baseColor.a;

AlphaDiscard(surfaceData.alpha, _Cutoff);
Then, at the end of the function, instead of just returning the result of UniversalFragmentPBR, let’s use another library function called OutputAlpha, which tries to ensure the correct alpha output based on the surface type and alpha-to-coverage settings.
// Calculate final PBR-lit color.
float4 color = UniversalFragmentPBR(inputData, surfaceData);
color.a = OutputAlpha(color.a, IsSurfaceTypeTransparent(_Surface));

return color;
If we take a look at that library function from ShaderVariablesFunctions.hlsl, we’ll see that for opaque objects with alpha testing on and alpha-to-coverage off, we always output 1, but transparent objects, and opaques with alpha-to-coverage, we output whatever alpha value was input without changing it.
half OutputAlpha(half alpha, bool isTransparent)
{
    if (isTransparent)
    {
        return alpha;
    }
    else
    {
#if defined(_ALPHATEST_ON)
        // Opaque materials should always export an alpha value of 1.0 unless alpha-to-coverage is available
        return IsAlphaToMaskAvailable() ? alpha : 1.0;
#else
        return 1.0;
#endif
    }
}
Now we can play whack-a-mole and make similar changes to each pass.
For the ShadowCaster pass, make sure the _Cull parameter is being used, the _ALPHATEST_ON keyword is included, the full CBUFFER that we used in the UniversalForward pass and the _BaseTexture are both defined, the appdata and v2f structs now both pass UV coordinates, the vertex shader passes those UVs with the TRANSFORM_TEX macro, and we run AlphaDiscard in the fragment shader after we sample the base texture.
Pass
{
    Tags
    {
        "LightMode" = "ShadowCaster"
    }

    Cull [_Cull]
    ZTest LEqual
    ZWrite On
    ColorMask 0

    HLSLPROGRAM
    #pragma vertex shadowPassVert
    #pragma fragment shadowPassFrag

    #include "Packages/com.unity.render-pipelines.universal/ShaderLibrary/Core.hlsl"
    #include "Packages/com.unity.render-pipelines.universal/ShaderLibrary/Lighting.hlsl"
    #include "Packages/com.unity.render-pipelines.universal/ShaderLibrary/Shadows.hlsl"

    #pragma multi_compile_vertex _ _CASTING_PUNCTUAL_LIGHT_SHADOW
    #pragma shader_feature_local_fragment _ _ALPHATEST_ON

    CBUFFER_START(UnityPerMaterial)
        float _Surface;
        float _Cutoff;
        float4 _BaseColor;
        float4 _BaseTexture_ST;
        float _NormalStrength;
        float _Metallic;
        float3 _SpecularColor;
        float _Smoothness;
        float _HeightMapStrength;
        float _OcclusionStrength;
        float3 _EmissionColor;
    CBUFFER_END

    TEXTURE2D(_BaseTexture);
    SAMPLER(sampler_BaseTexture);

    float3 _LightDirection;
    float3 _LightPosition;

    struct appdata
    {
        float4 positionOS : POSITION;
        float3 normalOS : NORMAL;
        float2 uv : TEXCOORD0;
    };

    struct v2f
    {
        float4 positionCS : SV_POSITION;
        float2 uv : TEXCOORD0;
    };

    float4 GetShadowPositionHClip(float3 positionOS, float3 normalOS)
    {
        float3 positionWS = TransformObjectToWorld(positionOS);
        float3 normalWS = TransformObjectToWorldNormal(normalOS);

#if _CASTING_PUNCTUAL_LIGHT_SHADOW
        float3 lightDirectionWS = normalize(_LightPosition - positionWS);
#else
        float3 lightDirectionWS = _LightDirection;
#endif

        float4 positionCS = TransformWorldToHClip(ApplyShadowBias(positionWS, normalWS, lightDirectionWS));
        positionCS = ApplyShadowClamping(positionCS);

        return positionCS;
    }

    v2f shadowPassVert(appdata v)
    {
        v2f o = (v2f)0;

        o.positionCS = GetShadowPositionHClip(v.positionOS.xyz, v.normalOS);
        o.uv = TRANSFORM_TEX(v.uv, _BaseTexture);

        return o;
    }

    float4 shadowPassFrag(v2f i) : SV_TARGET
    {
        float4 baseColor = SAMPLE_TEXTURE2D(_BaseTexture, sampler_BaseTexture, i.uv) * _BaseColor;
        AlphaDiscard(baseColor.a, _Cutoff);

        return 0;
    }

    ENDHLSL
}
For the DepthOnly pass, we have the _Cull parameter, the _ALPHATEST_ON keyword, the CBUFFER and the _BaseTexture, the UVs being declared and passed on, and then AlphaDiscard in the fragment shader.
Pass
{
    Tags
    {
        "LightMode" = "DepthOnly"
    }

    Cull [_Cull]
    ZTest LEqual
    ZWrite On
    ColorMask R

    HLSLPROGRAM
    #pragma vertex depthOnlyVert
    #pragma fragment depthOnlyFrag

    #include "Packages/com.unity.render-pipelines.universal/ShaderLibrary/Core.hlsl"

    #pragma shader_feature_local_fragment _ _ALPHATEST_ON

    CBUFFER_START(UnityPerMaterial)
        float _Surface;
        float _Cutoff;
        float4 _BaseColor;
        float4 _BaseTexture_ST;
        float _NormalStrength;
        float _Metallic;
        float3 _SpecularColor;
        float _Smoothness;
        float _HeightMapStrength;
        float _OcclusionStrength;
        float3 _EmissionColor;
    CBUFFER_END

    TEXTURE2D(_BaseTexture);
    SAMPLER(sampler_BaseTexture);

    struct appdata
    {
        float4 positionOS : POSITION;
        float2 uv : TEXCOORD0;
    };

    struct v2f
    {
        float4 positionCS : SV_POSITION;
        float2 uv : TEXCOORD0;
    };

    v2f depthOnlyVert(appdata v)
    {
        v2f o = (v2f)0;

        o.positionCS = TransformObjectToHClip(v.positionOS.xyz);
        o.uv = TRANSFORM_TEX(v.uv, _BaseTexture);

        return o;
    }

    float depthOnlyFrag(v2f i) : SV_TARGET
    {
        float4 baseColor = SAMPLE_TEXTURE2D(_BaseTexture, sampler_BaseTexture, i.uv) * _BaseColor;
        AlphaDiscard(baseColor.a, _Cutoff);

        return i.positionCS.z;
    }

    ENDHLSL
}
And it’s a similar story for the DepthNormals pass: _Cull, _ALPHATEST_ON, CBUFFER, _BaseTexture, and we already pass UVs so we’ll sample the texture and do AlphaDiscard in the fragment shader.
Pass
{
    Tags
    {
        "LightMode" = "DepthNormals"
    }

    Cull [_Cull]
    ZTest LEqual
    ZWrite On

    HLSLPROGRAM
    #pragma vertex depthNormalsVert
    #pragma fragment depthNormalsFrag

    #include "Packages/com.unity.render-pipelines.universal/ShaderLibrary/Core.hlsl"

    #pragma shader_feature_local_fragment _ _ALPHATEST_ON

    CBUFFER_START(UnityPerMaterial)
        float _Surface;
        float _Cutoff;
        float4 _BaseColor;
        float4 _BaseTexture_ST;
        float _NormalStrength;
        float _Metallic;
        float3 _SpecularColor;
        float _Smoothness;
        float _HeightMapStrength;
        float _OcclusionStrength;
        float3 _EmissionColor;
    CBUFFER_END

    TEXTURE2D(_BaseTexture);
    SAMPLER(sampler_BaseTexture);

    TEXTURE2D(_NormalTexture);
    SAMPLER(sampler_NormalTexture);

    struct appdata
    {
        float4 positionOS : POSITION;
        float2 uv : TEXCOORD0;
        float3 normalOS : NORMAL;
        float4 tangentOS : TANGENT;
    };

    struct v2f
    {
        float4 positionCS : SV_POSITION;
        float2 uv : TEXCOORD0;
        float3 normalWS : TEXCOORD1;
        float4 tangentWS : TEXCOORD2;
    };

    v2f depthNormalsVert(appdata v)
    {
        v2f o = (v2f)0;

        o.positionCS = TransformObjectToHClip(v.positionOS.xyz);
        o.uv = TRANSFORM_TEX(v.uv, _BaseTexture);
        float3 normalWS = TransformObjectToWorldNormal(v.normalOS);
        o.normalWS = NormalizeNormalPerVertex(normalWS);
        o.tangentWS = float4(TransformObjectToWorldDir(v.tangentOS.xyz), v.tangentOS.w);

        return o;
    }

    float4 depthNormalsFrag(v2f i) : SV_TARGET
    {
        float4 baseColor = SAMPLE_TEXTURE2D(_BaseTexture, sampler_BaseTexture, i.uv) * _BaseColor;
        AlphaDiscard(baseColor.a, _Cutoff);

        float3 normalWS = NormalizeNormalPerPixel(i.normalWS);

        float3 normalTS = UnpackNormalScale(SAMPLE_TEXTURE2D(_NormalTexture, sampler_NormalTexture, i.uv), _NormalStrength);

        float3 binormalWS = cross(normalWS, i.tangentWS.xyz) * i.tangentWS.w * unity_WorldTransformParams.w;
        normalWS = normalize(
            normalTS.x * i.tangentWS.xyz +
            normalTS.y * binormalWS +
            normalTS.z * normalWS);

        return float4(normalWS, 0.0f);
    }

    ENDHLSL
}
That’s every change we need to make to the shader, except one, but now let’s turn our attention to the editor script itself.
Subscribe to my Patreon for perks including early access, your name in the credits of my videos, and bonus access to several premium shader packs!

The custom editor script
In Unity, create a new folder called Editor (I’m making it as a subdirectory of the Shaders folder). This (and any other folder named “Editor”) is a special folder which will be stripped away in builds. Inside it, right-click and choose Create -> Scripting -> Empty C# Script and name it “PBRShaderGUI”. This is the script which we use to draw the GUI. Never mind UI Toolkit, or even the Unity UI you’ve been using forever, we’re doing some Unity archaeology and whipping out the pre-Unity 4.6 immediate mode GUI today.
This script should inherit from ShaderGUI from the UnityEngine namespace, which gives us an IMGUI box to do all our work in. I’m gonna put our class inside its own namespace called ShaderBasics.Editor, and then I’ll override a method called OnGUI, which is called every time Unity draws the material Inspector window. Here, we will collect shader properties and tell Unity how to draw them, and for that reason, we receive a MaterialProperty list and a MaterialEditor as parameters.
using System;
using UnityEditor;
using UnityEditor.Rendering;
using UnityEngine;
using UnityEngine.Rendering;

namespace ShaderBasics.Editor
{
    public class PBRShaderGUI : ShaderGUI
    {
        public override void OnGUI(MaterialEditor materialEditor, MaterialProperty[] properties)
        {

        }
    }
}
As a very basic example, let’s just get the _BaseColor property and display it straight away. Let’s use a method called FindProperty which takes in the property name and list of properties as parameters, and returns the property itself if it’s in that list. Simple! Now, when I say “property name”, I’m talking about the code-friendly name with the underscore in front of it, like _BaseColor. We can call materialEditor.ShaderProperty and pass in the property, plus a label string which can just be “Base Color”, and finally we ensure that any changes we make to any properties get saved back to the material by calling ApplyModifiedProperties.
public override void OnGUI(MaterialEditor materialEditor, MaterialProperty[] properties)
{
    var baseColor = FindProperty("_BaseColor", properties);
    materialEditor.ShaderProperty(baseColor, "Base Color");

    materialEditor.serializedObject.ApplyModifiedProperties();
}
Next, we need to tell our shader to use this custom GUI script when a material gets inspected. And I promise, this is the last change to the shader file. Right at the bottom of the PBR shader file, after every Pass block but still within the main Shader block, let’s use the CustomEditor command, followed by the full qualified name of the class including namespaces, so in our case that’s ShaderBasics.Editor.PBRShaderGUI.
Shader "Basics/PBR"
{
    Properties { ... }
    SubShader { ... }

    CustomEditor "ShaderBasics.Editor.PBRShaderGUI"
}
After saving and clicking on a PBR material, we’ll see our base color in all its glory!
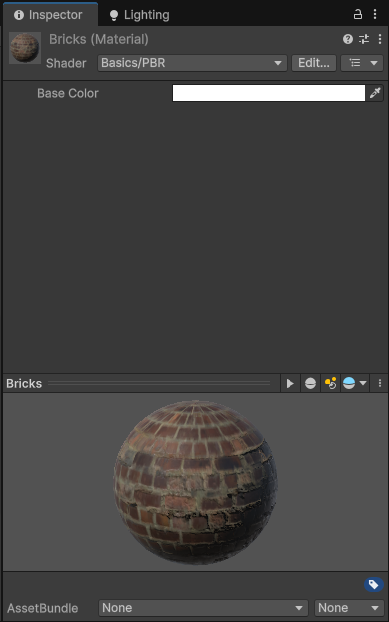
Okay, it’s a bit of a step back, but this is just the start.
I want to add the ability to swap between opaque and transparent, and to toggle alpha clipping, essentially all the sort of stuff you’d find under the Surface Options section of the URP Lit shader. That’s why we added all those properties to the shader, after all. And while we’re at it, why not implement these little drop-down sections in our own material window? After all, we have total power over the look of the GUI.
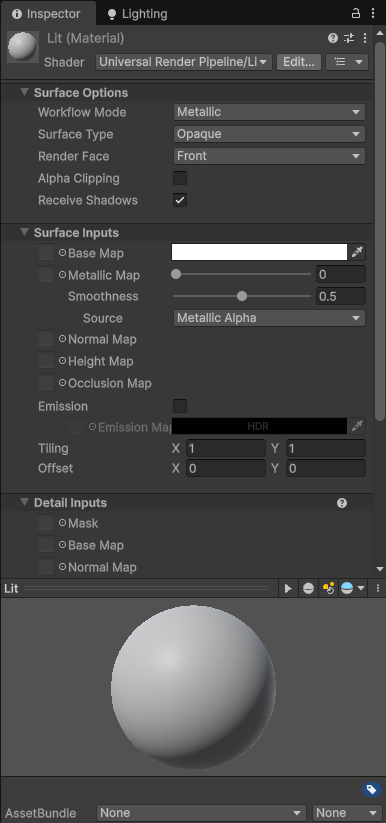
Let’s add a few variables for the little drop-down sections. Unity stores each of the sections inside a MaterialHeaderScopeList, so we can create one on initialization. This type can be found in the UnityEditor.Rendering namespace. Then, we will need to access the underlying MaterialEditor throughout this script to actually draw properties. Finally, I want to include a Boolean value to check if this is the first time OnGUI is called while the material Inspector is open, so that we can do some one-time setup on the first call.
private readonly MaterialHeaderScopeList materialScopeList = new();
private MaterialEditor materialEditor;
private bool firstTimeOpen = true;

public override void OnGUI(MaterialEditor materialEditor, MaterialProperty[] properties)
{
    ...
}
Just after the OnGUI method, I’m going to write a few empty methods, one for each section I want to have in my material Inspector. I’ll base my structure on the URP Lit shader’s material GUI, so I’ll have a DrawSurfaceOptions method, then DrawPBRProperties, and lastly DrawAdvancedSettings, so one method for each section. They all accept a material as their only input.
private void DrawSurfaceProperties(Material material)
{

}

private void DrawPBRProperties(Material material)
{

}

private void DrawAdvancedSettings(Material material)
{

}
Then, in OnGUI, we can create those sections. First, let’s remove what we already had, and then I’ll do a null check to ensure that we have access to a valid materialEditor, throwing an exception if it’s missing. If we do, let’s keep a reference to it since we’ll need it later in those three methods we just created, and then grab the material which is that editor’s target. The target is the thing being inspected.
Next, I want to make sure we have a reference to each MaterialProperty before trying to draw them in the Inspector. Later, we will write a helper method called FindProperties which will accept the MaterialProperty array as an argument, so let’s pretend it already exists and call it here.
Then, if this is the first time open, let’s register the three methods in the material scope list by calling RegisterHeaderScope. It takes in a parameter of type GUIContent, which we use to hold the actual text to display on the header, then a bit mask value that Unity uses to track which of the headers have been expanded and contracted, so each section uses a 1 which is bit-shifted a different amount to the left. Then the final parameter is an Action. This lets us essentially pass in a method as a parameter, and it’s specifically an Action<Material>, which means they must only accept a single Material as a parameter. We set up each of the functions so they take just a Material as a parameter, so we can just write the names of each function as the last parameter. Then, make sure we don’t call this setup code on the second call to OnGUI. Finally, we call DrawHeaders to actually display each header section.
public override void OnGUI(MaterialEditor materialEditor, MaterialProperty[] properties)
{
    if (materialEditor == null)
    {
        throw new ArgumentNullException(missingEditorText);
    }

    this.materialEditor = materialEditor;
    var material = materialEditor.target as Material;

    FindProperties(properties);

    if (firstTimeOpen)
    {
        materialScopeList.RegisterHeaderScope(new GUIContent("Surface Options"), 1u << 0, DrawSurfaceProperties);
        materialScopeList.RegisterHeaderScope(new GUIContent("PBR Inputs"), 1u << 1, DrawPBRProperties);
        materialScopeList.RegisterHeaderScope(new GUIContent("Advanced Options"), 1u << 2, DrawAdvancedSettings);
        firstTimeOpen = false;
    }

    materialScopeList.DrawHeaders(materialEditor, material);
    materialEditor.serializedObject.ApplyModifiedProperties();
}
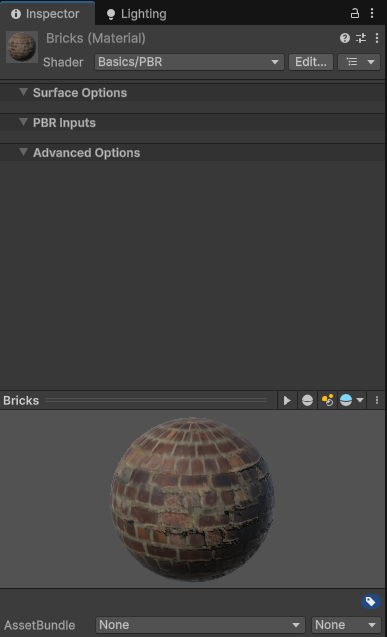
With these changes, the Inspector currently looks quite empty, but at least we can see the three sections. Let’s set up a bunch of variables we’ll need for the script.
Shader Properties
First, we need to declare some data for each of those shader properties we added. For each one, we need a lot of information: its code-friendly name, with the underscore, its human-friendly name, an optional tooltip for extra information when you hover over the parameter in the Inspector, a reference to the MaterialProperty like the one we were just using for the base color, and a nice extra would be the shader ID related to the property name. We would need this for each property:
private string baseColorName = "_BaseColor";
private string baseColorLabel = "Base Color";
private string baseColorTooltip = "Albedo color of the object.";
private MaterialProperty baseColorProp = null;
private int baseColorID = Shader.PropertyToID("_BaseColor");
But this is going to look stupid and complicated if we need to write a million lines of setup code, so I prefer to create a little struct to hold all this data and then we can call a constructor to set up each property on its own line. That struct looks a little like this:
public struct PBRShaderProperty
{
    public MaterialProperty prop;
    public readonly string name;
    public readonly GUIContent info;
    public readonly int id;

    public PBRShaderProperty(string name, string label, string desc)
    {
        prop = null;
        this.name = name;
        info = new GUIContent(label, desc);
        id = Shader.PropertyToID(name);
    }
}
The constructor takes in the code-readable name, human-readable label, and a tooltip description, and it auto-generates a GUIContent to hold the label and tooltip, plus it calls Shader.PropertyToID to get an internal ID based on the code-readable name. That last one isn’t strictly necessary, but apparently it’s more efficient to call methods like material.GetFloat by passing in the integer ID rather than a name string, so we’ll do that.
With that set up, we can just crank out member variables for each of our shader properties, making sure you check the spelling of the code-readable names carefully. Can you imagine needing five separate variables for each of them?
private PBRShaderProperty baseColor = new("_BaseColor", "Base Color",
    "Albedo color of the object.");
private PBRShaderProperty baseTexture = new("_BaseTexture", "Base Texture",
    "Albedo color of the object.");
private PBRShaderProperty useSpecularSetup = new("_UseSpecularSetup", "Use Specular Setup",
    "Should the shader use Specular workflow (instead of Metallic workflow)?");
private PBRShaderProperty metallicMap = new("_MetallicMap", "Metallic Map",
    "How metallic the object's surface is (only used in metallic workflow mode).");
private PBRShaderProperty metallic = new("_Metallic", "Metallic",
    "How metallic the object's surface is (only used in metallic workflow mode).");
private PBRShaderProperty specularMap = new("_SpecularMap", "Specular Map",
    "The color of the object's specular highlights (only used in specular workflow mode).");
private PBRShaderProperty specularColor = new("_SpecularColor", "Specular Color",
    "The color of the object's specular highlights (only used in specular workflow mode).");
private PBRShaderProperty smoothnessMap = new("_SmoothnessMap", "Smoothness Map",
    "How smooth (or rough) the microscopic surface of the object is.");
private PBRShaderProperty smoothness = new("_Smoothness", "Smoothness",
    "How smooth (or rough) the microscopic surface of the object is.");
private PBRShaderProperty convertFromRoughness = new("_ConvertFromRoughness", "Convert From Roughness",
    "Should the shader treat the smoothness texture as a roughness texture instead?");
private PBRShaderProperty normalTexture = new("_NormalTexture", "Normal Texture",
    "A texture encoding normal vector offsets at each point on the object surface.");
private PBRShaderProperty normalStrength = new("_NormalStrength", "Normal Strength",
    "How strongly the normal texture is applied to the existing surface normals.");
private PBRShaderProperty heightMap = new("_HeightMap", "Height Map",
    "The physical height offset of each part of the surface.");
private PBRShaderProperty heightMapStrength = new("_HeightMapStrength", "Height Map Strength",
    "How strongly the height map values are applied as UV offsets to create a surface height illusion.");
private PBRShaderProperty occlusionMap = new("_OcclusionMap", "Occlusion Map",
    "The strength of ambient occlusion at each point on the surface.");
private PBRShaderProperty occlusionStrength = new("_OcclusionStrength", "Occlusion Strength",
    "How strongly the occlusion map values are applied to the surface.");
private PBRShaderProperty emissionMap = new("_EmissionMap", "Emission Map",
    "The color of emissive (self-illuminated) light on the surface.");
private PBRShaderProperty emissionColor = new("_EmissionColor", "Emission Color",
    "The color of emissive (self-illuminated) light on the surface.");

private PBRShaderProperty surface = new("_Surface", "Surface Type",
    "Choose whether to use opaque or transparent rendering mode.");
private PBRShaderProperty cutoff = new("_Cutoff", "Alpha Cutoff",
    "Pixels with alpha below this threshold value get discarded.");
private PBRShaderProperty srcBlend = new("_SrcBlend", "Source Blend",
    "Blend factor to use for the existing framebuffer RGB contents.");
private PBRShaderProperty dstBlend = new("_DstBlend", "Destination Blend",
    "Blend factor to use for the newly drawn object RGB contents.");
private PBRShaderProperty srcBlendAlpha = new("_SrcBlendAlpha", "Source Blend Alpha",
    "Blend factor to use for the existing framebuffer alpha contents.");
private PBRShaderProperty dstBlendAlpha = new("_DstBlendAlpha", "Destination Blend Alpha",
    "Blend factor to use for the newly drawn object alpha contents.");
private PBRShaderProperty zWrite = new("_ZWrite", "ZWrite",
    "Should this material write depth information?");
private PBRShaderProperty zTest = new("_ZTest", "ZTest",
    "Choose which depth test to apply to this object.");
private PBRShaderProperty cull = new("_Cull", "Render Face",
    "Which faces should the shader draw?");
private PBRShaderProperty alphaToMask = new("_AlphaToMask", "Alpha To Mask",
    "Should the shader use alpha-to-mask if MSAA is enabled?");

private PBRShaderProperty castShadows = new("_CastShadows", "Cast Shadows",
    "Should the object cast shadows from realtime lights?");
private PBRShaderProperty receiveShadows = new("_ReceiveShadows", "Receive Shadows",
    "Should the object receive shadows from realtime lights?");
private PBRShaderProperty blend = new("_Blend", "Blend Mode",
    "Choose which blending function to use for transparent objects.");
private PBRShaderProperty alphaClip = new("_AlphaClip", "Alpha Clipping",
    "Choose whether to use alpha clipping. Note that the threshold value may be set within the graph itself.");
private PBRShaderProperty zWriteControl = new("_ZWriteControl", "ZWrite Control",
    "Choose whether to handle ZWrite automatically, or force it on or off at all times.");
private PBRShaderProperty queueOffset = new("_QueueOffset", "Sorting Priority",
    "Determines chronological rendering order for a Material. Materials with lower value are rendered first.");
private PBRShaderProperty queueControl = new("_QueueControl", "Queue Control",
    "Controls whether render queue is set based on material surface type, or explicitly set by the user.");
I’m now going to write that FindProperties helper method. As I mentioned, it takes in the MaterialProperty array as an argument, and we use FindProperty to grab a reference to each one. This time, we’re feeding the name member of each PBRShaderProperty struct instance as a parameter, and setting the prop member using the result. We need to find them all here, and now every shader property is available to us for drawing once we call FindProperties in OnGUI.
private void FindProperties(MaterialProperty[] props)
{
    baseColor.prop = FindProperty(baseColor.name, props, true);
    baseTexture.prop = FindProperty(baseTexture.name, props, true);

    useSpecularSetup.prop = FindProperty(useSpecularSetup.name, props, true);
    metallicMap.prop = FindProperty(metallicMap.name, props, true);
    metallic.prop = FindProperty(metallic.name, props, true);
    specularMap.prop = FindProperty(specularMap.name, props, true);
    specularColor.prop = FindProperty(specularColor.name, props, true);
    smoothnessMap.prop = FindProperty(smoothnessMap.name, props, true);
    smoothness.prop = FindProperty(smoothness.name, props, true);
    convertFromRoughness.prop = FindProperty(convertFromRoughness.name, props, true);
    normalTexture.prop = FindProperty(normalTexture.name, props, true);
    normalStrength.prop = FindProperty(normalStrength.name, props, true);
    heightMap.prop = FindProperty(heightMap.name, props, true);
    heightMapStrength.prop = FindProperty(heightMapStrength.name, props, true);
    occlusionMap.prop = FindProperty(occlusionMap.name, props, true);
    occlusionStrength.prop = FindProperty(occlusionStrength.name, props, true);
    emissionMap.prop = FindProperty(emissionMap.name, props, true);
    emissionColor.prop = FindProperty(emissionColor.name, props, true);

    surface.prop = FindProperty(surface.name, props, true);
    cutoff.prop = FindProperty(cutoff.name, props, true);
    srcBlend.prop = FindProperty(srcBlend.name, props, true);
    dstBlend.prop = FindProperty(dstBlend.name, props, true);
    srcBlendAlpha.prop = FindProperty(srcBlendAlpha.name, props, true);
    dstBlendAlpha.prop = FindProperty(dstBlendAlpha.name, props, true);
    zWrite.prop = FindProperty(zWrite.name, props, true);
    zTest.prop = FindProperty(zTest.name, props, true);
    cull.prop = FindProperty(cull.name, props, true);
    alphaToMask.prop = FindProperty(alphaToMask.name, props, true);

    castShadows.prop = FindProperty(castShadows.name, props, true);
    receiveShadows.prop = FindProperty(receiveShadows.name, props, true);
    blend.prop = FindProperty(blend.name, props, true);
    alphaClip.prop = FindProperty(alphaClip.name, props, true);
    zWriteControl.prop = FindProperty(zWriteControl.name, props, true);
    queueOffset.prop = FindProperty(queueOffset.name, props, true);
    queueControl.prop = FindProperty(queueControl.name, props, true);
}
Enums
Next, let’s create some enums that we need for controlling the shader’s behavior. The first is called SurfaceType, which contains two settings: Opaque, represented by 0, and Transparent, represented by 1. You probably see what the point of the enum is now – we need a way of mapping different human-readable concepts to distinct integers which the shader and our script can use.
public enum SurfaceType
{
    Opaque = 0,
    Transparent = 1
}
The next is called RenderFace, which maps Front to 2, Back to 1, and Both to 0. This one controls which side of a face is shown.
public enum RenderFace
{
    Front = 2,
    Back = 1,
    Both = 0
}
Then we have the BlendFunction enum, containing Alpha, Premultiply, Additive, and Multiply.
public enum BlendFunction
{
    Alpha = 0,
    Premultiply = 1,
    Additive = 2,
    Multiply = 3
}
Next is the ZWriteControl enum, containing Auto, ForceEnabled, and ForceDisabled.
public enum ZWriteControl
{
    Auto = 0,
    ForceEnabled = 1,
    ForceDisabled = 2
}
Finally, we have the QueueControl enum, with Auto and UserOverride values.
public enum QueueControl
{
    Auto = 0,
    UserOverride = 1
}
If you want the enum entries to use increasing values starting from 0, you don’t actually need to specify each number value, but I think it helps to make things clearer. The order and values I’ve chosen for each enum reflect the values used by some of Unity’s internal shader GUI scripts, so you’ll have an easier time following what’s going on there if you ever dig into Unity’s code.
There’s actually one last enum which we will use for the ZTest comparison function, but Unity provides one called CompareFunction, so we don’t need to define it ourselves. It contains these values:
public enum CompareFunction
{
  Disabled,
  Never,
  Less,
  Equal,
  LessEqual,
  Greater,
  NotEqual,
  GreaterEqual,
  Always,
}
See! LessEqual is the fifth value down, but the list is zero-indexed so it corresponds to the value 4, which is what we used as the default value earlier in the shader.
Later, we’re going to need some arrays containing the names in each of these enums, so I’ll set up variables for each one, including CompareFunction.
private string[] surfaceTypeNames = Enum.GetNames(typeof(SurfaceType));
private string[] renderFaceNames = Enum.GetNames(typeof(RenderFace));
private string[] blendFunctionNames = Enum.GetNames(typeof(BlendFunction));
private string[] zWriteControlNames = Enum.GetNames(typeof(ZWriteControl));
private string[] queueControlNames =  Enum.GetNames(typeof(QueueControl));
private string[] compareFunctionNames = Enum.GetNames(typeof(CompareFunction));
The last thing we’ll need is a variable for offsetting the render queue value, which we’ll discuss in more detail when we add the Advanced Settings to the shader.
private const int queueOffsetRange = 50;
SetBlendMode
Next, let’s create a helper method for setting the blend modes, which accepts a blend function, surface type, and material as parameters. This method is responsible for setting the source and destination blend factors, which are enumerated in Unity’s built-in BlendMode enum. If we have an opaque object, that’s easy, we just use One and Zero respectively, so let’s use those as the default values. By the way, BlendMode can be found in the UnityEngine.Rendering namespace, so make sure you’re using it at the top of the script.
If the object is transparent, then we’ll set blend factors based on the blend function we have chosen. For alpha blending, we use SrcAlpha and OneMinusSrcAlpha for the RGB factors, and One and OneMinusSrcAlpha for the alpha factors.
Then for premultiply blending, it’s One and OneMinusSrcAlpha for both sets of factors.
For additive blending, we use SrcAlpha and One for the RGB factors and One for both the alpha factors.
And finally, for multiply blending, we use DstColor and Zero for the RGB factors, and Zero and One for the alpha factors. Lastly, we use the SetFloat method to set each value, using the shader IDs for each property and passing in the four factors we just set.
protected void SetBlendMode(BlendFunction blendFunction, SurfaceType surfaceType, Material material)
{
    var srcBlendRGB = BlendMode.One;
    var dstBlendRGB = BlendMode.Zero;
    var srcBlendA = BlendMode.One;
    var dstBlendA = BlendMode.Zero;

    if (surfaceType == SurfaceType.Transparent)
    {
        switch (blendFunction)
        {
            case BlendFunction.Alpha:
            {
                srcBlendRGB = BlendMode.SrcAlpha;
                dstBlendRGB = BlendMode.OneMinusSrcAlpha;
                srcBlendA = BlendMode.One;
                dstBlendA = BlendMode.OneMinusSrcAlpha;
                break;
            }
            case BlendFunction.Premultiply:
            {
                srcBlendRGB = BlendMode.One;
                dstBlendRGB = BlendMode.OneMinusSrcAlpha;
                srcBlendA = BlendMode.One;
                dstBlendA = BlendMode.OneMinusSrcAlpha;
                break;
            }
            case BlendFunction.Additive:
            {
                srcBlendRGB = BlendMode.SrcAlpha;
                dstBlendRGB = BlendMode.One;
                srcBlendA = BlendMode.One;
                dstBlendA = BlendMode.One;
                break;
            }
            case BlendFunction.Multiply:
            {
                srcBlendRGB = BlendMode.DstColor;
                dstBlendRGB = BlendMode.Zero;
                srcBlendA = BlendMode.Zero;
                dstBlendA = BlendMode.One;
                break;
            }
        }
    }

    material.SetFloat(srcBlend.id, (float)srcBlendRGB);
    material.SetFloat(dstBlend.id, (float)dstBlendRGB);
    material.SetFloat(srcBlendAlpha.id, (float)srcBlendA);
    material.SetFloat(dstBlendAlpha.id, (float)dstBlendA);
}
And now, finally, we can start work on the DrawSurfaceProperties method.
Subscribe to my Patreon for perks including early access, your name in the credits of my videos, and bonus access to several premium shader packs!
DrawSurfaceProperties
There’s nothing really special or abnormal about the base color, so we could just use materialEditor.ShaderProperty, which is a sort of catch-all property drawer method. Now, though, I want to be a bit more explicit about how some of these properties get drawn.
To draw the _Surface property, I’ll use a different method called PopupShaderProperty, which draws an enum drop-down. It accepts the property, a GUIContent, and an array of names of the enum entries.
Next, I want to draw the option to choose the blend function, but I only really need to display this if the object is transparent, so we can first use the GetFloat method to get the value of the _Surface property. If the object is transparent, then we’ll display the _Blend property, using the same PopupShaderProperty method. Let’s also save the _Blend value into a variable for later.
private void DrawSurfaceProperties(Material material)
{
    materialEditor.PopupShaderProperty(surface.prop, surface.info, surfaceTypeNames);
    var surfaceTypeValue = (SurfaceType)material.GetFloat(surface.id);

    if (surfaceTypeValue == SurfaceType.Transparent)
    {
        materialEditor.PopupShaderProperty(blend.prop, blend.info, blendFunctionNames);
    }

    var blendFuncValue = (BlendFunction)material.GetFloat(blend.id);

    ...
}
Next, we can use PopupShaderProperty to display the _Cull, _ZWriteControl, and _ZTest properties.
var blendFuncValue = (BlendFunction)material.GetFloat(blend.id);

materialEditor.PopupShaderProperty(cull.prop, cull.info, renderFaceNames);
materialEditor.PopupShaderProperty(zWriteControl.prop, zWriteControl.info, zWriteControlNames);
materialEditor.PopupShaderProperty(zTest.prop, zTest.info, compareFunctionNames);

...
Following this, let’s deal with the _AlphaClip property, which we’ll need to treat differently because I want it to show up as a tickbox in the Inspector. There are multiple ways we can do that, but since the MaterialEditor doesn’t have a convenient method for drawing a tickbox, I’m going to use an EditorGUI helper method.
The underlying property type is a float, which should either be one or zero, so we can convert it to a Boolean, then use a method called EditorGUILayout.Toggle, which draws a toggleable box and returns the Boolean state of that box. It accepts a GUIContent for drawing a nice label and tooltip in the Inspector, and the initial Boolean state of the box. So, the Boolean value remains the same unless we click the box this frame.
materialEditor.PopupShaderProperty(zTest.prop, zTest.info, compareFunctionNames);

var alphaClipValue = material.GetFloat(alphaClip.id) > 0.5f;

alphaClipValue = EditorGUILayout.Toggle(alphaClip.info, alphaClipValue);
The annoying thing here is that we’re not using a built-in MaterialEditor method, so Unity doesn’t really know that this toggle is linked to the material property value, so it won’t log an entry into the undo-redo system. We need to do that manually. Using a pair of methods called EditorGUI.BeginChangeCheck and EndChangeCheck, we can detect whether the value of that toggle changed this frame. If it did, then we can use the Undo.RecordObject method to insert an entry into the undo-redo stack which saves the full state of the material to memory, then change the alpha clip property on the material. Now, if we toggle alpha clip and then undo it in the Unity Editor, Unity will restore the material to the same state we saved with Undo.RecordObject, and forget about all changes we made after calling it (namely, setting the property value).
var alphaClipValue = material.GetFloat(alphaClip.id) > 0.5f;

EditorGUI.BeginChangeCheck();
alphaClipValue = EditorGUILayout.Toggle(alphaClip.info, alphaClipValue);
if (EditorGUI.EndChangeCheck())
{
    Undo.RecordObject(material, "Toggle Alpha Clipping");
    material.SetFloat(alphaClip.id, alphaClipValue ? 1.0f : 0.0f);
}

...
Next, if the _AlphaClip property is ticked, its value will be 1, so in that case we can also display the _Cutoff property. We have full control over how the GUI gets drawn, so it would be nice to also indent this property a little, which we can do by incrementing EditorGUI.indentLevel, then decrementing it after drawing the property.
if (alphaClipValue)
{
    EditorGUI.indentLevel++;
    materialEditor.ShaderProperty(cutoff.prop, cutoff.info);
    EditorGUI.indentLevel--;
}

...
Right now, most of these settings don’t change the shader’s behavior, because as I mentioned, we need to do the work of setting keywords and render modes here in the GUI script. That depends on the surface type and the blend function we chose.
Let’s set up some variables for the default states of alpha-to-mask, the render queue value, and whether we write depth.
bool useAlphaToMask = false;
int renderQueueValue = material.shader.renderQueue;
bool useZWrite = false;

...
If the surface is opaque, then we can use the SetBlendMode method we wrote earlier to make the shader use One Zero blending, and by default set z-write to on. We also need to disable a keyword used for transparent rendering called _SURFACE_TYPE_TRANSPARENT.
If alpha clipping is enabled, we need to enable the corresponding _ALPHATEST_ON keyword and use the AlphaTest render queue. We also need to change the shader’s RenderType to AlphaTest with the SetOverrideTag method, and finally ensure that the shader uses AlphaToMask appropriately which improves the image quality around cutoff pixels if MSAA is being used.
If alpha clipping is disabled, then we disable the _ALPHATEST_ON keyword just in case it was previously enabled, we set the render queue to Geometry, and then set the RenderType to Opaque. That’s what it is by default, but it might have been changed previously if you’ve toggled some of these settings.
if (surfaceTypeValue == SurfaceType.Opaque)
{
    SetBlendMode(blendFuncValue, surfaceTypeValue, material);
    useZWrite = true;
    material.DisableKeyword("_SURFACE_TYPE_TRANSPARENT");

    if (alphaClipValue)
    {
        material.EnableKeyword("_ALPHATEST_ON");
        renderQueueValue = (int)RenderQueue.AlphaTest;
        material.SetOverrideTag("RenderType", "AlphaTest");
        useAlphaToMask = true;
    }
    else
    {
        material.DisableKeyword("_ALPHATEST_ON");
        renderQueueValue = (int)RenderQueue.Geometry;
        material.SetOverrideTag("RenderType", "Opaque");
    }
}
else
{
    ...
}
If, instead, the object is transparent, we do roughly the opposite of everything we just did. The RenderType should now be Transparent, and the SetBlendMode method will now set blend factors based on the blend function we chose. Z-write should be disabled by default for transparent objects, the render queue should be Transparent, and let’s enable that _SURFACE_TYPE_TRANSPARENT keyword. Depending on whether alpha clip is active, we can enable or disable the _ALPHATEST_ON keyword, but we don’t need to swap render queues like we did for opaque objects.
else
{
    material.SetOverrideTag("RenderType", "Transparent");
    SetBlendMode(blendFuncValue, surfaceTypeValue, material);
    useZWrite = false;
    renderQueueValue = (int)RenderQueue.Transparent;
    material.EnableKeyword("_SURFACE_TYPE_TRANSPARENT");

    if (alphaClipValue)
    {
        material.EnableKeyword("_ALPHATEST_ON");
    }
    else
    {
        material.DisableKeyword("_ALPHATEST_ON");
    }
}

...
After closing out the if-else statement, we can set the _AlphaToMask value appropriately, and then let’s deal with the _ZWriteControl property. If we’re using Auto mode, then we can use the default value we just set up. But if we’re using ForceEnabled or ForceDisabled mode, let’s override the default useZWrite value, and then set the corresponding shader property with SetFloat. The shader should only use the DepthOnly pass if depth write is enabled, so we can use the SetShaderPassEnabled method along with the pass name and a Boolean value to enable or disable the pass.
material.SetFloat(alphaToMask.id, useAlphaToMask ? 1.0f : 0.0f);

var useZWriteControl = (ZWriteControl)material.GetFloat(zWriteControl.id);

if (useZWriteControl == ZWriteControl.ForceEnabled)
{
    useZWrite = true;
}
else if (useZWriteControl == ZWriteControl.ForceDisabled)
{
    useZWrite = false;
}

material.SetFloat(zWrite.id, useZWrite ? 1.0f : 0.0f);
material.SetShaderPassEnabled("DepthOnly", useZWrite);

...
Next, let’s think about the little slider you see on the bottom of URP’s built-in shaders which let you change the rendering priority of objects. Behind the scenes, this is actually modifying the render queue value of the material by adding the priority value to it. Problem is, when we modify the surface type in DrawSurfaceProperties, we also modify the base render queue value, so we’ll need to add this offset back on whenever we change the surface type. We’ll worry about actually adding this priority slider a little later, when we write DrawAdvancedSettings.
With that in mind, if we’re using the Auto QueueControl mode, this slider will be active, so we can add the offset and manually set the material’s render queue value.
if (material.GetFloat(queueControl.id) == (float)QueueControl.Auto)
{
    renderQueueValue += (int)material.GetFloat(queueOffset.id);
    material.renderQueue = renderQueueValue;
}

...
Finally, we can write some code for the _CastShadows and _ReceiveShadows tick boxes. These work much the same as the _AlphaClip tick box, so we’ll need to do a similar thing involving EditorGUILayout.Toggle and a manual Undo.RecordObject. Both these tick boxes have some special behavior: for the _CastShadows toggle, we’ll set the ShadowCaster pass active or inactive, much like we did for the DepthOnly pass. And for the _ReceiveShadows toggle, we need to enable or disable a keyword called _RECEIVE_SHADOWS_OFF based on the shader property’s value.
bool castShadowsValue = material.GetFloat(castShadows.id) > 0.5f;

EditorGUI.BeginChangeCheck();
{
    castShadowsValue = EditorGUILayout.Toggle(castShadows.info, castShadowsValue);
}
if (EditorGUI.EndChangeCheck())
{
    Undo.RecordObject(material, "Toggle Cast Shadows");
    material.SetFloat(castShadows.id, castShadowsValue ? 1.0f : 0.0f);

    material.SetShaderPassEnabled("ShadowCaster", castShadowsValue);
}

bool receiveShadowsValue = material.GetFloat(receiveShadows.id) > 0.5f;

EditorGUI.BeginChangeCheck();
{
    receiveShadowsValue = EditorGUILayout.Toggle(receiveShadows.info, receiveShadowsValue);
}
if (EditorGUI.EndChangeCheck())
{
    Undo.RecordObject(material, "Toggle Receive Shadows");
    material.SetFloat(receiveShadows.id, receiveShadowsValue ? 1.0f : 0.0f);

    if (receiveShadowsValue)
    {
        material.DisableKeyword("_RECEIVE_SHADOWS_OFF");
    }
    else
    {
        material.EnableKeyword("_RECEIVE_SHADOWS_OFF");
    }
}
That’s all for the DrawSurfaceProperties method. It’s a long one, but it’s doing a surprising amount of heavy lifting managing the state of our shader, and adding this code has vastly increased the power of our shader.
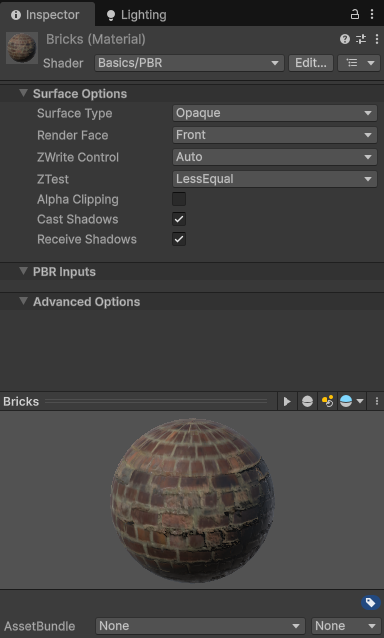
It’s just hard to appreciate that when we can’t change any of the PBR texture maps yet, so let’s add all those back in the DrawPBRProperties method.
DrawPBRProperties
This one is considerably shorter and simpler than DrawSurfaceProperties. First, let’s add back the _BaseColor and _BaseTexture properties. Instead of just using the ShaderProperty method to draw them, which is perfectly fine, we can neaten up the Inspector window a little by using the TexturePropertySingleLine method instead, which draws a small thumbnail image instead of the regular-size texture property icon. For some reason, this accepts the GUIContent and the MaterialProperty as parameters the opposite way round to the ShaderProperty method, which is slightly annoying, but oh well. The nice thing about it is that we can chain another property onto the end to draw it on the same line, so let’s also throw in the _BaseColor here too.
private void DrawPBRProperties(Material material)
{
    materialEditor.TexturePropertySingleLine(baseTexture.info, baseTexture.prop, baseColor.prop);

    ...
}
In the Inspector, both the texture thumbnail and the color picker are shown on the same line. Nice!
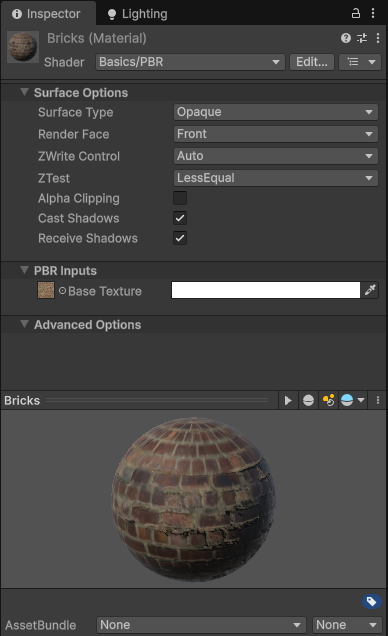
By choosing to draw the _BaseTexture like this, we have lost access to the tiling and offset options, but we can draw those back in with the TextureScaleOffsetProperty method, which takes in the _BaseTexture property as input. Remember that this tiling/offset combo is used for all PBR textures in the shader we wrote, so we only need to add this back in for the _BaseTexture.
materialEditor.TexturePropertySingleLine(baseTexture.info, baseTexture.prop, baseColor.prop);
materialEditor.TextureScaleOffsetProperty(baseTexture.prop);

...
Following this, let’s add the toggle for the _UseSpecularSetup property. Since we originally set this property up in the shader with a Toggle attribute, we don’t need to do anything weird here like we did for the _AlphaClip property – we can just use the ShaderProperty method and Unity will display it as a tick box, just like we want.
materialEditor.ShaderProperty(useSpecularSetup.prop, useSpecularSetup.info);

...
Depending on the value of that property, which we can get directly from the MaterialProperty with the intValue variable, we’ll display either the _SpecularMap and _SpecularColor, or the _MetallicMap and _Metallic slider value.
if (useSpecularSetup.prop.intValue > 0)
{
    materialEditor.TexturePropertySingleLine(specularMap.info, specularMap.prop, specularColor.prop);
}
else
{
    materialEditor.TexturePropertySingleLine(metallicMap.info, metallicMap.prop, metallic.prop);
}

...
And then after that, we can simply display each of the PBR maps using the TexturePropertySingleLine method to display their respective additional properties, and _ConvertFromRoughness can use the ShaderProperty method.
materialEditor.TexturePropertySingleLine(smoothnessMap.info, smoothnessMap.prop, smoothness.prop);
materialEditor.ShaderProperty(convertFromRoughness.prop, convertFromRoughness.info);
materialEditor.TexturePropertySingleLine(normalTexture.info, normalTexture.prop, normalStrength.prop);
materialEditor.TexturePropertySingleLine(heightMap.info, heightMap.prop, heightMapStrength.prop);
materialEditor.TexturePropertySingleLine(occlusionMap.info, occlusionMap.prop, occlusionStrength.prop);
materialEditor.TexturePropertySingleLine(emissionMap.info,  emissionMap.prop, emissionColor.prop);
Told you - shorter than DrawSurfaceProperties.
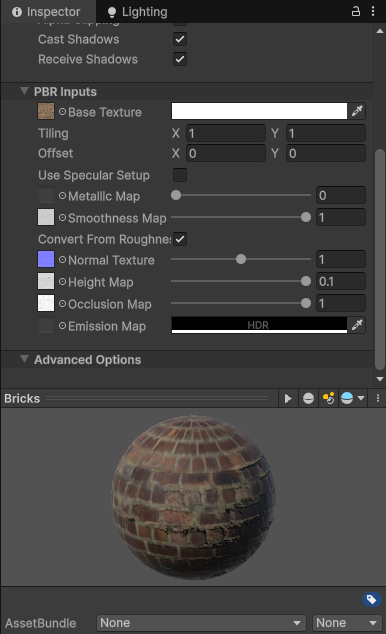
The only thing that’s left to do is fill out the DrawAdvancedSettings method.
DrawAdvancedSettings
This method is also relatively short. First, let’s display the _QueueControl enum property. There are only two possible values for this property. If it’s set to Auto, then we want to use the appropriate render queue for the type of surface we have – opaque, alpha clip, or transparent – and then add an offset. We handle the actual logic for setting those values back in DrawSurfaceProperties, but we display the slider here. We can use a method called IntSliderShaderProperty, which takes in minimum and maximum possible values as additional inputs. Unity’s built-in shaders use -50 to +50, but you can change that if you’d like.
If the _QueueControl is set to UserOverride, then we want to give the user complete control over the specific queue value. There’s actually a handy RenderQueueField method for doing this.
private void DrawAdvancedSettings(Material material)
{
    // If auto queue is used, then use sorting priority field. Otherwise, let user set render queue freely.
    materialEditor.PopupShaderProperty(queueControl.prop, queueControl.info, queueControlNames);

    if(material.GetFloat(queueControl.id) == (float)QueueControl.UserOverride)
    {
        materialEditor.RenderQueueField();
    }
    else
    {
        materialEditor.IntSliderShaderProperty(queueOffset.prop, -queueOffsetRange, queueOffsetRange, queueOffset.info);
    }
}
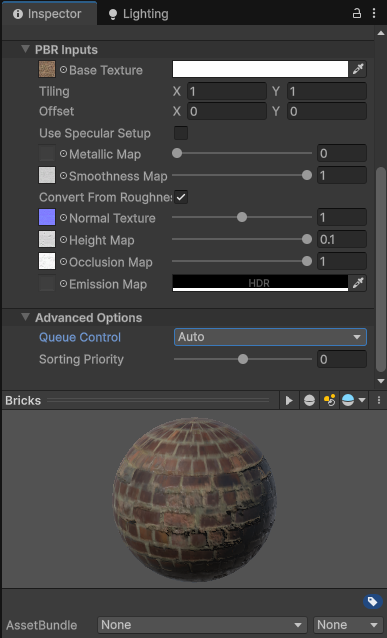
And that is essentially it! We’ve now created a much nicer Inspector window than the default one Unity gives our materials, and we have vastly improved the feature set of the shader. It’s much more flexible than it would otherwise be, as we can seamlessly swap between an opaque and transparent surface, choose which sides of each face to draw, control how the depth test is performed, choose whether to clip based on an alpha threshold, and both cast or receive shadows on a per-material basis.
We also have total control over each PBR map, of course, and over the render queue of the material, so we can intentionally draw some objects over others in a strange order, especially if they use the Transparent render queue. If we set all of these spheres to transparent but increase the sorting priority of the brick sphere by 1, you’ll see this:
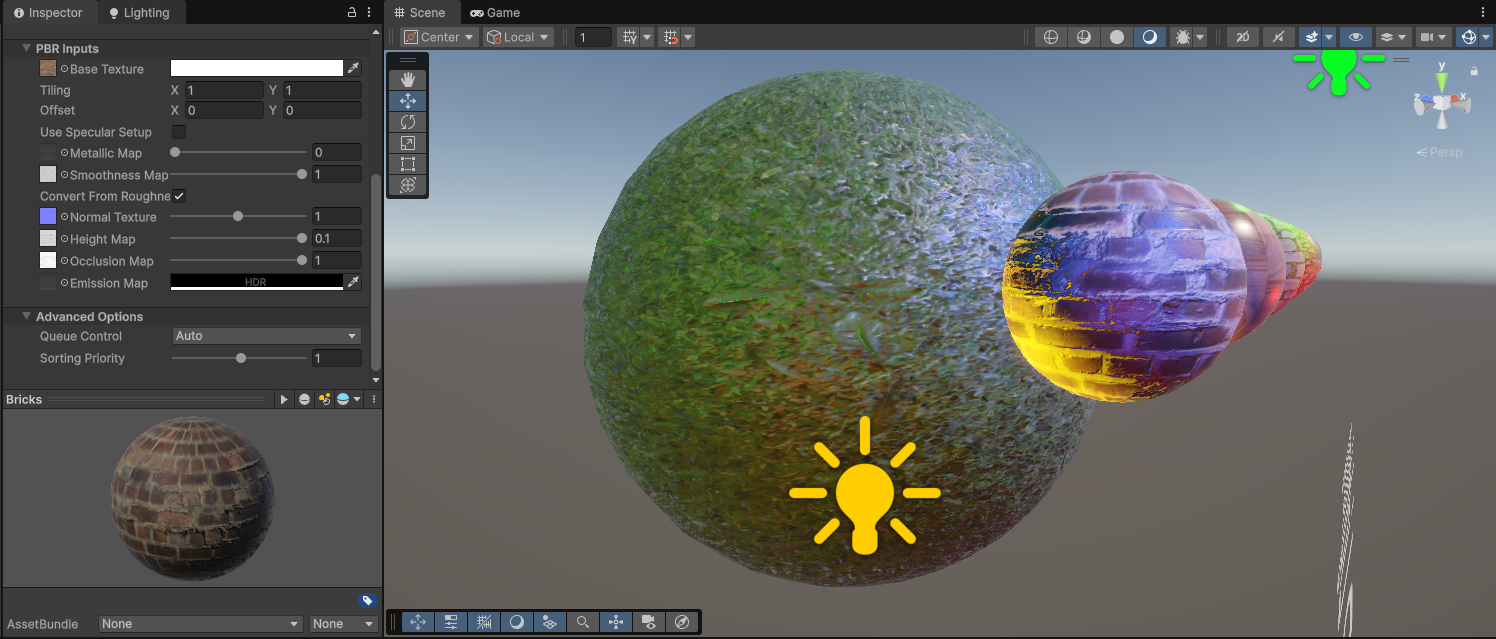
That was a beefy tutorial for such a seemingly simple topic! In the next tutorial, we will explore post processing effects. Until next time, have fun making shaders!
Subscribe to my Patreon for perks including early access, your name in the credits of my videos, and bonus access to several premium shader packs!