In Part 10, we’re going to explore your options when Shader Graph doesn’t provide the nodes for something you want to do. Back in Part 7, we made a basic cel-shaded effect which uses the Main Light Direction node, a diffuse calculation, and a hard cutoff point, but this has two major drawbacks: firstly, lights are not defined only by their direction - they also have color, and some types of light such as point lights have an intensity that falls off as the distance between the light and the object increases. Secondly, scenes commonly have more than just one main light. With the effect we made in Part 7, if you had a main directional light and additional point lights, then sadly, those additional lights have no effect on an object’s appearance at all. Let’s solve both of those issues.


The CelShadedAdditional Graph
I’ll start by copying the CelShaded graph from Part 7 and naming the duplicate “CelShadedAdditional” (you can edit the original directly instead if you want). Here, the main lighting calculation was taking the dot product between the light direction and the normal vector.

I want to add support for extra light data, such as color, which requires us to write some custom HLSL code in a separate file and use a Custom Function node to include that code in our graph. Or you can just copy this file from the GitHub repository and sort of skim your way through me explaining it. Although this isn’t an HLSL tutorial per se, I’ll at least explain what these functions do broadly.
Getting main light data
First, we need to create a new HLSL file, which is more annoying than it ought to be. There’s no way to do this with the Create menu, so you’ll need to create an empty file in something like Visual Studio, then save it with the HLSL extension. I named my file “CustomLighting.hlsl”.
I’ll wrap the file in a header guard called ADDITIONAL_LIGHT_INCLUDED. If you’ve used HLSL before or come from a C or C++ background, you’ll know that a header guard prevents a source file from being included in the compiled code more than once. In between the header guard statements, we can define as many functions as we want, and then we can use Shader Graph’s Custom Function node to choose any one of those functions by name. Each function must be written with a particular structure.
#ifndef ADDITIONAL_LIGHT_INCLUDED
#define ADDITIONAL_LIGHT_INCLUDED

// Function code goes here.

#endif // ADDITIONAL_LIGHT_INCLUDED
Let’s start with a function to get data from the main light. This function will have a return type of void, its name is MainLight, and then I need to add either _float or _half to the end of the name. That’s because graphs can use numbers with either single or half precision, and this is something you can actually choose between on the graph level in the Graph Settings or on individual nodes in the Node Settings. To be honest, you will rarely need to think about this, at least as a beginner. Yes, half-precision numbers will be slightly more efficient at the expense of precision, but the savings will be tiny. You can include both _float and _half versions of the same function in your file and I will include both versions on GitHub, though. The remaining code examples will show off just the _float version.
Next, we put all the inputs and outputs to the function in its parameter list. We need the world position as a float3 input, then as outputs - which we specify with the out keyword - we’ll have the float3 direction, float3 color, and float attenuation factor. That last one is a value between 0 and 1 where 0 means the light is too far away so the object is not lit, and 1 means the object is fully lit by this light.
#ifndef ADDITIONAL_LIGHT_INCLUDED
#define ADDITIONAL_LIGHT_INCLUDED

void MainLight_float(float3 WorldPos, out float3 Direction, out float3 Color, out float Attenuation)
{

}

#endif // ADDITIONAL_LIGHT_INCLUDED
We need to run different code depending on whether this function is running inside a Shader Graph preview window, or in a real scene. We can check if we’re running inside Shader Graph with #ifdef SHADERGRAPH_PREVIEW (short for “if defined”). If we are, then there is no actual light, so we’ll just fake one with a constant direction and a white color.
void MainLight_float(float3 WorldPos, out float3 Direction, out float3 Color, out float Attenuation)
{
#ifdef SHADERGRAPH_PREVIEW
     Direction = normalize(float3(1.0f, 1.0f, 0.0f));
     Color = 1.0f;
     Attenuation = 1.0f;
#else

#endif
}
Else, we’ll get the real main light using the GetMainLight function. If you’re interested, this function can be found in URP’s shader library in the Lighting.hlsl file, which you can freely open by scrolling down to the Packages section of the Project View and going to Universal RP -> ShaderLibrary.
This folder contains the include files that are used by URP shaders, and you can #include them in your own code shaders if you want. There’s a few more includes in Core RP Library -> ShaderLibrary, too, and Universal RP -> Shaders contains the actual source code for URP’s shaders: Lit, Unlit, terrains, particles, and so on. I’ve found these files really useful when designing my own shader asset packs (e.g., you can just copy the Lit shader and adjust its behavior), but now we’re straying a little from Shader Graph. Basically, the Lighting.hlsl file is one that Shader Graph includes anyway, so we can use GetMainLight from it and then set the output values accordingly by accessing the member variables of the Light struct.
void MainLight_float(float3 WorldPos, out float3 Direction, out float3 Color, out float Attenuation)
{
#ifdef SHADERGRAPH_PREVIEW
     Direction = normalize(float3(1.0f, 1.0f, 0.0f));
     Color = 1.0f;
     Attenuation = 1.0f;
#else
     Light mainLight = GetMainLight();
     Direction = mainLight.direction;
     Color = mainLight.color;
     Attenuation = mainLight.distanceAttenuation;
#endif
}
Now that we have a MainLight function, we can use it in Shader Graph with the Custom Function node. When we click on the node, we’ll first need to drag the CustomLighting.hlsl file into the Source slot, then type MainLight into the Name field. Don’t include the _float bit of the name here.
It’s going to throw up an error, and that’s because we haven’t set up the inputs and outputs yet. We can do that by clicking the plus arrow buttons, and then we can add each input or output as it appears in the code: WorldPos is a Vector3 input, then Direction and Color are both Vector3 outputs, and finally, Attenuation is a Float output. We can rename each one by double-clicking the name field, although it’s not immediately obvious this field is editable.

Once you’ve added them all, the node will stop displaying errors, and the preview window will start displaying whatever the first output of the node is. In our case, that’s the Direction, so the node converts whatever direction we specified in the SHADERGRAPH_PREVIEW part of the code into a color and displays that. For me, that’s yellow.

Now, instead of using the Main Light Direction node, we can use our custom function node and input a Position node in World space to it. Currently, our graph will do the same thing as the original CelShaded graph from Part 7, which is a good sanity check to see if our code works.

However, the point of using this custom code was to incorporate the light color and attenuation into the mix, so I’m going to take the result of the ambient light Lerp node and multiply by the MainLight Color, then by the MainLight Attenuation.

And now, in the Scene View, we can change the color of the main light and see the color of the mesh change too.

Getting additional light data
Of course, we’re still only taking the main light into account. To get information about additional lights, such as extra point lights around the object, we need a bit more custom code. I’ll write a second function called AdditionalLight, which will take the same parameters as MainLight, plus a lightID int to specify which light we want data about. You can include this function in the same CustomLighting.hlsl file, just below the MainLight function.
//void MainLight_float() { ... } goes here

void AdditionalLight_float(float3 WorldPos, int lightID, out float3 Direction, out float3 Color, out float Attenuation)
{

}
In the code for this function, we’re going to start with a fake light which is completely black and fully attenuated, then check if a light with the specified ID exists and overwrite the output values. Here’s the fake light to begin with.
void AdditionalLight_float(float3 WorldPos, int lightID, out float3 Direction, out float3 Color, out float Attenuation)
{
     Direction = normalize(float3(1.0f, 1.0f, 0.0f));
     Color = 0.0f;
     Attenuation = 0.0f;
}
Next, I’ll say: if this code isn’t running in a Shader Graph preview window (with #ifndef rather than #ifdef this time), and if the lightID is lower than the total number of additional lights shining on the object (which we get with GetAdditionalLightsCount()), we can grab the actual additional light information (with GetAdditionalLight()) and output that light’s data. Else, we already set up a fake light, so that gets output instead.
void AdditionalLight_float(float3 WorldPos, int lightID, out float3 Direction, out float3 Color, out float Attenuation)
{
     Direction = normalize(float3(1.0f, 1.0f, 0.0f));
     Color = 0.0f;
     Attenuation = 0.0f;

#ifndef SHADERGRAPH_PREVIEW
     int lightCount = GetAdditionalLightsCount();
     if(lightID < lightCount)
     {
          Light light = GetAdditionalLight(lightID, WorldPos);
          Direction = light.direction;
          Color = light.color;
          Attenuation = light.distanceAttenuation;
     }
#endif
}
Let’s add another Custom Function node and set it up similar to the one for MainLight. We’ll need to drag the CustomLighting.hlsl file onto the Source slot again, but this time the function Name is AdditionalLight. For the inputs, we have a Vector3 called WorldPos, and a Float called LightID - there isn’t a separate option for an int so a float will do - then the outputs are the same as the ones from MainLight: a Vector3 called Direction, a Vector3 called Color, and a Float called Attenuation.

And now, we’re going to come up against what I think is one of the biggest and most impactful limitations of Shader Graph: it can’t do loops. In shader code, we can loop over each additional light once and run the same bit of code for each, but in Shader Graph, not only do we need to duplicate the nodes to run the calculations for each light, we also can’t dynamically check how many lights actually exist and only run the code for that number of lights. If there is only one additional light, but we made our graph with four lights in mind, then we’ll run the AdditionalLight function exactly four times every time.
I’ll explore an alternative method later, but for now, I’m going to assume there are four additional lights and accept that my graph wastes some performance if there are actually fewer than that.
We can use a similar set of nodes here for the lighting calculations as we previously used for the main light. First, I’ll input the world position to my AdditionalLight node and leave the LightID as 0. Then, I’ll take the Dot Product of the AdditionalLight Direction with a Normal Vector node, then Smoothstep the output of this using the Cutoff Thresholds, and then we can multiply that result by the AdditionalLight Color, and then its Attenuation. The only difference here is that we took the ambient light into account in the MainLight calculations, but that only needs doing once.
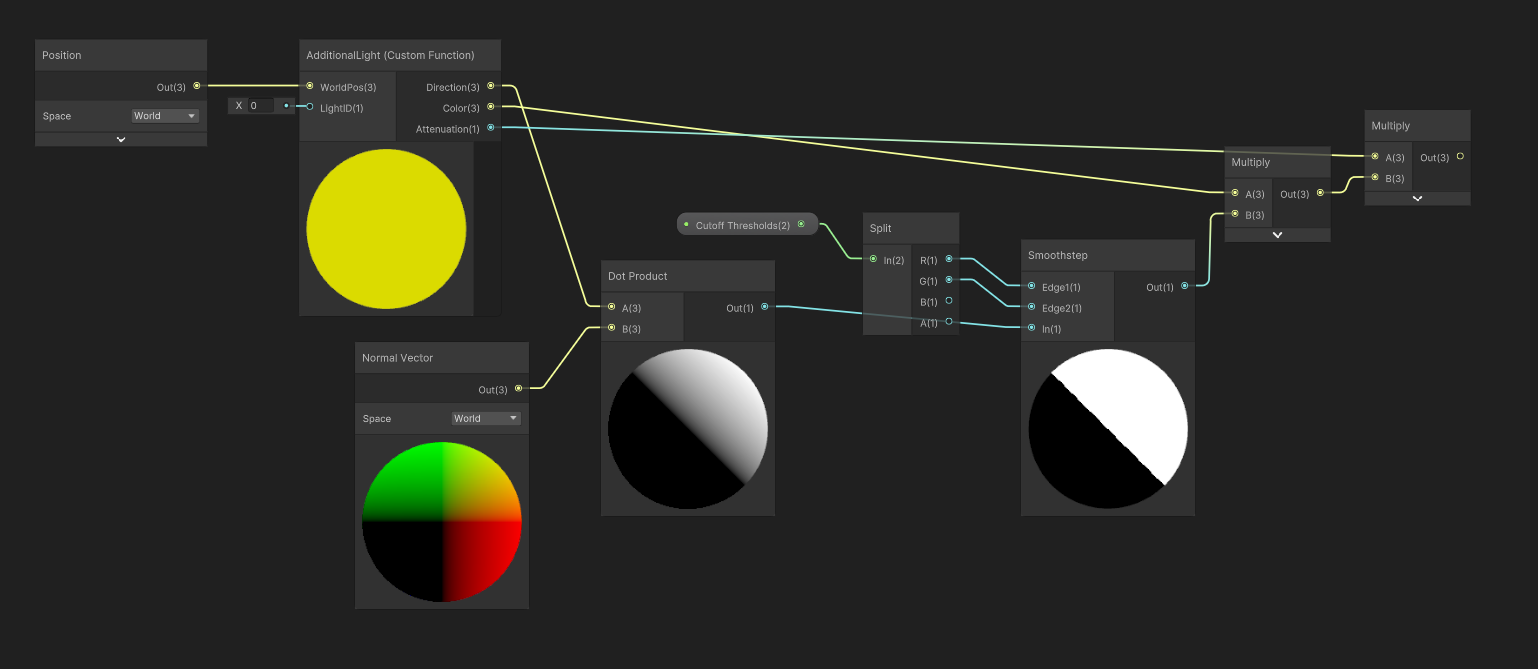
Then, we can add both lighting values together.

Subscribe to my Patreon for perks including early access, your name in the credits of my videos, and bonus access to several premium shader packs!

The AdditionalLight subgraph
To make sure my graph doesn’t become totally cluttered, I’ll turn this section of nodes into a subgraph. Let’s select the nodes starting with the Position node and ending at the last Multiply, then right click and choose Convert To -> Sub-graph.

Opening up the subgraph, let’s make a few additions. We need a property for the LightID, so I will add a Float property called (predictably) LightID and connect it to the AdditionalLight node.

Finally, our singular output is going to be the color of the light after attenuation has been applied, so we can rename this output to LightColor or something similar by clicking on the Output node and changing the name in the Node Settings window.

Back on the CelShadedAdditional graph, we now have a single node doing all of the calculations for the first additional light, and we can duplicate this three more times, change the LightIDs of the new nodes to 1, 2, and 3 respectively, and add together the outputs of all these nodes to the lighting calculations for the main light.

If we Save Asset and return to the Scene View, we can verify that everything is working by adding four point lights around the object and moving them. Adding a fifth point light means that one of the lights gets ignored, although I’m not sure how Unity is deciding which four lights are the closest - it seems a bit wonky sometimes. In this example, the green light is chosen over the blue light to be the fourth light acting on the sphere, even though it’s further away. Oh well, point is, there’s 4 additional lights appearing on the sphere now.

Getting more additional light data
Now, as I mentioned, this method might be a bit wasteful if there are fewer than 4 additional lights because it’s still running the calculations and always coming up with a black light color for those phantom lights that don’t exist. We might even have more than 4 additional lights, so we could extend the graph with more AdditionalLight custom nodes, but that makes the first problem even worse. Point is, this method is not easily scalable.
To that end, I’ve included another HLSL function called AllAdditionalLights which takes in the world position, world normal, and cutoff thresholds and outputs only a LightColor, and just does all of the additional light calculations here in HLSL, taking advantage of looping. It starts off with the color black, and accumulates light color by processing each light that actually exists in turn. You’ll recognize the names of HLSL’s built-in functions here, such as dot and smoothstep, as being the same as Shader Graph’s nodes:
void AllAdditionalLights_float(float3 WorldPos, float3 WorldNormal, float2 CutoffThresholds, out float3 LightColor)
{
     LightColor = 0.0f;

#ifndef SHADERGRAPH_PREVIEW
     int lightCount = GetAdditionalLightsCount();

     for(int i = 0; i < lightCount; ++i)
     {
          Light light = GetAdditionalLight(i, WorldPos);

          float3 color = dot(light.direction, WorldNormal);
          color = smoothstep(CutoffThresholds.x, CutoffThresholds.y, color);
          color *= light.color;
          color *= light.distanceAttenuation;

          LightColor += color;
     }
#endif
}
Putting everything together in Shader Graph follows a now-familiar process of:
- Adding another new
Custom Functionnode - Dragging in the CustomLighting.hlsl file and inputting
AllAdditionalLightsas the name - Matching up the inputs and outputs to those in the HLSL code
- Inputting the required
PositionandNormal Vectornodes (in World space) into theCustom Functionnode - Adding the
MainLightoutput to this newAllAdditionalLightsoutput instead of the individualAdditionalLightnodes from before

Then, we can admire the fact that the graph is far simpler with just one node handling all of the additional light calculations and hit Save Asset before returning to the Scene View, where we can add additional lights up to the maximum limit of 8 and all of them will have a visible impact on the object, while doing only the exact number of calculations needed for however many lights we actually have.
So, why did I choose to make this graph in this tutorial? Well, I think it’s a use case that Shader Graph does not handle well, for a few reasons, primarily the lack of lighting nodes and the lack of loops. As much as I hate to admit it, you might sometimes find things far easier to work with in code, even if you’re a beginner, so it’s still worth your time to pick up a bit of HLSL even if you plan to mostly work inside Shader Graph. It’s at least worth knowing what to search if you do need to implement a custom node! That said, I think this is one of the more challenging scenarios for Shader Graph and we were still able to put together the effect we wanted, even if it’s a little messy.
If you’d like to see me continue making tutorials like this, then one of the best ways to support me is to pick up one of my premium asset packs! I recently released PSX Shaders Pro on itch.io - it’s a collection of shaders designed to look just like the PS1, including its limited vertex precision, wobbly perspective-incorrect textures, and a CRT post processing effect. It should hopefully land on the Asset Store soon too!

I would greatly appreciate your support, and thanks for reading! The Basics series will continue, and until next time, have fun making shaders!
Subscribe to my Patreon for perks including early access, your name in the credits of my videos, and bonus access to several premium shader packs!
Acknowledgements
Special thanks to my Patreon backers for June-July 2024!
Leonard Michael Verisutha Webmaster Johancity Jack Dixon Felipe Gomes dos Santos Morrie Mr.FoxQC Adam Meyer Alexis Lessard claudio croci Jun Lukas Schneider Muhammad Azman Olly J Paul Froggatt Will Poillion Zachary Alstadt 源 刘